
Have you ever spent hours tweaking your WordPress theme only to hit a wall when it comes to publishing your changes? You’re not alone.
Navigating the ins and outs of WordPress can feel like a maze, especially when you’re eager to showcase your newly edited theme. But here’s the good news: publishing your WordPress theme after making edits doesn’t have to be complicated. In this guide, we’ll walk you through the steps to seamlessly publish your theme, ensuring your website looks exactly how you envisioned.
Stick with us, and by the end, you’ll feel confident in hitting that ‘publish’ button, knowing your site will shine with your personal touch. Ready to make your website stand out? Let’s dive in.
Accessing The WordPress Dashboard
Start by opening your web browser. Type the URL of your WordPress site. Add /wp-admin at the end. Press enter to go to the login page. Enter your username and password. Click the Login button. Now you are in the WordPress dashboard.
The dashboard is your main control area. Here, you can edit your theme. You can also add new posts and pages. Many more options are available. Look for the Appearance tab on the left. Click on it to see more options. Choose Themes from the list. Now you can see all installed themes. Select the theme you want to edit or publish.

Credit: make.wordpress.org
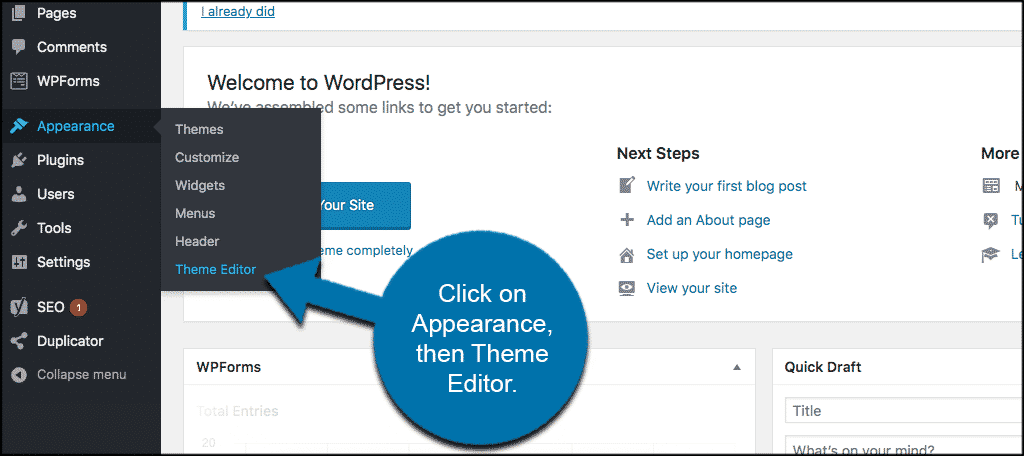
Navigating To The Theme Editor
Find your way to the Theme Editor in WordPress. First, log into your WordPress dashboard. Look at the left-hand menu. Click on Appearance. Then, find the Theme Editor option. It’s under the Appearance section. Click on it. The editor will open. Here, you can see theme files. Each file has a name. You can edit these files. Make sure to save changes. Saving is important.
Changes are published after saving. Always check your website. See if it looks good. Look for errors. Fix them if needed. Editing themes can be tricky. Always be careful. Use simple edits first. Learn from each change. Over time, it gets easier.
Editing Theme Files
The theme structure has many folders. Each folder has files that control different parts of your site. The main folders are assets, templates, and includes. Assets have CSS and JavaScript. Templates have HTML files. Includes have special PHP functions. Knowing where each piece lives helps you make changes.
To change code, first open the right file. Use a simple editor like Notepad or a code editor. Look for the lines you want to change. Make your edits carefully. Save the file when done. Test your site to see the changes. Mistakes can break the site, so go slow.

Credit: www.instagram.com
Customizing Theme Settings
The WordPress Customizer makes theme editing easy. Open it from your dashboard. You can see changes in real-time. Change the site title or the background color. Adjust the header image or the footer text. Save your edits when you finish.
Widgets add extra features to your site. You can find them in the Widgets section. Drag and drop them into place. Use them to display recent posts or social links. Menus help users find content. Create them in the Menus section. Add pages, posts, or custom links. Drag them to organize the order. Save your changes to apply them.
Previewing Changes
Live Preview Features help you see changes instantly. This feature lets you view edits without publishing. It ensures your theme looks perfect before going live. You can check fonts, colors, and layout. These previews are safe and do not affect the live site. Make necessary adjustments easily. Use the preview tool to test different setups. Experiment with design options confidently.
Troubleshooting Common Issues can be necessary when changes don’t appear right. Sometimes themes might not update correctly. Clearing your browser cache can solve this problem. Ensure your internet connection is stable. Check for plugin conflicts that might cause issues. Verify theme compatibility with WordPress version. These steps help fix most problems quickly. If issues persist, seek help from online forums. Community support can be valuable in solving tricky problems.
Saving And Publishing The Theme
Before publishing, always save your edits. Click the Save button. This keeps changes safe. Check every change. Make sure everything looks right. You can always go back. Fix anything you don’t like. It’s easy to redo edits. Look at the preview. See how the theme appears. Adjust colors and fonts. Make it look good. Save again after changes. This ensures everything is up to date.
Publishing makes your theme visible to everyone. Click the Publish button. Your changes go live. Visitors see the new theme. Double-check everything before you publish. Mistakes can be seen by everyone. Make sure images load fast. Check links. They should work properly. Look at the design on mobile. It should look good there too. Once happy, publish the theme. Everyone will see your hard work.
Testing The Updated Theme
Always check your theme on different browsers. Use Firefox, Chrome, and Safari. Each browser might show things differently. This helps find hidden bugs. Fixing these bugs will make users happy.
Ensure your theme looks good on all devices. Test on phones and tablets. Use the browser’s developer tools. Change the screen size to see the changes. Users should have a great experience everywhere. Each device, each screen. This is important for everyone.
Credit: www.greengeeks.com
Backing Up Your Theme
Creating a backup is very important. It keeps your work safe. You can use a plugin. Some plugins are free. Others cost money. Pick one that suits you. Backup your theme before making changes. This is a good habit to have.
Restoring from backup is easy. Find your backup file. Click to restore it. Your theme will go back to how it was. No changes will be lost. This saves you time and stress. Always have a backup ready. It is your safety net.
Frequently Asked Questions
How Do I Publish A WordPress Theme?
To publish a WordPress theme, navigate to your WordPress dashboard. Click on “Appearance,” then select “Themes. ” Choose your edited theme and click “Activate. ” If you made changes outside the dashboard, upload the theme folder via FTP and activate it from the dashboard.
Can I Edit Theme Before Publishing?
Yes, you can edit a WordPress theme before publishing. Use the Theme Customizer or directly modify theme files. Ensure you preview changes in the live preview mode. Once satisfied, save your changes and activate the theme for your site.
What Happens After Theme Activation?
After activating a theme, your website’s appearance changes to match the new design. Ensure all elements display correctly, including widgets and menus. Check for compatibility with plugins. Review your website pages to ensure everything functions as expected with the new theme.
How To Revert Theme Changes?
To revert theme changes, navigate to “Appearance” in your WordPress dashboard. Select “Themes,” then activate your previous theme. Alternatively, restore a backup of your site. Ensure you have backups available before making theme changes to ease reversion.
Conclusion
Editing and publishing your WordPress theme is simple. Follow the steps carefully. Save changes often to avoid losing work. Preview the theme before publishing. This ensures it looks right. Use the WordPress dashboard for easy navigation. Check your theme on different devices.
Make sure it works everywhere. If you face issues, consult WordPress forums. Community help is valuable. Keep your WordPress updated for best performance. Regular updates improve security and functionality. Enjoy your new theme design. Happy blogging!


