
Unlocking the full potential of your WordPress site doesn’t have to be a daunting task. Imagine transforming your website into a digital masterpiece with just a few clicks.
Sounds enticing, right? That’s exactly what the WordPress Theme Customizer offers you. Whether you’re a seasoned web developer or someone who’s just starting out, mastering this tool can elevate your site’s design and functionality without the need for extensive coding skills.
Picture creating a visually stunning website that captivates your audience and reflects your unique brand identity. With the right guidance, you can turn this vision into reality. So, are you ready to dive into the world of seamless customization and discover how to make your website truly shine? Keep reading to learn how to harness the power of WordPress Theme Customizer and give your site the makeover it deserves.
Accessing The Theme Customizer
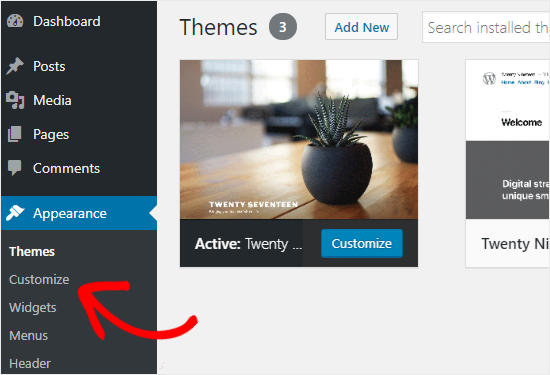
To access the Theme Customizer, first go to your WordPress dashboard. Look for the menu on the left side. This menu is where you will find all the settings. Next, find the Appearance option. It should be near the bottom of the menu. Click on it to see more options.
Navigating To Appearance
After clicking on Appearance, a new menu will pop up. From here, find the Customize option. It’s usually the first one. Click on Customize to open the Customizer panel. This is where you can make changes to your site.
Opening The Customizer Panel
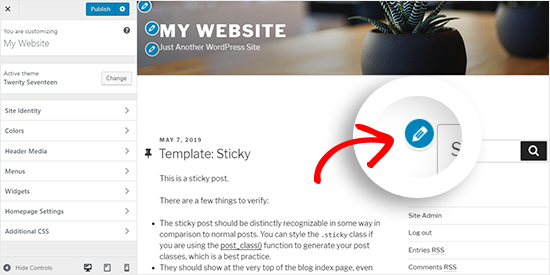
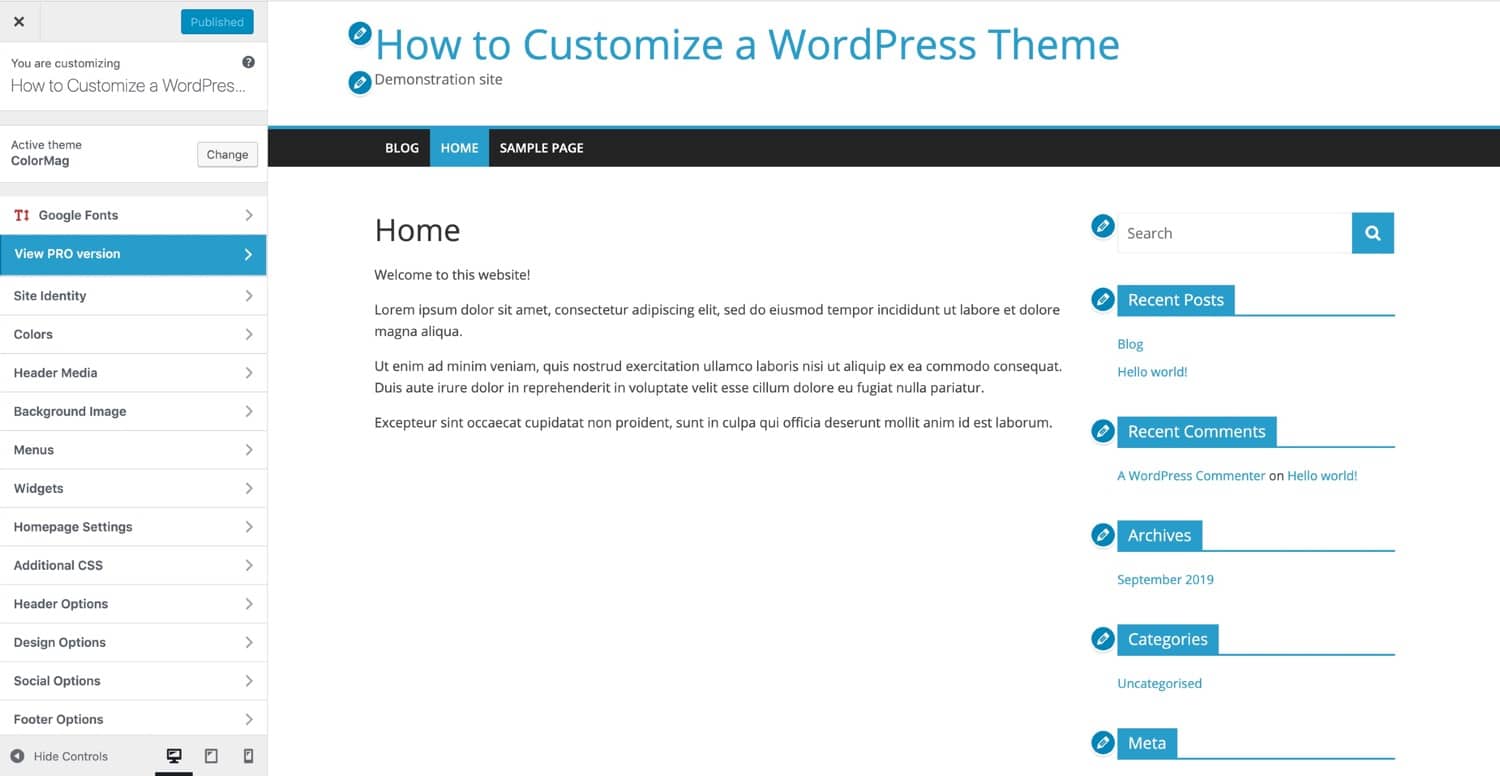
The Customizer panel will open on the left. You will see many options here. Each option lets you change different parts of your site. Click on any option to start customizing. Changes you make will appear on the right. This helps you see how your site looks.
Understanding Customizer Options
Site Identity helps you set your website’s basic details. Add your website’s name and tagline. This is what visitors see first. Upload a site logo to make your site unique. These changes appear instantly. You can preview them right away.
Colors make your site look lively. Choose a color for your header and background. Pick colors that match your brand. It makes your site look consistent. Backgrounds can be plain or with images. This adds more style to your site.
Typography settings let you change the font style and size. Choose fonts that are easy to read. This helps visitors enjoy your content. Adjust font size for different sections. It makes reading comfortable. Keep it simple and neat.
Customizing Site Identity
Site title shows at the top of your site. It’s important to have a clear title. Go to the Customizer in WordPress. Click on Site Identity. Type your new title in the box. See your changes instantly. Save your work when done.
A logo helps your site stand out. To upload, go to the Customizer. Find Logo under Site Identity. Click the upload button. Choose your logo file. Adjust its size if needed. Check how it looks. Save your changes to keep the logo.
The site icon appears in browser tabs. This small picture is also called a favicon. Open the Customizer and go to Site Identity. Find Site Icon option. Click to upload your icon. Pick a square image. It should be clear and simple. Save to apply the icon.
Adjusting Layout And Design
Change the header to make your site unique. Add your logo or change the background. Make sure it looks nice. For the footer, add links. Important links like contact or privacy. You can also add a small text. Something like “© 2023 My Website”.
Sidebars can be on the left or right. Choose what looks best. Add menus or links in the sidebar. This helps visitors find things easily. Some themes let you remove the sidebar. If you want a full-width look.
Widgets are little tools. They make your site better. Add a widget for recent posts. Or maybe a calendar. You can drag and drop them. It’s easy to move them around. Make sure they fit your site’s design.
Enhancing Appearance With Colors
Pick colors that match your site’s style. Bright colors can catch the eye. Soft colors give a calm feeling. Contrast helps text stand out. Use color wheels to find perfect matches.
The header is the first thing visitors see. Make it bold with strong colors. Use white or light shades for a clean look. Dark colors can add mystery. Choose colors that fit your brand.
Backgrounds set the tone. Bright backgrounds make things pop. Dark backgrounds can be elegant. Patterns add texture. Solid colors keep it simple. Change backgrounds to fit different seasons or events.
Modifying Fonts And Typography
Choose a font style for your website. Sans-serif fonts are clean. Serif fonts are traditional. Fonts show your site’s mood. Pick one that fits your theme. Changing fonts is easy in the WordPress Customizer. Find the font option. Click and see the list of fonts. Try different fonts until you like one.
Font size affects readability. Bigger fonts are easy to read. Smaller fonts give more space. Choose a size that suits your content. Go to the font size option in the Customizer. Drag the slider to change size. Watch how text changes as you slide.
Text alignment helps organize content. Left align is common for most text. Center align is great for headings. Right align is less used. Align text from the Customizer. Click the text alignment option. Choose your preferred alignment style. Check how your text looks after changes.
Integrating Menus And Navigation
Navigate WordPress Theme Customizer effortlessly to integrate menus and enhance site navigation. Access menu settings, arrange items, and customize styles for seamless user experience. Ensure intuitive design for easy exploration and engagement.
Creating Custom Menus
To create a custom menu, go to the WordPress dashboard. Find the Appearance section. Click on Menus. You can add a new menu here. Give your menu a unique name. This helps in identifying it later. Choose items from the left column. Add them to your menu. These items can be pages, posts, or links.
Managing Menu Locations
Menu locations decide where your menu appears. Some themes have multiple menu spots. Go to the Manage Locations tab. Here, you can assign menus to different spots. Choose the right location for your menu. This ensures it shows up correctly on your site.
Adding Menu Items
Adding items to a menu is simple. Select items from the left column. Add pages, posts, categories, or links. Click the Add to Menu button. Arrange items by dragging them. Place them in the desired order. Save your menu once done.
Credit: www.wpbeginner.com
Utilizing Additional Css
Open your WordPress dashboard. Go to Appearance and click on Customize. Find the Additional CSS section. This is where you can edit styles. It’s easy to access and use.
In the CSS box, write your code. Make changes to fonts, colors, or layout. Keep each line clear and simple. Use tags like h1 or p to target elements. This helps your site look just right.
See changes instantly in the preview window. Adjust if needed. Click the Publish button to save. Your site updates with your new styles. It’s fun to watch your design come to life.
Saving And Publishing Changes
Preview your changes before saving them. This helps you see how your site will look. Click the “Preview” button. Your changes will appear in a new window. This step is crucial to ensure everything looks right. You can go back and fix any issues. Make sure your site is just how you want it.
Ready to show your changes to the world? Click the “Publish” button. This makes your site live with all the new updates. Everyone visiting your site will see the changes. Take a moment to review one last time. It’s important to check everything is correct before publishing.
Not ready to publish yet? You can save your work as a draft. Click the “Save Draft” button. This keeps your changes safe. You can come back and finish later. Your site stays the same for visitors until you publish. This is a good option if you need more time.
Credit: www.wpbeginner.com
Credit: kinsta.com
Frequently Asked Questions
What Is WordPress Theme Customizer?
WordPress Theme Customizer is a tool for personalizing your site’s appearance. It allows you to adjust settings like colors, fonts, and layouts in real-time. Accessible from the WordPress dashboard, it provides an intuitive interface for making design changes without coding expertise.
How Do I Access Theme Customizer?
Access the Theme Customizer from your WordPress dashboard. Navigate to “Appearance” and select “Customize. ” This opens a panel where you can modify various aspects of your theme, including colors, fonts, and widgets, all with real-time previews.
Can I Preview Changes Before Saving?
Yes, the WordPress Theme Customizer lets you preview changes before saving. It provides a live preview of modifications, ensuring you’re satisfied with your adjustments. This feature helps avoid mistakes and ensures your site’s design aligns with your vision.
Are Changes In Theme Customizer Reversible?
Yes, changes made using the Theme Customizer can be reversed. You can revert to previous settings or restore defaults if necessary. This flexibility ensures you can experiment with different designs without worrying about permanent alterations.
Conclusion
Mastering the WordPress Theme Customizer empowers your website design. You can easily personalize colors, fonts, and layouts. The customizer offers a user-friendly interface for quick changes. Your site becomes unique, reflecting your brand and vision. Visitors enjoy a cohesive and engaging experience.
Remember, practice makes perfect. Explore options and get comfortable with features. The more you experiment, the better your site looks. Don’t rush; take your time. With patience, your website will shine. Embrace creativity and let your ideas flow. Your WordPress site becomes a true reflection of you.


