
Do you own a domain on Namecheap and need to update your DNS records? Whether you’re setting up a new website, changing your hosting provider, or enhancing security, knowing how to manage your DNS records is crucial.
Yet, the process can seem daunting if you’re not familiar with the technical terms and steps involved. But don’t worry; you’re about to discover just how simple it can be! Imagine having the power to control your website’s traffic and functionality with just a few clicks.
By mastering this skill, you can ensure your site runs smoothly and remains accessible to your audience. You’ll no longer feel overwhelmed by the technical jargon but empowered to make changes confidently. This guide will walk you through the process step-by-step, using clear language and easy-to-follow instructions. By the end of this article, you’ll have the knowledge to update your DNS records with ease and precision. Get ready to transform your understanding of DNS management and take control of your online presence.
Accessing Your Namecheap Account
Access your Namecheap account to update DNS records quickly. Navigate to the domain list and select your domain. Choose “Advanced DNS” to make changes easily.
Accessing your Namecheap account is the first step in updating your DNS records. Whether you’re a seasoned web developer or a beginner just starting your online journey, gaining access to your account is crucial. This process might seem daunting at first, but with clear guidance, you’ll find it’s straightforward and manageable. ###Logging Into Your Namecheap Dashboard
Begin by navigating to the Namecheap website. At the top right corner, you’ll see the Sign In button. Click it, and you’ll be prompted to enter your username and password. Make sure your credentials are handy to avoid any delays. ###Recovering Lost Credentials
Have you forgotten your password or username? No worries. Click on the Forgot Password link beneath the login fields. You’ll receive an email with instructions to reset your password or retrieve your username. Ensure the email associated with your account is active and accessible. ###Exploring The Account Panel
Once logged in, you’ll land on your account dashboard. This is your control center. Take a moment to familiarize yourself with the layout. Knowing where everything is will make updating DNS records a breeze. ###Security Measures And Verification
Namecheap takes your security seriously. If you’re prompted for additional verification, such as two-factor authentication, don’t skip it. This extra step protects your account from unauthorized access. Consider enabling these security features if you haven’t already. ###Personalizing Your Dashboard
Did you know you can customize your Namecheap dashboard? Adjust the layout to prioritize the tools and information you use most. This personalization can save you time and streamline your workflow when managing DNS records. ###Accessing Domain List
To update DNS records, head to the Domain List section. It’s located on the left side of your dashboard. Here, you’ll see all your registered domains. Click on the domain you wish to modify, and you’re ready to dive into DNS settings. ###Staying Logged In Securely
If you frequently update DNS records, you might prefer staying logged in. However, always ensure you’re on a secure network. Avoid public Wi-Fi to protect your account from potential threats. Updating DNS records might seem technical, but it starts with accessing your Namecheap account efficiently. Have you found any other tricks to streamline your login process? Share your thoughts and help others on their Namecheap journey.Navigating To Domain List
Updating DNS records in Namecheap starts with finding the Domain List. This list is the gateway to managing your domain settings. Navigating it can be simple if you know where to look. Follow the steps below to easily access the Domain List.
First, log into your Namecheap account. Use your username and password. This is your portal to all domain settings. Keep your login details secure.
Finding The Dashboard
After logging in, you will land on the dashboard. This is your main control center. Look for the left sidebar. It contains several options for navigating.
Locating The Domain List
On the sidebar, find the “Domain List” option. Click it to view all your domains. This list displays each domain you own. It is crucial for managing DNS records.
From the Domain List, select the domain you want to update. Click on it to access specific settings. This step directs you to the domain management page.
Selecting Your Domain
Updating DNS records in Namecheap involves accessing the domain settings. First, log into your Namecheap account. Navigate to the “Domain List” and select your domain. Under the “Advanced DNS” tab, you can add or edit records such as A, CNAME, and MX to point your domain to the right server.
Selecting your domain is the first crucial step when updating DNS records in Namecheap. It might seem simple, but choosing the right domain involves more than just clicking a button. Imagine you’re searching through a list of your domains—each with its own purpose and potential. Picking the right one is like selecting the key that opens the door to your digital presence. It’s a moment that requires attention to detail and clarity about your goals. ### Start by logging into your Namecheap account. Your dashboard will display a list of all your domains. It’s like opening a treasure chest filled with possibilities. Consider the purpose of each domain. Are you updating the DNS records for a business site, a personal blog, or perhaps a project with friends? Your decision here impacts the next steps. ###Understanding Your Domain’s Role
Each domain you own might serve a different role. Think about what each domain represents and why it needs DNS updates. Are you aiming to improve security, enhance speed, or manage email settings? Reflect on how each domain fits into your overall strategy. A business domain might need frequent updates to align with new marketing campaigns, whereas a personal blog might be more static. Knowing your domain’s role helps in deciding which one to focus on. ###Checking Domain Expiration Date
Before proceeding, check the expiration date of your domain. An expired domain can disrupt your plans. It’s like preparing for a trip without checking your passport’s validity. Ensure your domain is active and renewed if necessary. This simple check saves you from unexpected downtime and maintains your online credibility. ###Confirming Domain Ownership
Verify that you have full control over the domain. It’s essential to ensure you’re the rightful owner and have access to make changes. Imagine trying to update DNS records only to realize you don’t have the necessary permissions. Double-check your ownership details. This step ensures you’re working on the correct domain and have the authority to implement the changes. ###Domain Selection Tips
Use a systematic approach when selecting your domain. Make a checklist of criteria such as purpose, expiration date, and ownership. Consider using tools or software that helps organize and manage your domains efficiently. Reflect on your personal experiences with domain management. Have you ever selected the wrong domain by mistake? Share your insights and tips to avoid common pitfalls. ###Engage With Your Domain
Have you considered the long-term vision for your domain? How does it contribute to your digital goals? Engaging deeply with your domain selection can lead to more strategic decisions. Picture your domain as a piece of your online identity. How do you want it to represent you or your business? Use this thought to guide your selection process. Choosing the right domain might seem straightforward, but it’s a decision that can shape your digital future. Take your time, use your insights, and ensure your domain aligns with your vision.Accessing Advanced Dns Settings
Accessing Advanced DNS Settings in Namecheap can seem intimidating at first. But once you get the hang of it, you’ll realize how simple it is to manage your domain’s DNS records efficiently. Whether you’re setting up a new website or tweaking settings for an existing one, understanding how to navigate these options is crucial for ensuring your site operates smoothly.
Locating The Advanced Dns Tab
Start by logging into your Namecheap account. Once you’re in, head to the ‘Dashboard’. Here, you’ll find a list of all your domains.
Click on the domain you want to modify. This action will lead you to the domain management page. On this page, look for the ‘Advanced DNS’ tab. It’s usually located towards the top or side, depending on the interface updates.
Understanding The Interface
When you click on ‘Advanced DNS’, you’ll see a table displaying existing DNS records. Each row represents a different type of record like A, CNAME, MX, etc.
Pay attention to the columns, as they show the record type, host, and value. If you’re unsure about any setting, hover over the info icon beside each section for explanations.
Making Changes To Dns Records
To add or edit a record, click the ‘Add New Record’ button or the edit icon next to an existing record. A form will appear where you can input the necessary details.
Always double-check the information you enter. Incorrect DNS settings can cause your website to malfunction or become inaccessible. Wouldn’t it be frustrating to lose traffic because of a simple typo?
Saving And Testing Changes
Once you’ve made your changes, don’t forget to save them. There’s usually a ‘Save Changes’ button at the bottom of the page.
After saving, it’s wise to test your website to ensure everything works correctly. Use tools like DNS checker or simply try accessing your site. If something seems off, revisit your settings and verify them.
Updating DNS records in Namecheap is a straightforward process if you know where to look and what to do. Have you encountered any challenges while updating DNS records? Share your experiences below; maybe someone else has the solution!
Understanding Dns Record Types
Understanding DNS record types is crucial for managing your website’s domain settings. DNS records are like instructions that help the internet locate your website. Each type has a specific role in guiding traffic, email, and other services to the right place. Knowing how these records work ensures your website functions smoothly.
A Records
A Records, or Address Records, link your domain to an IP address. They tell browsers where to find your website. For example, if your domain is example.com, the A Record directs traffic to your server’s IP address. This connection is vital for your website’s accessibility.
Cname Records
CNAME Records, or Canonical Name Records, create an alias for your domain. They point one domain to another domain, not an IP address. Use CNAME Records for subdomains like www.example.com. They ensure consistency by redirecting traffic to the main domain.
Mx Records
MX Records, or Mail Exchange Records, manage email delivery for your domain. They specify the mail servers responsible for receiving emails. Proper configuration is crucial for email functionality. This ensures that your domain can send and receive emails efficiently.
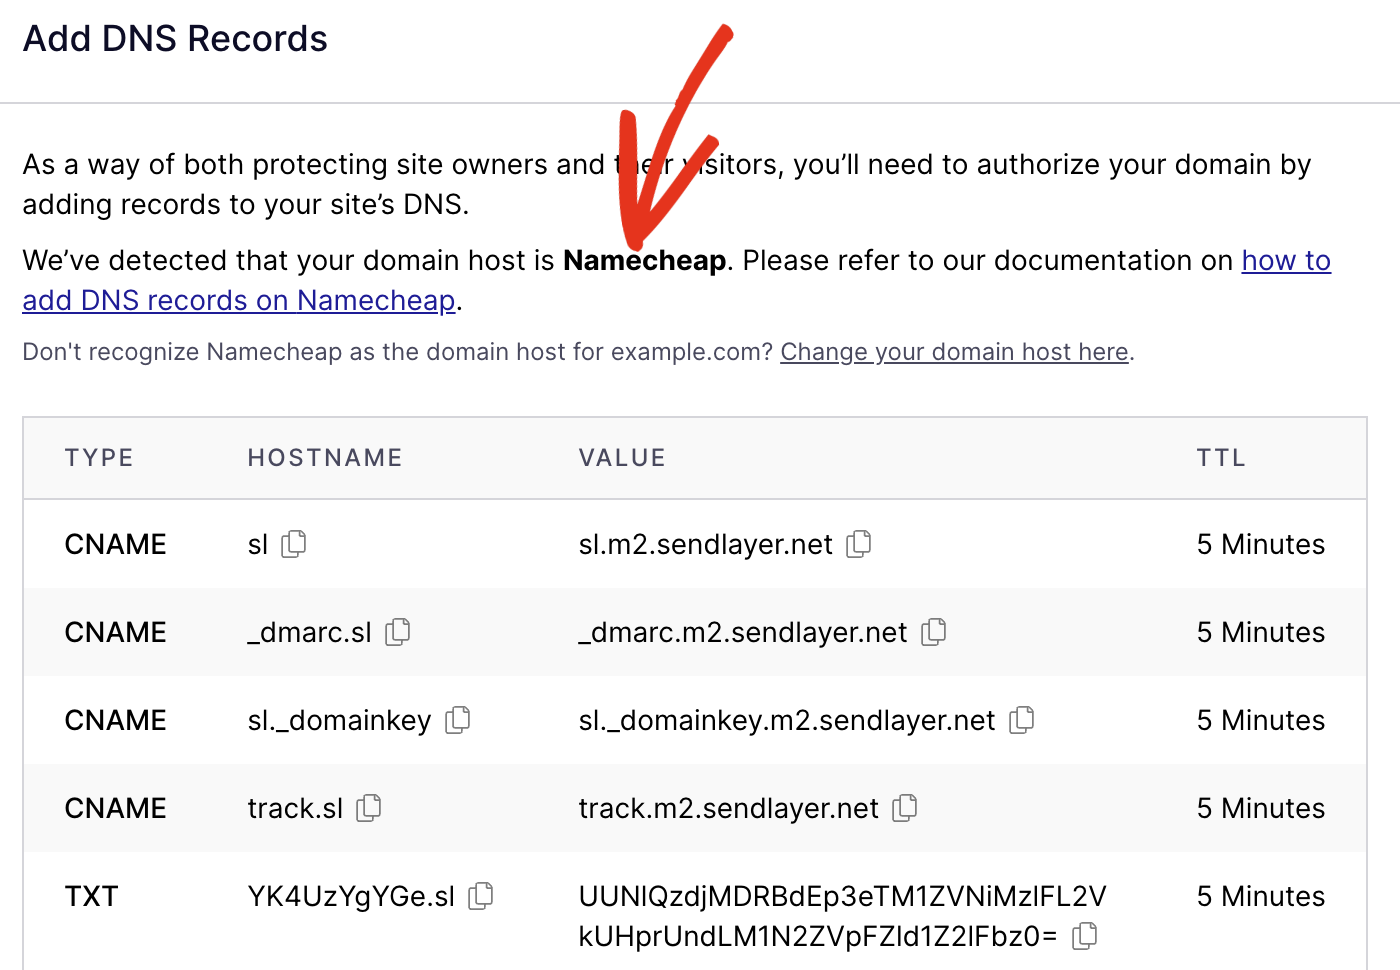
Txt Records
TXT Records contain text information for external sources. They are often used for verification purposes. For example, they can validate ownership of a domain with services like Google. These records enhance security and help confirm legitimate domain activities.
Editing Dns Records
Editing DNS records is crucial for managing your domain settings. Namecheap provides a user-friendly platform to update DNS records efficiently. Proper management of these records ensures your website’s smooth operation. Let’s delve into modifying and adding DNS records in Namecheap.
Modifying Existing Records
To modify an existing DNS record, access your Namecheap dashboard. Log in to your account and navigate to the “Domain List” section. Locate your domain and click “Manage” next to it. Select the “Advanced DNS” tab to view current DNS records.
Find the record you need to change. Click the “Edit” icon next to the record. Update the necessary fields such as “Type,” “Host,” “Value,” or “TTL.” Ensure accuracy to avoid connectivity issues. Once changes are made, click the checkmark to save.
Adding New Records
Adding new DNS records is simple in Namecheap. Go to the “Advanced DNS” tab as before. Click the “Add New Record” button. A dropdown menu will appear. Choose the type of record you want to add.
Fill in the required information. Enter details for “Host,” “Value,” and “TTL.” Double-check the information for errors. Click the checkmark to save the new record.
Changes to DNS records may take time to propagate. Patience is key for updates to reflect globally.
Saving Changes
Updating DNS records in Namecheap involves accessing your account and navigating to the Domain List. Select your domain, then click “Manage” to find the DNS settings. Enter the new records, and save changes to ensure your domain points correctly.
Updating DNS records in Namecheap can feel daunting, especially if you’re not tech-savvy. But once you’ve made the necessary changes, saving them correctly ensures your website runs smoothly. This step is crucial, as it confirms your updates are applied and visible online. Let’s dive into how you can save your DNS record changes effectively and avoid common pitfalls. ###Clicking The Save Button
Once you’ve entered your DNS changes, look for the Save Changes button. This button is usually located at the bottom of the page. Don’t forget to click it! Missing this step can lead to frustration when your modifications don’t appear. Clicking save is like locking in your new configuration. ###Understanding Propagation Time
After saving changes, remember that DNS updates aren’t instantaneous. It might take a while for changes to reflect globally. This delay, known as propagation time, can range from a few minutes to 48 hours. It’s like waiting for a letter to reach its destination—patience is key. So, don’t panic if you don’t see immediate results. ###Verifying Your Changes
Once saved, it’s wise to verify your changes. You can use online tools to check if your DNS records have updated correctly. These tools provide real-time information on your DNS status. They ensure your changes are working and help catch any errors early. It’s like double-checking your work to guarantee success. ###Common Issues And Troubleshooting
Sometimes, despite saving changes, issues arise. Incorrect data entry or cache problems might be to blame. If your website isn’t functioning as expected, review your entries. Clear your browser cache and try again. Have you ever overlooked a small detail that caused a big issue? This is a gentle reminder to be thorough. ###Optimizing For Future Changes
To make future updates smoother, keep a record of your DNS settings. Document any changes you make and note their purpose. Having this reference can save time and prevent mistakes. It’s like having a map to navigate future updates without unnecessary detours. How prepared are you for your next DNS adventure?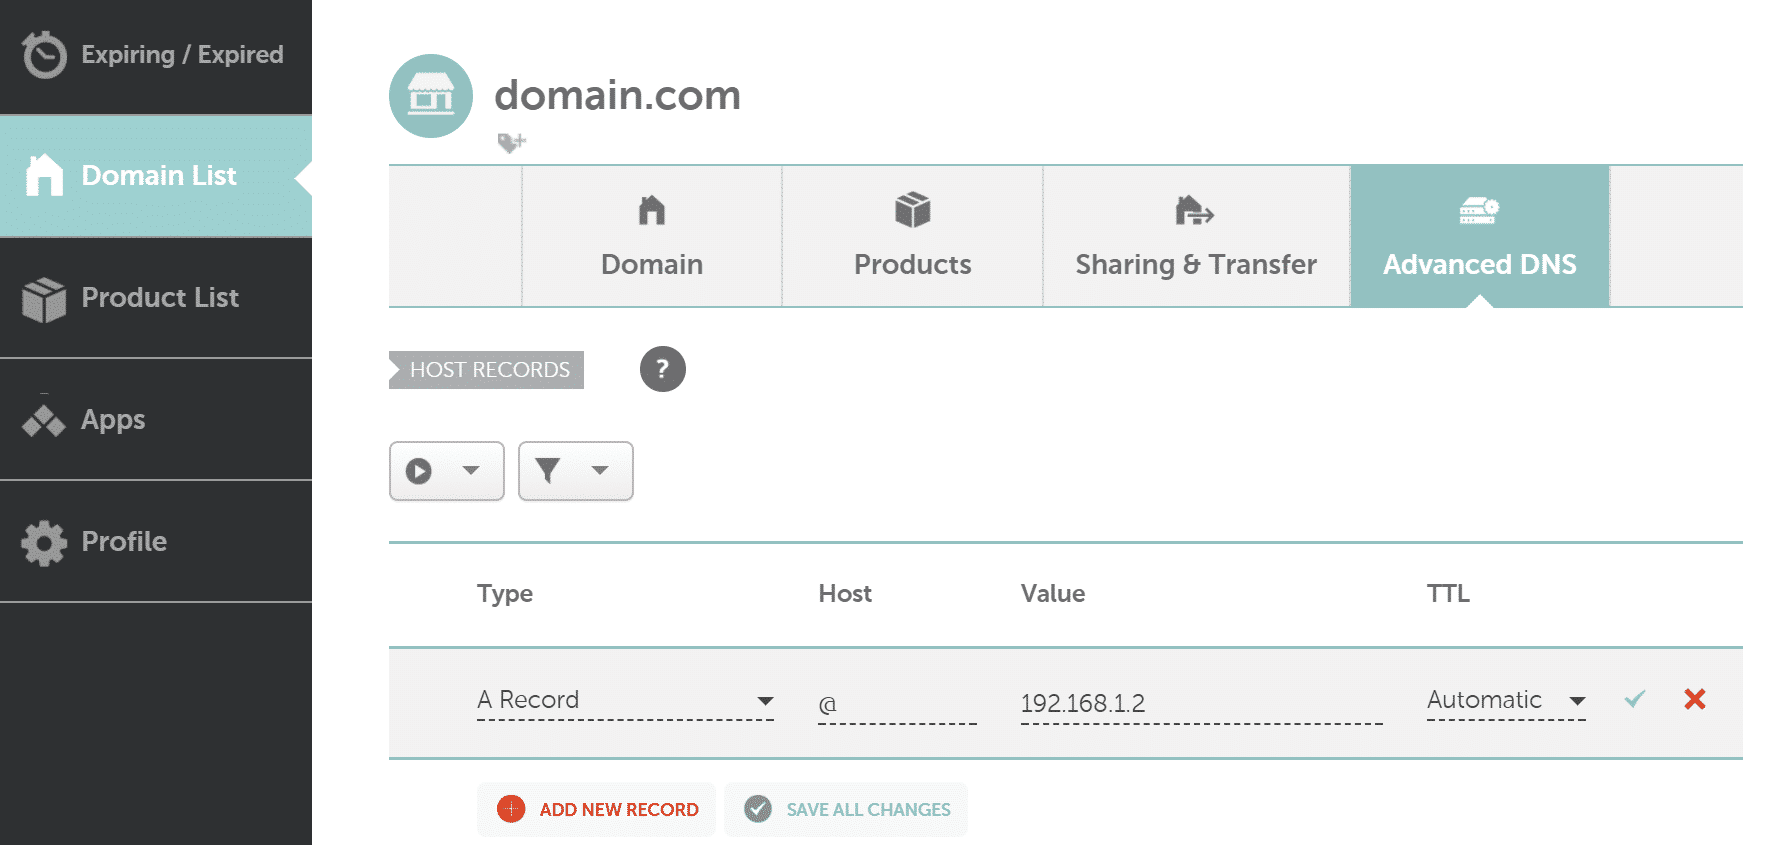
Credit: kinsta.com
Verifying Dns Updates
Updating DNS records in Namecheap involves accessing the domain list and selecting DNS settings. Make changes by adding, editing, or deleting records. Verify updates by checking the DNS propagation status to ensure changes are effective globally.
Verifying DNS updates is a crucial step after making changes in Namecheap. It ensures your updates are correctly applied and functioning. Without verification, you might face connectivity issues. This step confirms your domain directs users to the correct location. Learn how to verify your DNS updates efficiently.Using Online Tools
Online tools offer an easy way to verify DNS changes. They help check if updates are live across various servers. These tools are user-friendly. Enter your domain name. Then, see how the world sees your DNS records. Websites like DNS Checker and MX Toolbox are popular. They provide instant results. These tools display DNS information from multiple locations. This helps in identifying any lag in updates.Checking Propagation
DNS propagation can take time. It varies based on your DNS settings and global server networks. Propagation can last from a few minutes to 48 hours. To check propagation, use a DNS propagation checker. This tool shows where your DNS has updated. Not all servers update simultaneously. Some regions might show changes faster than others. Regular checks help track this progress. Keep an eye on changes until all servers reflect updates. This ensures your website operates smoothly for all users.Troubleshooting Common Issues
Updating DNS records in Namecheap involves accessing your account dashboard and navigating to the domain list. Select the domain you wish to update, click “Advanced DNS,” and modify existing records or add new ones. Save changes to ensure proper domain functionality.
Updating DNS records in Namecheap can be a straightforward task, but sometimes things don’t go as planned. If you’ve ever found yourself scratching your head wondering why changes aren’t taking effect, you’re not alone. Troubleshooting DNS issues requires patience and a keen eye for detail. Here’s how you can overcome some of the most common problems you might encounter.Propagation Delays
One of the most frustrating aspects of DNS changes is the dreaded propagation delay. After updating your DNS records, there might be a waiting period before changes reflect globally. This delay can range from a few minutes to up to 48 hours. To minimize anxiety, consider checking your settings during off-peak hours. Use online tools to track propagation across different regions. This not only saves you from unnecessary stress but also helps you plan accordingly.Incorrect Record Entries
A simple typo in your DNS records can wreak havoc on your website’s functionality. It’s easy to overlook a misplaced dot or a missing number. Before saving any changes, double-check every entry. Make a habit of copying and pasting data to avoid human errors. If you notice issues, review each record meticulously. This attention to detail can save you from future headaches and downtime. In one instance, I spent hours troubleshooting only to find I had swapped two numbers. That small mistake cost me valuable time. Have you ever experienced something similar? Double-checking could be your best friend in these situations. When you keep these common issues in mind, you not only troubleshoot effectively but also enhance your skill set. Do you feel more confident tackling DNS updates now? Remember, every challenge is a learning opportunity.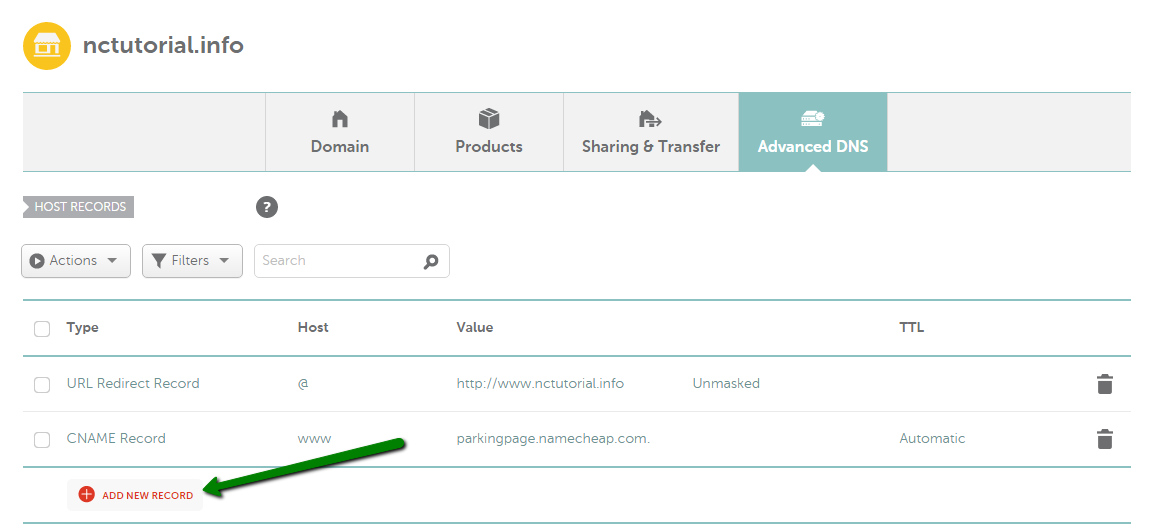
Credit: www.namecheap.com
Credit: sendlayer.com
Frequently Asked Questions
How Do I Update My Dns Record?
To update your DNS record, log into your domain registrar’s website. Navigate to DNS settings. Select the record you want to edit. Enter the new value and save changes. Changes may take up to 48 hours to propagate globally.
How Do I Access My Dns Records On Namecheap?
Log into your Namecheap account. Go to “Domain List” and click “Manage” next to your domain. Select the “Advanced DNS” tab to view and edit your DNS records.
How Long Does It Take For Dns Records To Update Namecheap?
DNS records on Namecheap typically update within 24 to 48 hours. Factors like ISP caching may affect this time. Make sure to clear your browser cache for faster access. If changes do not reflect, check settings or contact Namecheap support for assistance.
How Do I Change My Dns Settings?
To change DNS settings, access your network settings. Choose ‘Internet Protocol Version 4 (TCP/IPv4)’. Enter preferred DNS addresses. Save changes. Ensure your new DNS is active by restarting your device.
Conclusion
Updating DNS records in Namecheap is simple and straightforward. Follow the step-by-step guide carefully. Ensure each setting matches your desired configuration. Double-check entries for accuracy. This prevents errors and downtime. With practice, the process becomes second nature. Remember, DNS changes might take some time to propagate.
Patience is key. Keep your login details secure. Regular updates ensure your domain functions smoothly. Explore Namecheap’s support if you face issues. Happy managing your DNS!


