
Are you ready to take the next step in managing your online presence? Transferring domain ownership on Namecheap might seem like a daunting task, but it’s simpler than you think.
Whether you’re selling a domain, gifting one to a friend, or just reorganizing your digital assets, knowing how to transfer domain ownership is crucial. This guide will walk you through the process, ensuring you avoid common pitfalls and make the transition smooth and hassle-free.
Imagine the peace of mind you’ll feel once you know your domain is in the right hands. Let’s dive in and unlock the secrets to a successful domain transfer on Namecheap. Your digital future awaits!
Credit: www.namecheap.com
Preparing For Domain Transfer
Transferring domain ownership on Namecheap involves a few key steps. First, unlock your domain and obtain the EPP code. Then, initiate the transfer to the new owner’s Namecheap account. Ensure both parties confirm the transfer to complete the process smoothly.
Preparing for a domain transfer is essential. It ensures a smooth and hassle-free transition. Before diving into the transfer process, certain steps must be completed. These steps guarantee that the domain is eligible. They also ensure the domain is ready for transfer. Understanding each step will make the process simpler.Check Transfer Eligibility
First, confirm the domain is eligible for transfer. The domain must be at least 60 days old. It should not be in the midst of another transfer. Ensure the domain is not locked in any disputes. Check the domain’s status in your Namecheap account. Verify that it meets all requirements. This step prevents unexpected delays.Unlock Domain
Domains are often locked for security reasons. Unlocking the domain is crucial. Log into your Namecheap account. Navigate to the domain management section. Find the lock setting and disable it. This allows the transfer to proceed. Remember, a locked domain cannot be transferred.Update Contact Information
Accurate contact details are vital. Update the domain’s WHOIS information. Ensure the email address is correct. This address receives important transfer notifications. Check that all contact information is current. Avoid using outdated or incorrect details. This helps in avoiding communication issues during the transfer.Initiating Transfer On Namecheap
Transferring domain ownership on Namecheap is simple. Start by unlocking your domain and getting the transfer code. Then, provide this code to the new owner.
Transferring domain ownership on Namecheap can be a straightforward process when you know the steps involved. Whether you’re selling your domain or simply moving it to a different account, understanding how to initiate this transfer is crucial. It’s not just about clicking a few buttons; it’s about ensuring a smooth transition without losing any valuable information. As someone who has navigated this process successfully, I can assure you that with the right guidance, you’ll have your domain transferred in no time. Let’s dive into the steps to get you started. ###Access Domain Management
To begin, you’ll need to access your Namecheap account. Once logged in, head over to the dashboard where your domains are listed. You’ll find the “Domain List” section which houses all your registered domains. It’s here that you’ll find the tools needed to manage and transfer your domain. From personal experience, having all your domain details organized in one place is a lifesaver. Imagine searching for a misplaced document; it’s frustrating, right? Keeping your domain details handy makes the process seamless. Take a moment to familiarize yourself with this section; it’s the control center for your domain activities. ###Select Domain For Transfer
Now, identify the domain you wish to transfer. Click on the domain name to reveal more options. This step is crucial as selecting the wrong domain can lead to unwanted complications. Ensure you are choosing the correct one by double-checking the domain details. Think of this step like packing for a trip—choosing the right items is essential to avoid last-minute hiccups. Similarly, selecting the correct domain ensures a smooth transfer process. It’s always wise to verify details before proceeding. ###Generate Authorization Code
Once you’ve selected the domain, you’ll need an authorization code to initiate the transfer. This code is like a key that unlocks the ability to move your domain from one account to another. Navigate to the “Domain Settings” and find the option to generate this code. Why is the authorization code so important? It acts as a security measure, ensuring that only authorized transfers occur. Without it, your domain remains secure from unauthorized changes. It’s a small yet significant step in safeguarding your domain’s integrity. Have you ever been locked out of an account and needed a special code to regain access? Generating this code is similar—it’s about maintaining control and security throughout the transfer process. Ensure you keep this code safe as it’s pivotal to completing your domain transfer. Embarking on a domain transfer may sound technical, but with clear steps, it becomes manageable. Are you ready to initiate your domain transfer? The process is at your fingertips, and with Namecheap, you’re in good hands.Completing Transfer Process
Transferring domain ownership on Namecheap involves a few straightforward steps. Start by unlocking your domain and obtaining the transfer code. Then, initiate the transfer through the receiving registrar, ensuring all details are correct for a smooth transition.
Transferring domain ownership can seem daunting, but understanding the steps involved can make the process smooth and straightforward. Whether you’re passing the baton to a new owner or consolidating domains under one account, completing the transfer process with Namecheap is a task that requires careful attention to details. From entering the authorization code to monitoring the transfer’s progress, each step is crucial. Let’s dive into how you can accomplish this efficiently.Enter Authorization Code
The authorization code, often referred to as the EPP code, is like a key that unlocks the ability to move your domain from one registrar to another. It’s essential to ensure you have the correct code. Double-check the code provided by your current registrar. It’s usually a string of letters and numbers. Have you ever typed in an incorrect password and faced frustration? The same applies here—accuracy is key.Confirm Transfer Request
Once the authorization code is entered, Namecheap will need you to confirm the transfer request. This step is crucial in ensuring you’re moving forward with intention. Look out for a confirmation email from Namecheap. It will contain instructions to proceed. Remember the excitement of confirming a booking for a dream vacation? Confirming a transfer request holds similar importance in your domain journey.Monitor Transfer Progress
After confirmation, it’s time to watch the progress unfold. This can take a few days, so patience is essential. Keep an eye on your email for updates from Namecheap. They will notify you once the transfer is complete. Ever waited for a package to arrive and checked its status daily? Monitoring your transfer progress is similar—anticipation and excitement are part of the process. Have you ever wondered how you can streamline such processes in the future? Understanding these steps equips you with skills that are not only beneficial for domain transfers but also for broader digital management tasks.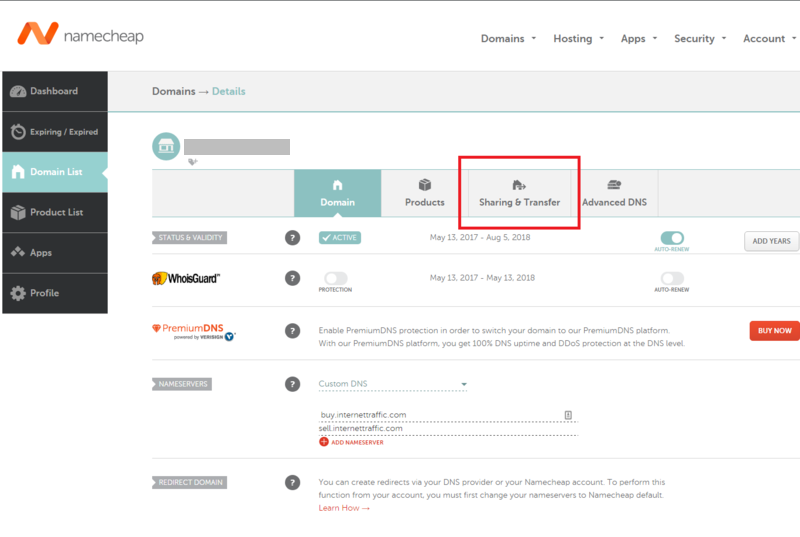
Credit: www.escrow.com
Post-transfer Considerations
Transferring domain ownership on Namecheap requires careful post-transfer steps. Ensure contact information is updated and verify the domain’s DNS settings. Confirm that all renewal reminders are set to avoid expiration.
Transferring a domain ownership can feel like a huge relief once it’s done, but don’t let your guard down just yet. There are a few crucial steps you need to take care of to ensure everything runs smoothly post-transfer. These tasks are not just technical formalities; they are essential for maintaining your website’s integrity and security.Verify Domain Settings
Once the domain is transferred, double-check that all the domain settings are correct. It’s easy to overlook a setting during the transfer process. For instance, ensure that the contact information is up to date. This is crucial if you ever need to prove ownership or if there are any issues with the domain.Update Dns Records
After a transfer, DNS records might need an update to reflect new hosting environments. This step is vital to ensure your website remains online and accessible. Head over to your DNS settings and make sure everything aligns with your current hosting setup. If your website suddenly becomes unreachable, outdated DNS records might be the culprit.Review Privacy Protection
Privacy protection settings can sometimes change during a domain transfer. You might want to reinstate these settings to keep your personal information secure. Consider enabling WHOIS privacy protection if it’s available. This will shield your personal details from being publicly accessible, providing an added layer of security.Have you ever faced unexpected issues after a domain transfer? Paying attention to these post-transfer considerations can save you from potential headaches down the line. Act now, and you’ll thank yourself later.
Common Issues And Troubleshooting
Transferring domain ownership on Namecheap often involves common issues such as incorrect WHOIS information or authorization code errors. Troubleshooting requires verifying account details, updating contact info, and ensuring the domain is unlocked before initiating the transfer process.
Transferring domain ownership on Namecheap can be straightforward. Yet, some users face challenges. Knowing common issues and solutions helps smooth the process. Understanding these can save time and stress. Below, explore typical problems and effective ways to address them.Failed Transfers
Failed domain transfers occur due to incorrect settings. Check if your domain is unlocked. Locked domains cannot transfer. Also, verify the email linked to your domain. Ensure it is active and accessible. Confirm the registrar’s rules on transfer timelines. Some domains have specific waiting periods.Authorization Code Errors
Authorization codes are vital for transfers. Incorrect codes result in errors. Always double-check the code provided. It should match exactly. If issues persist, request a new code from Namecheap. Ensure your domain’s contact details are up-to-date. This can prevent code delivery issues.Contacting Support
Sometimes, self-troubleshooting isn’t enough. Namecheap’s support team can assist. Reach out via their live chat or ticket system. Provide detailed information about your issue. This helps expedite the resolution process. Support can guide you through complex problems effectively.Tips For A Smooth Transfer
Transferring domain ownership with Namecheap involves simple steps. First, unlock your domain in your account settings. Then, request a transfer code to share with the new owner. Follow the prompts to complete the process smoothly.
Transferring a domain can be seamless with the right approach. Many worry about losing control or facing downtime. Here are some tips to ensure a smooth transfer from Namecheap. Each step is crucial to avoid errors and delays.Timing Considerations
Timing is key when transferring a domain. Start the process well before your domain expires. This helps avoid any last-minute rush. It also provides a buffer for unexpected issues. Ensure your domain is unlocked and not in the 60-day transfer lock period. Confirm that your contact information is up to date. This ensures you receive all necessary notifications.Preparing Backup Information
Backing up your domain information is wise. Record your domain settings and DNS configurations. This includes email settings, if applicable. If something goes wrong, this information is vital. Save it in a secure location. It can help restore your domain quickly. Always keep a record of your authorization code. You will need this to initiate the transfer.Communicating With Both Registrars
Effective communication is essential. Contact your current registrar, Namecheap, for guidance. They can provide specific instructions for the transfer process. Also, reach out to your new registrar. Confirm they are ready to receive your domain. Clear communication prevents misunderstandings. It also ensures both parties are on the same page. This can significantly speed up the transfer process.
Credit: www.youtube.com
Frequently Asked Questions
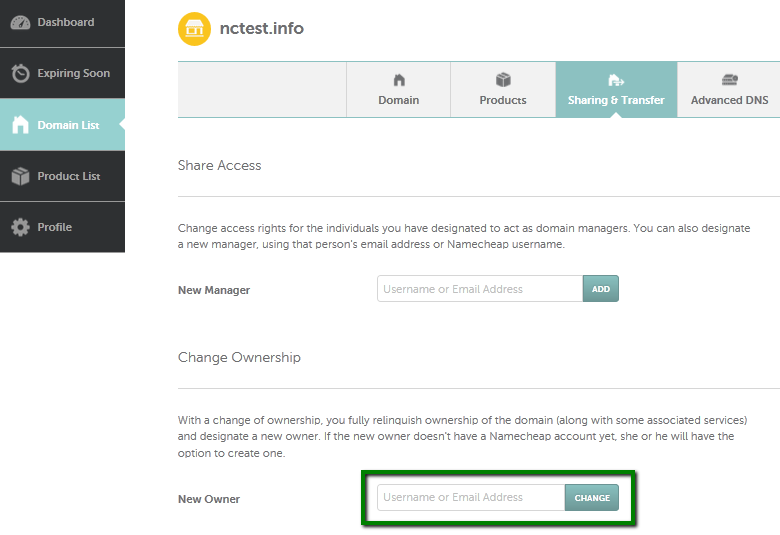
How Do I Transfer Ownership Of A Namecheap Domain?
To transfer ownership of a Namecheap domain, log in to your account. Go to the “Domain List” tab. Click “Manage” next to the domain. Select “Change Ownership” and enter the new owner’s email address. Confirm the transfer via the email link sent.
How Do I Transfer A Domain To A New Owner?
Unlock the domain at your current registrar. Obtain the transfer authorization code. Initiate transfer at the new owner’s registrar. Confirm the transfer through the provided email link. Ensure domain settings are updated post-transfer.
How Long Does It Take To Transfer A Domain Namecheap?
Transferring a domain to Namecheap usually takes 5 to 7 days. Ensure your domain is eligible for transfer and unlock it. Confirm the transfer with your current registrar. Monitor your email for confirmation messages and follow instructions promptly to avoid delays.
How Do I Transfer My Domain Name To Another Domain?
Unlock your domain and obtain the authorization code. Initiate the transfer with the new registrar. Approve transfer emails. Wait for the transfer to complete. Ensure DNS settings are updated.
Conclusion
Transferring domain ownership with Namecheap is straightforward. Follow the steps carefully. Always double-check details to avoid mistakes. Ensure both parties agree on terms. This prevents future issues. Namecheap provides support if needed. Their resources can guide you. Keep your domain secure during transfer.
Protect your digital assets. Completing the process brings peace of mind. Your domain’s new owner can then take over. They will manage it as agreed. Understanding these steps is crucial. It ensures a smooth transition. Enjoy the benefits of successful domain transfer.
Now you’re ready for what’s next.


