
Are you tired of relying on third-party web hosting services? Do you crave more control over your website’s performance and security?
Starting your own web hosting server might be the game-changer you need. Imagine the power to customize every aspect of your hosting environment, ensuring it perfectly aligns with your vision and requirements. Intrigued? You should be. In this guide, you’ll uncover the essential steps to launch your own web hosting server, even if you’re not a tech wizard.
We’ll break down complex concepts into simple, actionable tasks, empowering you to take charge of your online presence. Ready to unlock the full potential of your website? Let’s dive in and explore how you can get started today.
Choosing The Right Hardware
Picking the right server is very important. Processors handle many tasks. A fast CPU makes everything smooth. RAM is for memory. More RAM helps the server run better. Storage is where data is kept. Fast storage means data is found quickly.
Hard drives keep all your data safe. SSD drives are faster than regular drives. They make everything load quicker. Think about how much data you will store. More data needs more storage space.
A good network card helps connect to the internet. It should be fast and reliable. Routers and switches help manage connections. Strong equipment means better internet speed.
Selecting An Operating System
Choosing the right operating system is crucial for starting your own web hosting server. Consider compatibility, security features, and user support when making your decision. Linux and Windows are popular options, each offering unique benefits.
Linux Vs Windows
Choosing the right operating system is crucial. Linux is known for its stability. It is often used for web servers. Linux is also free and open-source. It supports many programming languages. Windows, on the other hand, is easier for beginners. It has a user-friendly interface. Windows is not free; you need a license. It supports ASP.NET applications.
Compatibility is important when choosing. Linux works well with PHP and MySQL. Windows supports Microsoft SQL Server. Think about the software you plan to use. Ensure it runs on your chosen system. Both systems have their own advantages. Decide based on your needs and budget.
Setting Up Your Server Environment
Choose a reliable operating system. Many prefer Linux for servers. It is free and open-source. You can also use Windows. Follow the steps on the screen. Install the OS carefully. Make sure every step is complete. A stable OS is important for your server.
Set up your network settings. Assign a static IP address. This makes the server accessible. Configure the DNS settings. Ensure the server connects to the internet. Check all connections twice. A good network setup is key.
Protect your server with security protocols. Install a firewall for safety. Use strong passwords everywhere. Keep your software updated. Updates fix security issues. Regular checks keep your server safe. Security is important for server health.

Credit: diggitymarketing.com
Choosing Web Hosting Software
Picking a control panel is crucial. A control panel helps manage hosting tasks. Popular options include cPanel and Plesk. Both offer user-friendly interfaces. cPanel is widely used. Plesk supports Windows servers. Each has unique features. Compare them before deciding. Ease of use is important. Look for helpful support tools. Choose wisely for smooth operations.
Managing your server is vital. Tools like Webmin make this easy. Webmin offers a web-based interface. It simplifies complex tasks. For advanced users, ISPConfig is another option. Both tools help with server management. They offer security features. Keep your server safe. Regular updates are necessary. Protect your data. Choose tools that fit your needs. Ensure your server runs smoothly.
Domain Management
Choose a unique name for your website. Visit a domain registrar’s website. Search for your desired name. If it’s available, you can buy it. Prices can vary. Some names cost more. Think about your budget. Check if the name fits your brand. Once bought, the name is yours. You can use it for your site. Remember to renew it every year. Don’t let it expire.
DNS helps connect your domain to the server. Access your domain registrar’s settings. Find the DNS management section. You need to add your server’s IP address here. This tells the internet where your site is. Save the changes after editing. The process might take a few hours. Be patient. Your site will become live soon. Always check the settings if something’s wrong.
Implementing Security Measures
Establishing a web hosting server requires solid security measures. Protect your server by installing firewalls and using strong passwords. Regular software updates and backups keep data safe and secure.
Firewall Setup
A firewall is like a guard for your server. It keeps bad traffic out. Set up rules for what can enter and exit. Only allow trusted connections. This makes your server safe. Firewalls are essential for security. They help protect your data. Always check your firewall settings. Update them often. This ensures your server stays secure.
Ssl Certificates
SSL certificates make websites secure. They encrypt data. This keeps information private. Customers feel safe when they see SSL. Install SSL certificates on your server. They protect passwords and credit card info. Use a trusted provider. Keep the certificates up to date. Regular checks are important. Secure servers are more reliable. They build trust with users.
Performance Optimization
Caching makes a website fast. It saves copies of pages. Users get these copies quickly. This means less waiting. Websites can handle more visitors. Use caching tools like Varnish or Redis. They are helpful and easy to set up. Every second counts online. Fast sites keep visitors happy. Happy visitors stay longer. This helps your site grow.
Load balancing is key. It shares tasks across servers. No one server gets too busy. This prevents slowdowns. Use tools like Nginx or HAProxy. They manage traffic well. Traffic can be heavy sometimes. Servers stay healthy with load balancing. Healthy servers mean happy users. Happy users are good for business.
Credit: www.liquidweb.com
Monitoring And Maintenance
Starting your own web hosting server requires regular monitoring and maintenance. Ensure server performance by checking logs and uptime. Update software frequently to keep security tight and features current.
Performance Tracking
Tracking the server’s performance is very important. It helps you know if your server is slow. Use tools to check speed and load times. Slow servers make people unhappy. They might leave your site. Keep an eye on CPU and memory usage. High usage means your server is working hard. This can slow things down. Set alerts to get warnings. This helps you fix issues fast.
Regular Updates
Servers need updates to stay safe. Updates fix bugs and add new features. Always install the latest software versions. This keeps your server strong against hackers. Automated updates can help. Set a schedule for updates. This way, you won’t forget. Regular checks ensure everything works well. Backup your data before updates. This keeps your files safe.
Troubleshooting Common Issues
Starting your own web hosting server can be challenging. Troubleshooting common issues like connectivity and server configuration is essential. Regularly checking server logs helps identify problems swiftly, ensuring smooth operation.
Error Logs Analysis
Error logs help you find what went wrong. They show the exact error message. Look for patterns in errors. Check the timestamp to see when errors happen. Note the file names mentioned in logs. These files might need fixing. Use logs to understand error types. This helps in solving issues.
Network Connectivity Problems
Network problems stop servers from working. Check if cables are connected properly. Ensure the router and modem are on. Test internet speed with online tools. Slow speed can cause issues. Check IP settings on your server. Wrong settings stop connections. Restarting devices often fixes problems. Try that first.

Credit: www.youtube.com
Scaling Your Web Hosting Server
Vertical scaling means adding more power to your server. It involves increasing CPU, RAM, or storage. It’s like giving your server a bigger engine. Horizontal scaling is adding more servers. This spreads the load across multiple machines. Think of it as having multiple servers working together. Both have pros and cons. Vertical scaling is easy but costly. Horizontal scaling is complex but flexible. Choose based on your needs. Do you need more power or more machines?
Cloud integration connects your server to the cloud. It helps in storing and managing data. The cloud provides flexibility and scalability. You can access resources as needed. This reduces costs and increases efficiency. Cloud services offer tools for better performance. They ensure your server runs smoothly. Using the cloud is like having a backup plan. It prepares you for unexpected traffic spikes. Ensure your server is cloud-ready for optimal performance.
Frequently Asked Questions
How Do I Create My Own Hosting Server?
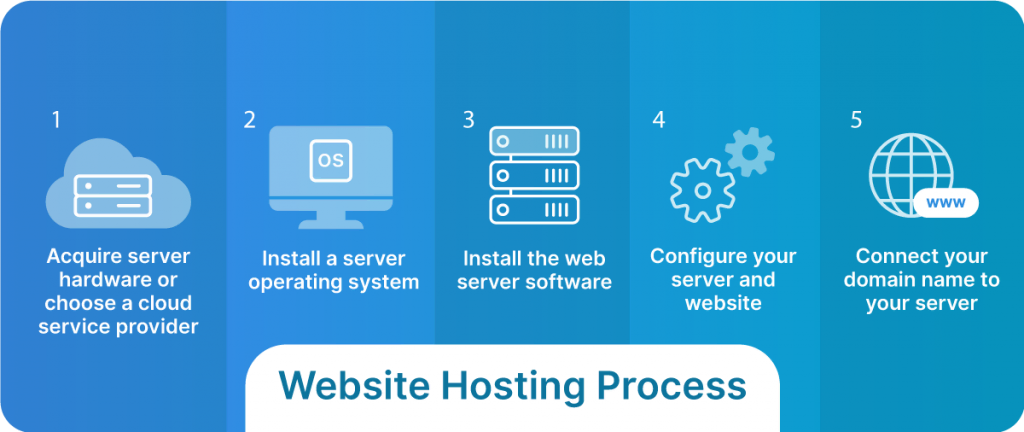
To create your own hosting server, choose hardware, install server software, configure settings, and secure the server. Ensure reliable internet connection and maintain regular backups.
Can I Host My Website By Myself?
Yes, you can host your website yourself. You need a server, technical knowledge, and constant maintenance. Self-hosting gives full control, but requires time and resources. Consider hosting costs, security, and uptime before deciding. Many opt for third-party hosting for convenience and reliability.
How To Start Your Own Server Hosting Company?
Research the market and identify your niche. Invest in reliable hardware and software. Choose a secure data center. Develop a competitive pricing strategy. Focus on excellent customer support and marketing.
Can You Host A Server Yourself?
Yes, you can host a server yourself. You need a reliable internet connection, hardware, and software. Ensure your server is secure and properly configured. Consider electricity costs and potential downtime. Hosting a server provides control but requires technical knowledge and maintenance.
Conclusion
Starting your own web hosting server can be a rewarding journey. Follow the steps carefully and ensure proper setup. Secure your server to protect data and privacy. Regular updates keep your server running smoothly. Test your server to catch issues early.
A reliable server builds trust with users. Start small, then expand as needed. Patience and dedication are crucial in this process. Troubleshoot problems promptly to maintain service quality. Stay informed about hosting trends and technologies. A well-managed server supports your online goals effectively.
Enjoy the process and the benefits it brings.


