
Setting up web hosting can feel like a daunting task, especially if you’re not a tech guru. But what if there was a way to make it simpler and more manageable?
Enter Putty, a tool that can streamline the process. Imagine having the power to control your web server with just a few clicks, all from the comfort of your computer. With Putty, you can do just that, making web hosting setup both accessible and efficient.
Are you ready to turn the chaos into clarity? This guide will take you step-by-step through the process of setting up web hosting using Putty. Whether you’re launching a personal blog or a business website, you’ll find this method not only effective but also surprisingly easy. By the end of this article, you’ll feel empowered, ready to tackle your web hosting needs with confidence. So, let’s dive in and transform your web hosting experience from intimidating to inspiring.
Web Hosting Basics
Web hosting stores your website files. There are different types. Shared hosting is cheap. Many sites share one server. VPS hosting is better. It offers more control. You get a part of the server. Dedicated hosting is the best. You have the whole server for yourself. It’s expensive but fast. Cloud hosting is flexible. It uses many servers. If one fails, others help. WordPress hosting is for WordPress sites. It is optimized and easy to use.
Pick a reliable provider. Look for good reviews. Check the uptime. It should be 99% or more. Customer support is important. You need help at times. See if they have live chat. Pricing matters. Compare costs. Check if they offer free SSL. It keeps data safe. Look for easy setup. Beginner-friendly tools are helpful. Some providers offer money-back guarantee. It’s good to try their service.
Credit: cpanel.net
Introduction To Putty
PuTTY is a free software used to connect computers. It helps in remote access to servers. It uses a method called SSH for security. Users can send commands to servers from their computers. It’s like a chat between your computer and the server. PuTTY is easy to use and very helpful for web hosting. It supports different systems like Windows and Unix. Many web developers use it daily.
PuTTY is great for web hosting. It makes tasks simple. You can manage files easily. Users can install software on servers fast. PuTTY helps in troubleshooting server issues. It is very secure and keeps data safe. It supports many protocols for different needs. Many people find PuTTY reliable and trustworthy. It is a favorite tool for many web hosts.
Installing Putty
Your computer needs a few things. It should have Windows or Linux. Make sure you have at least 10 MB of free space. Check if you have administrator rights. Without this, installation may not work. A stable internet connection is also important. This helps in downloading the software. A modern web browser like Chrome or Firefox is good too.
First, visit the PuTTY website. Find the download section. Click on the download link for your system. After downloading, locate the setup file. Double-click to start installation. Follow the on-screen instructions. Choose the default settings if unsure. Wait for installation to finish. Now, you can use PuTTY!
Configuring Putty For Ssh
Generating SSH keys is very important. It helps secure your connection. First, open PuTTYgen. It’s a tool included with PuTTY. Click the “Generate” button. Move your mouse around to create randomness. This helps make a strong key. Save the public and private keys. Keep them safe. Never share your private key.
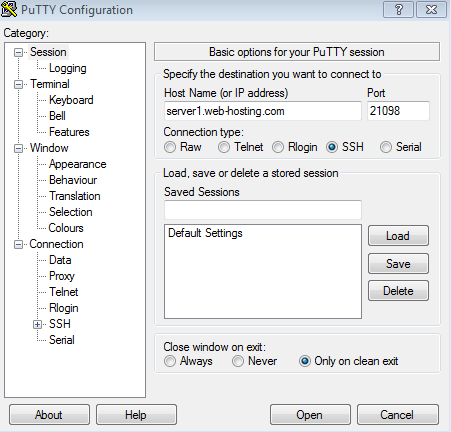
Open PuTTY to set up the SSH connection. Enter your server’s IP address. Use port 22 for SSH. Go to the “Connection” settings. Select “SSH”. Then go to “Auth”. Choose your private key file. Click “Open” to connect. Enter your username when prompted. Now, you are connected to the server.
Connecting To Your Hosting Server
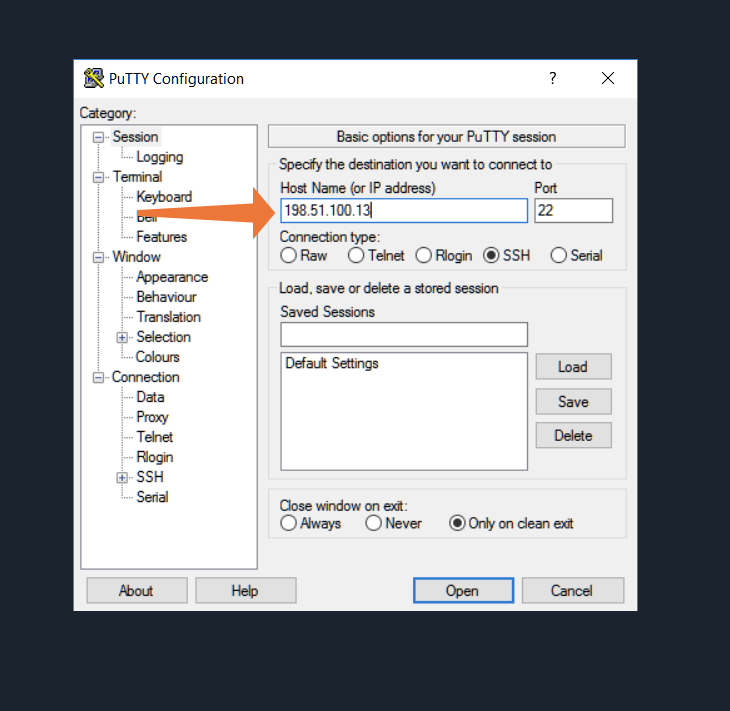
To connect safely, open Putty on your computer. Enter your server’s IP address in the Host Name field. Choose the SSH option to ensure a secure connection. Click on ‘Open’ to start the connection process. You will see a black window pop up. This is your command window. Type your username and press Enter. Then type your password. Be careful; it won’t show the letters. Press Enter again to log in. Now you are connected to your server securely.
Check the server’s fingerprint when connecting. Putty shows a warning message about the server’s identity. Compare the fingerprint with the one provided by your host. If they match, you are safe. Click ‘Yes’ to accept the connection. If they don’t match, stop and contact your host. It is important to ensure your server’s identity is correct. This prevents unauthorized access and keeps your data safe.
Managing Files With Putty
Managing files with PuTTY simplifies web hosting setup. PuTTY allows secure access to your server, helping you transfer files easily. Learn to navigate directories, edit configurations, and manage permissions efficiently.
File Transfer Protocols
Using PuTTY, you can transfer files easily. File Transfer Protocols (FTP) help in this process. Secure File Transfer Protocol (SFTP) and Secure Copy Protocol (SCP) are popular choices. They keep files safe during transfer. SFTP works like FTP but uses secure encryption. SCP also uses encryption for safety. Both protocols need a server address and login details. This ensures only authorized users can access files. PuTTY provides a secure way to manage files.
Uploading And Downloading Files
Uploading and downloading files with PuTTY is simple. First, connect to your server. Next, choose the file you want to upload or download. Use the command line to transfer files. Type the correct command to start the process. For uploading, use commands like `put` or `scp`. For downloading, use `get` or `scp` with the file path. Always check the file path is correct. This prevents errors during the transfer. PuTTY helps you manage files with ease.
Server Configuration And Management
Putty helps connect to your server. It uses SSH for secure links. Commands are typed in the terminal. Each word does a task. To see files, type ls. To move, use cd. Create new folders with mkdir. Delete files with rm. Edit files using nano or vi. These tools change text. Copy files with cp. Move them using mv. Command line is powerful. It helps manage servers easily.
Keeping servers healthy is vital. Update software regularly. Use apt-get update for updates. Check disk space with df. Monitor memory using free. Restart services if needed. Type service restart. Backup data to avoid loss. Use tar for backups. Clean logs to free space. Secure servers by changing passwords. Use passwd for this. Regular checks keep servers fast and safe.
Troubleshooting Common Issues
Set up web hosting with Putty by accessing your server remotely. Learn to troubleshoot common issues like connection errors. Ensure smooth hosting setup with simple, step-by-step guidance.
Connection Problems
Sometimes, the network might be slow. Check your internet connection. Make sure the IP address is correct. Also, the port number should be right. Port 22 is for SSH. Firewalls can block connections. Disable any active firewalls temporarily. Restart the router if needed. This can fix network issues. If it still doesn’t work, contact your internet provider.
Authentication Errors
Username and password must be correct. Double-check them before trying again. Ensure Caps Lock is off. Passwords are case-sensitive. Check if the SSH key is set up properly. Sometimes, keys can be misplaced. Update the key if needed. The server might need a restart. After changes, try reconnecting.
Security Best Practices
Setting up web hosting with Putty involves connecting to your server securely. First, download and install Putty on your computer. Use your server’s IP address to establish a secure SSH connection.
Secure Ssh Configuration
SSH stands for Secure Shell. It helps you connect safely. Always use a strong password. Make it hard to guess. Use a mix of letters and numbers. Avoid common words. Change the default port from 22 to another number. This makes it harder for bad people to find.
Disable root login. This adds another layer of safety. Create a new user with limited access. Use this user to log in. Enable key-based authentication. This is safer than passwords. Generate a pair of keys. Keep the private key safe. Share the public key only.
Protecting Against Cyber Threats
Keep your software up to date. This fixes security holes. Use a firewall. It blocks unwanted traffic. Only allow trusted IP addresses. Monitor your logs. Look for strange activities. Set up automatic alerts for unusual events. This helps you act fast.
Back up your data regularly. Store backups in a safe place. This helps if you get attacked. Remember, strong security keeps your data safe.
Credit: www.namecheap.com

Credit: serverhub.com
Frequently Asked Questions
How Do I Add A Host In Putty?
Open PuTTY, enter the host’s IP address or hostname in the “Host Name” field, then click “Open. “
How To Use Putty To Connect To A Server?
Open PuTTY and enter your server’s IP address in the ‘Host Name’ field. Select ‘SSH’ as the connection type. Click ‘Open’ to initiate the connection. Input your username and password when prompted. You are now connected to your server using PuTTY.
How Do I Connect To Cpanel With Putty?
Open PuTTY and enter your server’s IP address in the “Host Name” field. Set the “Port” to 22. Select “SSH” as the connection type. Click “Open” to start the session. Log in with your cPanel username and password. You can now access cPanel via the command line.
How To Connect To An Ip Address Using Putty?
Open PuTTY, enter the IP address in the “Host Name” field. Select SSH as the connection type. Click “Open” to connect. Ensure the server is running and reachable. Use correct login credentials when prompted. Adjust network settings if you encounter connectivity issues.
Conclusion
Setting up web hosting with Putty is simple. Follow the steps closely. Your server connects securely using SSH. Putty offers a user-friendly interface. Command line tasks become straightforward. With practice, you’ll gain confidence. Troubleshooting becomes manageable. Remember, patience is key.
Each step builds your skills. Soon, you’ll navigate hosting setups easily. This guide serves as a solid foundation. Explore, learn, and grow your web hosting knowledge. Keep experimenting. Success lies in consistent efforts. Web hosting with Putty is within reach.
Stay curious and keep progressing. Happy hosting!


