
Are you ready to streamline your communication with a professional email address? Setting up Namecheap Email is the perfect way to enhance your online presence and keep your inbox organized.
Whether you’re a small business owner, a freelancer, or just someone who wants a personalized email, Namecheap makes it easy and affordable. You don’t need to be a tech genius to get started; we’ll guide you through each step. Imagine the confidence you’ll feel with a polished email address that matches your domain.
It’s more than just an email—it’s a step towards a more professional you. Stick around and discover just how simple it is to set up your Namecheap Email. Your path to a seamless communication experience starts here.

Credit: www.mailjerry.com
Choosing Your Namecheap Email Plan
Setting up Namecheap Email is simple. Begin by selecting the ideal email plan for your needs. Each plan offers features like spam protection and custom domain emails, making communication streamlined and secure.
Choosing the right Namecheap email plan is crucial. It ensures your communication runs smoothly. Namecheap offers several options tailored to different needs. Understanding these options helps find the perfect fit for your requirements.Comparing Plan Options
Namecheap provides various email plans. Each plan offers unique features. Basic plans cover essential email needs. These include reliable email hosting and basic storage. Advanced plans offer more storage and additional tools. They suit growing businesses needing extra features. Understanding these differences helps you make informed decisions.Budget Considerations
Budget plays a key role in choosing an email plan. Namecheap has options for every budget. Basic plans are cost-effective. They suit personal use or small businesses. Advanced plans come with higher costs. They provide more features and larger storage. Choose a plan that balances features with your budget. This ensures you get value without overspending.Creating Your Namecheap Account
Setting up Namecheap email starts with creating your account. Sign up on Namecheap’s website. Follow the prompts to verify your email. Once verified, access the dashboard. Navigate to the email section and select your preferred email plan. Complete the setup by linking your domain.
Enjoy seamless communication.
Creating a Namecheap account is your first step towards accessing their reliable email services. Whether you’re setting it up for business purposes or personal use, having a Namecheap account is essential. This process is straightforward and designed to be user-friendly, even for those who aren’t tech-savvy. Let’s dive into the steps you need to follow. ###Navigating The Sign-up Process
To start, head over to Namecheap’s official website. You’ll find a ‘Sign Up’ button prominently displayed on the top-right corner. Clicking on this will direct you to a form where you’ll need to input your details. Here, simplicity is key. Fill out your name, email address, and a secure password. Make sure your password is strong; a mix of letters, numbers, and symbols works best. Once you’ve filled in the details, click ‘Create Account’. Isn’t it satisfying to watch that progress bar fill up? ###Account Verification Steps
Once your basic information is submitted, Namecheap will ask you to verify your email address. This is a crucial step to ensure your account’s security. Check your inbox for a verification email from Namecheap. Open the email and click on the link provided. This action will confirm your identity and activate your account. Have you ever had an account locked because of unverified email? This quick step helps avoid that hassle. After your email is verified, you’re officially part of the Namecheap community. You can now explore their range of services, including setting up your email. What will you do first after setting up your account? The possibilities are endless!Configuring Email Settings
Setting up your Namecheap email can enhance your communication. Proper configuration ensures seamless email delivery and receipt. Let’s explore how to configure your email settings effectively.
Accessing The Dashboard
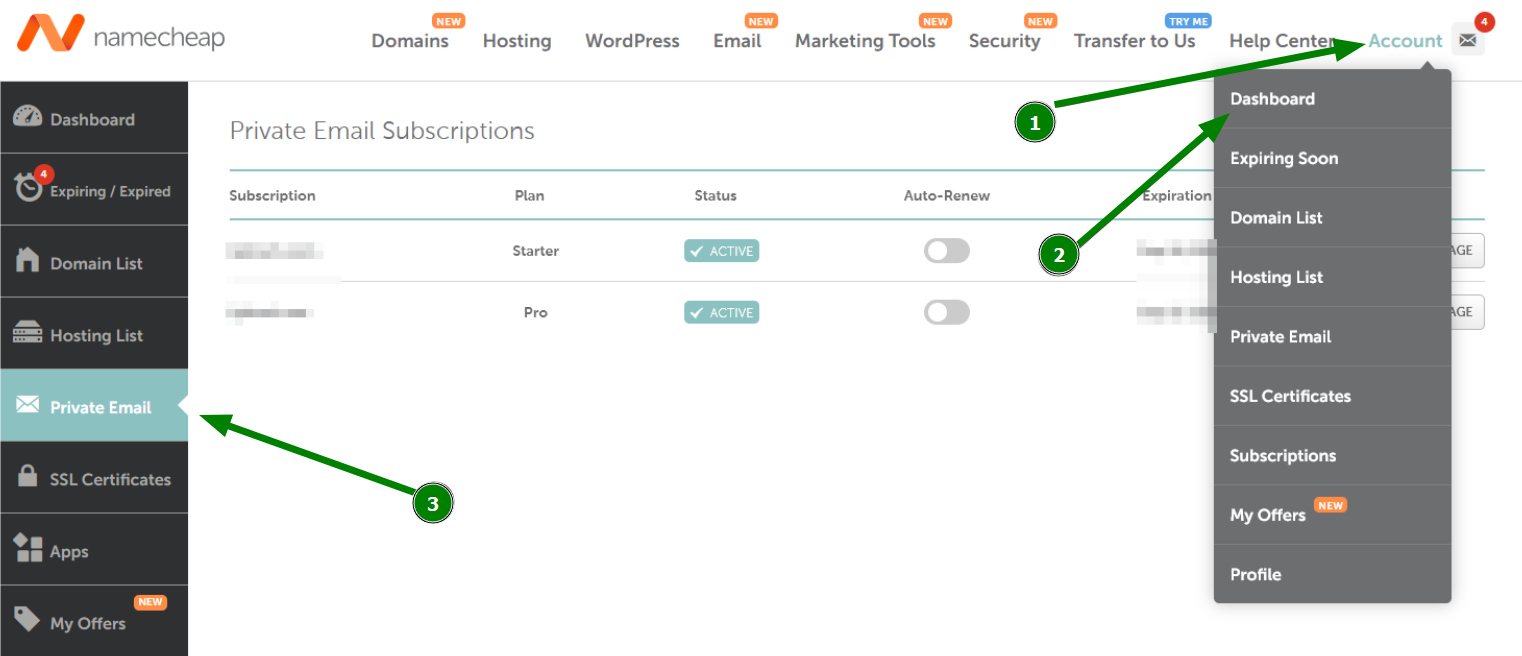
First, log into your Namecheap account. Use your username and password. After logging in, navigate to the dashboard. The dashboard is your control center. Here, you manage all email settings.
Locate the “Email” section on the dashboard. Click on it to view your email options. This is where you start setting up your email.
Setting Up Your Domain
Now, select the domain for your email. Your domain must be active to proceed. Click on “Manage” next to your domain name. This opens the domain management page.
Scroll down to find “Email Settings.” Click to access the configuration options. Here, you can specify custom email addresses. Choose a preferred format that suits your needs.
Enter the necessary information, then save your settings. Your Namecheap email setup is now complete. Enjoy your personalized email experience.
Credit: www.namecheap.com
Customizing Email Features
Customizing your Namecheap email features boosts productivity and personalizes your experience. Tailor your inbox settings to fit your unique needs. Adjust spam filters for a cleaner email flow. Learn how to make the most of these options.
Personalizing Your Inbox
Personalizing your inbox helps organize your emails effectively. Arrange your messages into folders. Create labels for easy access. Use color codes for quick identification. Customize your signature to reflect your personality. Add custom themes to make your inbox visually appealing.
Managing Spam Filters
Manage spam filters to reduce unwanted emails. Adjust your filter settings to block specific senders. Mark emails as spam to improve future filtering. Review your spam folder regularly to catch important messages. Use whitelists to ensure important emails land in your inbox. Keep your email environment clean and efficient.
Connecting Namecheap Email To Devices
Connecting your Namecheap email to various devices enhances accessibility. It simplifies communication. Learn how to integrate your email with mobile and desktop devices. This ensures seamless access wherever you are.
Setting Up On Mobile
Setting up Namecheap email on mobile is straightforward. Begin by accessing your phone’s settings. Locate the email section. Select the option to add a new account. Enter your Namecheap email credentials carefully. Choose IMAP or POP as the account type. Configure incoming and outgoing server settings. Use Namecheap’s recommended server details. Save your settings to complete the setup.
Ensure you have a stable internet connection. Verify your email syncs properly. Test sending and receiving messages. This ensures everything functions smoothly.
Syncing With Desktop Applications
Syncing Namecheap email with desktop applications is similar. Open your chosen email client. Outlook and Thunderbird are popular options. Navigate to the account settings. Choose to add a new email account.
Input your Namecheap email address and password. Configure server settings using Namecheap’s guidelines. Select IMAP or POP for synchronization. Save settings after configuration.
Check for successful sync. Send a test email to verify connectivity. Troubleshoot if necessary. Ensure all features work correctly.
Troubleshooting Common Issues
Setting up Namecheap Email can be straightforward. Yet, some users face common issues. These problems often involve login challenges and email delivery errors. Understanding these troubles helps ensure smooth operation. Below are simple solutions to these issues.
Resolving Login Problems
Login problems are frustrating. First, check your username and password. Ensure they are correct. Sometimes, incorrect login details cause issues. Use the ‘Forgot Password’ feature to reset it. Also, check your internet connection. A weak connection can block access. Clearing your browser’s cache may help. This refreshes your browser’s memory. If the problem persists, contact Namecheap support. They provide guidance and assistance.
Fixing Email Delivery Errors
Email delivery errors disrupt communication. Start by checking your email settings. Ensure they match Namecheap’s recommended settings. Incorrect settings often lead to delivery failures. Next, verify the recipient’s email address. Typos can prevent emails from reaching their destination. Sometimes, spam filters block emails. Mark important emails as “not spam” to avoid this. Another tip is to check your storage space. Full inboxes can reject incoming mail. These steps can resolve most delivery issues.
Exploring Advanced Email Options
Set up your Namecheap email easily with this guide. Follow step-by-step instructions for a smooth setup process. Learn to configure your email settings for better communication.
When setting up your Namecheap Email, you might wonder what advanced features can enhance your email experience. While basic setup is essential, diving into advanced options can significantly boost productivity and security. Let’s uncover some practical ways to elevate your email setup.Integrating Third-party Tools
Adding third-party tools can transform your Namecheap Email into a robust communication hub. Tools like Slack, Trello, or Google Workspace can streamline workflow, allowing seamless coordination. Imagine receiving an important email and turning it into a task on Trello with just a few clicks. Integrations can save time and reduce stress. Picture this: you link your calendar to your email. Now, scheduling meetings or setting reminders happens effortlessly. You no longer juggle between apps to organize your day.Enhancing Security Features
Security is a top priority, especially with sensitive information exchanged over email. Namecheap Email offers features like two-factor authentication (2FA) to protect your account. Enabling 2FA adds an extra layer of security, making it harder for unauthorized users to access your emails. Consider using encryption for your emails. Encryption ensures that only intended recipients can read your messages. It’s like sending a letter in a sealed envelope instead of a postcard. Have you ever experienced the anxiety of a hacked account? By utilizing these security features, you can have peace of mind knowing your information is safe. Take proactive steps today to safeguard your digital communication. Embarking on this journey of exploring advanced email options can transform how you manage communication. What tools will you integrate, and how will you enhance your email security? Your choices today can lead to a more efficient and secure tomorrow.
Credit: www.youtube.com
Frequently Asked Questions
How To Set Up Email From Namecheap?
Log in to your Namecheap account. Go to the “Email” section. Select “Manage” next to your domain. Choose “Email Forwarding” or “Private Email”. Follow prompts to set up your email account. Configure your email client using provided server settings. Save changes to finalize your setup.
Is Namecheap Email Pop Or Imap?
Namecheap email supports both POP and IMAP protocols. You can choose either based on your needs. POP downloads emails to your device, while IMAP synchronizes them across devices. Ensure your email client is configured correctly for seamless communication.
Does Namecheap Offer Free Email?
Namecheap offers free email hosting with their domain registration. You get two months of free private email hosting. This allows you to create a professional email address. After the trial, you can choose a paid plan to continue using their services.
How To Set Up Gmail In Namecheap?
Log into Namecheap. Go to “Domain List” and select your domain. Click “Advanced DNS” and add MX records for Gmail. Verify settings via Google’s MX record guide. Save changes.
Conclusion
Setting up Namecheap email is straightforward. Follow steps carefully for success. Get organized and improve communication with this service. It offers reliable and user-friendly options. Take advantage of its features for better email management. Enjoy a seamless experience with efficient setup.
Namecheap email enhances your online presence. Suitable for personal or business use. Start today and simplify your email needs. Remember, patience and attention to detail are key. With Namecheap, you’re in control. Your email journey begins here. Experience the ease and efficiency firsthand.
Now, you’re ready to take the next step!


