
Have you ever wished to have your brand’s logo elegantly displayed in the menu bar of your WordPress site? Imagine the impact of your logo being the first thing visitors see.
It’s not just about aesthetics; it’s about making your brand unforgettable. This simple tweak can enhance your site’s professionalism and boost your brand recognition significantly. In this guide, you’ll discover how easy it is to seamlessly integrate your logo into the menu bar of your WordPress theme.
Whether you’re a seasoned WordPress user or a complete newbie, this step-by-step tutorial will empower you to transform your site’s appearance effortlessly. You’ll no longer have to rely on generic themes; instead, your site will reflect your brand’s unique identity. Keep reading to unveil the secrets of this transformation. You’ll be surprised at how a small change can make a big difference in captivating your audience and making your brand unforgettable. Ready to take your WordPress site to the next level? Let’s dive in!
Choosing The Right Logo
Importance of a Well-Designed Logo is crucial for any website. A logo is the face of your brand. It tells your story in a simple image. People recognize your website by this symbol. A good logo builds trust. It makes visitors feel welcome. It must be clear and easy to understand. It should match the theme of your website. Colors and shapes matter. They create the mood of your site. A well-designed logo makes your site look professional. It sets your site apart from others.
Logo Size and Format Considerations are important too. The logo should be the right size. Not too big or too small. It must fit well in the menu bar. The format should be simple. PNG or JPEG are good choices. These formats keep the logo clear. The logo should not lose quality. It must look good on all devices. Phones, tablets, and computers. A good logo size is between 100px to 200px. This size keeps it neat and tidy. Always check the logo before adding it.
Accessing WordPress Dashboard
First, open your web browser. Go to your WordPress site. Add /wp-admin at the end of your site’s URL. Enter your username and password. Click on the Login button. Now, you are in your WordPress dashboard.
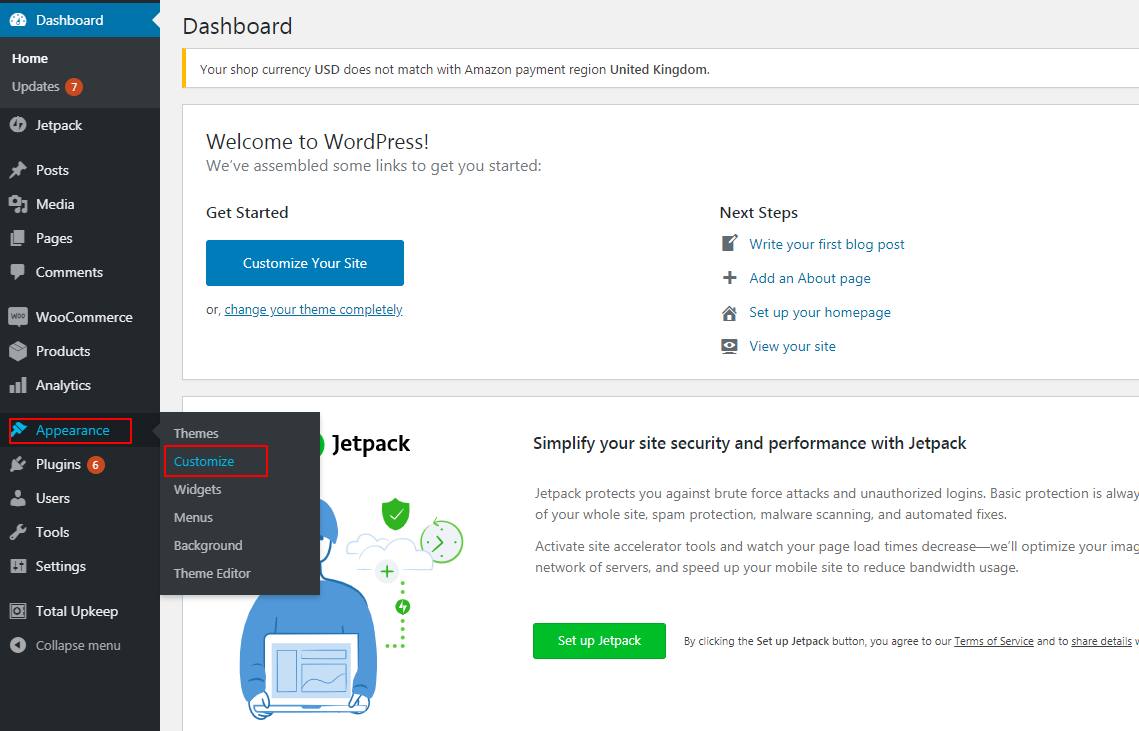
In the dashboard, look at the left side. Find and click on Appearance. Then, choose Customize from the menu. You will see the theme customization screen. Here, you can change many things. Look for the Header or Logo section. This is where you can add your logo to the menu bar.
Locating Menu Bar Settings
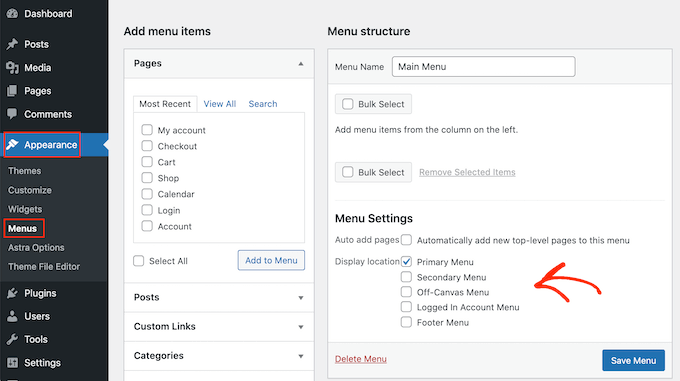
First, open your WordPress dashboard. Go to the Appearance section. Next, click on Menus. This is where you will find the menu bar settings. Look for the menu you want to edit. Often, it is named Main Menu or Header Menu. Once found, click to open it. You are now ready to add your logo.
Finding The Menu Bar Section
Check the menu settings panel. Look for a tab or section called Custom Links or Logo Settings. This is where you will add your logo. Some themes might have a specific logo area. It will be easy to spot. Always check the Theme Options if you can’t find it right away. Most themes have this feature available.
Identifying Logo Placement Options
Now, decide where the logo should appear. It can be on the left, center, or right. Some themes allow you to choose the position. Others might have it fixed. Make sure to look at the Logo Position option. If not available, check under Header Settings. Always save your changes after placing the logo. Refresh your site to see the update.
Credit: ca.wordpress.org
Uploading Your Logo
Open your WordPress dashboard. Click on Media. Choose Add New. You will see the upload page. Click the Select Files button. Find your logo file. Select it. Wait for the upload to finish. Your logo is now in the library. Ready for use in the menu bar.
Start by opening the dashboard. Find the Appearance tab. Click on Customize. Look for the Header settings. Click on Site Identity. Find the logo upload option. Click Upload. Choose your logo file. Click open. Your logo uploads. Simple and quick.
Adjusting Logo Position
Easily adjust your WordPress theme by placing your logo in the menu bar. Customize your site’s appearance and enhance branding. Follow simple steps to ensure your logo fits perfectly within the menu.
Centering The Logo
To center your logo, navigate to the theme settings. Look for the header options. Select the center alignment. This places the logo in the middle. It gives a balanced look. Users find it appealing. The logo should be in high resolution. It should be clear and visible. This ensures good user experience. Test the view on different devices. Ensure it looks good everywhere. Check mobile and desktop versions. Adjust as necessary.
Aligning To The Left Or Right
Positioning the logo on the left or right is simple. Go to the theme settings. Select the header section. Choose left alignment for classic design. Opt for right alignment if preferred. This can create a unique style. Make sure the logo is not too big. Keep it neat and tidy. Check how it looks on mobile screens. Ensure it does not overlap other elements. Adjust margins if needed.
Credit: www.inmotionhosting.com
Customizing Logo Appearance
Adjusting the size of your logo can make it stand out more. Find the theme customizer in your WordPress dashboard. Look for the logo settings. You can set a new height and width. This will change how big or small your logo looks. Keep the logo size balanced. Too big might cover the menu. Too small might not be clear. Save your changes when you’re done.
Changing the colors can give your logo a fresh look. Go to the theme customizer again. Look for the color settings for your logo. Pick colors that match your site. Make sure the logo is easy to see. Colors should not clash with the background. Use simple color choices. This keeps the logo neat and clear. Save the changes to see the new look.
Implementing Custom Css
Enhancing your WordPress site involves adding a logo to the menu bar using custom CSS. Begin by identifying the correct CSS class or ID for the menu area. Next, use the ‘background-image’ property in your theme’s custom CSS section to insert the logo seamlessly.
Understanding Css Basics
CSS helps style your website. It controls how elements look. Colors, fonts, and sizes can change with CSS. Learn the basics to use CSS well. Use selectors to target specific elements. Use properties to define styles. Simple syntax makes CSS powerful. It’s like giving instructions to your website.
Adding Css For Logo Customization
Start by targeting the menu bar. Find its class or ID in the HTML. Use this to write CSS. Add your logo image using the background-image property. Adjust the size with width and height. Ensure the logo fits well. Use margin or padding to position it nicely. Check how it looks on different devices.
Credit: www.wpbeginner.com
Testing And Previewing
Check if the logo looks good on all devices. Open your website on a phone, tablet, and computer. Make sure the logo is not too big or too small. It must fit well and look clear on each screen. Adjust the size if needed. Sometimes logos can hide or overlap with other menu items. Fix these issues by changing settings. Test the logo in vertical and horizontal views. This helps to make sure it is always visible.
Browsers are like windows to the internet. Each one can show your logo differently. Open your website in popular browsers like Chrome, Firefox, and Safari. Look at how the logo appears. Sometimes it might move or change size. Make sure it looks good in all browsers. Fix any problems you see. This helps everyone see your logo the same way, no matter what browser they use.
Saving And Publishing Changes
First, click the “Save” button in your WordPress dashboard. This keeps your changes safe. Now, look for the “Publish” button. It’s usually at the top right corner. Clicking this makes your logo appear for everyone. Don’t forget this step. If not, your changes won’t show. Your logo stays hidden. Always remember to save and publish.
Finalizing Customizations
Check how your site looks. Open a new tab in your browser. Visit your website. Is the logo there? If not, go back and check settings. Sometimes, a refresh helps. Make sure your logo is clear. It should fit well in the menu. Don’t let it cover other items. A neat look is important.
Making Your Logo Live
Once you’re happy, your logo is ready for everyone. Tell your friends to visit your site. See if they can spot the logo. It’s your brand’s face. Make sure it represents you well. A good logo catches the eye. It leaves a lasting impression. Enjoy your new look!
Frequently Asked Questions
How To Add A Logo To The WordPress Menu?
To add a logo to the WordPress menu, go to your theme’s customizer. Navigate to “Header” or “Menu” settings. Upload your logo image, and adjust its size. Save changes to see the logo appear in your menu bar. Ensure your theme supports logo customization for optimal results.
Can I Use A Plugin For Logo Placement?
Yes, you can use plugins to add a logo. Plugins like “Max Mega Menu” and “WP Mega Menu” offer features for logo placement in the menu bar. Install and configure them to include your logo. This method is helpful if your theme doesn’t natively support logo integration.
What Size Should The Logo Be For A Menu Bar?
The ideal logo size for a menu bar is around 150×50 pixels. This ensures the logo is visible without overwhelming the menu. Check your theme’s documentation for specific recommendations. Resizing might be necessary to fit seamlessly within the menu layout.
Is Custom Css Needed For Logo Adjustments?
Custom CSS can be used for precise logo adjustments. If your theme’s settings are insufficient, use custom CSS to modify size, alignment, or spacing. Add the CSS code via the WordPress customizer or a child theme. This approach requires some familiarity with CSS coding.
Conclusion
Adding a logo to your WordPress menu bar is simple. It helps in branding and recognition. Follow the steps carefully. Customize your theme settings. Use plugins if needed. Make sure the logo fits well. Check the mobile view too. A clear and visible logo enhances user experience.
Practice makes perfect. Try a few designs. Choose what looks best. A well-placed logo can make a big difference. Keep it neat and professional. Your website will stand out more. Happy customizing!


