
Are you ready to give your website a fresh look but unsure how to install a WordPress theme on HostGator? You’re in the right place!
Whether you’re launching a new site or revamping an existing one, choosing the perfect theme can set the tone for your online presence. Imagine clicking a few buttons and seeing your website transform into a visually appealing masterpiece. That’s the power of WordPress themes! But the question is, how do you install them seamlessly on HostGator?
In this guide, we’re diving straight into the steps you need to follow to make your website stand out. Keep reading to discover how easy it is to take control and elevate your site’s design today!
Credit: www.hostgator.com
Requirements
Before installing a WordPress theme, ensure you have access to your Hostgator account. A stable internet connection is crucial. Your computer or device should be ready for use. Keep your WordPress login details handy. These details include your username and password. It’s wise to have your desired theme file ready. Download it in advance.
Ensure your browser is updated. Outdated browsers can cause issues. A compatible web browser is necessary. Have a backup of your website. This prevents data loss. Backups are important. Be prepared for unexpected problems. Keep your support contact information accessible. This helps if you need assistance.
Accessing Hostgator Account
Log into your HostGator account with your username. Find the Dashboard once inside. Click on “My Account” to view settings. Choose “Hosting” from the menu. This section shows your hosting plans.
Look for the option named cPanel. Click on it to enter cPanel. There, manage all your website tools. Find the “WordPress Installer” in cPanel. Click to start WordPress setup. The installer will guide you.
After installation, go back to cPanel. Find the File Manager tool. Use it to upload themes. Navigate to the “wp-content” folder. Select “Themes” inside this folder. Upload your theme here.
Navigating To WordPress Dashboard
First, log in to your Hostgator account. Find the WordPress section. Click on the link to open your dashboard. This is where the magic happens. It’s like the control room of your website. Look for the Appearance tab on the left. Click it to find the Themes option. This is where you can change how your site looks. You can add new themes here. You can also manage existing ones. Remember, the dashboard is easy to use. Just follow the steps one by one. Soon, you’ll have a beautiful site.
Locating Theme Options
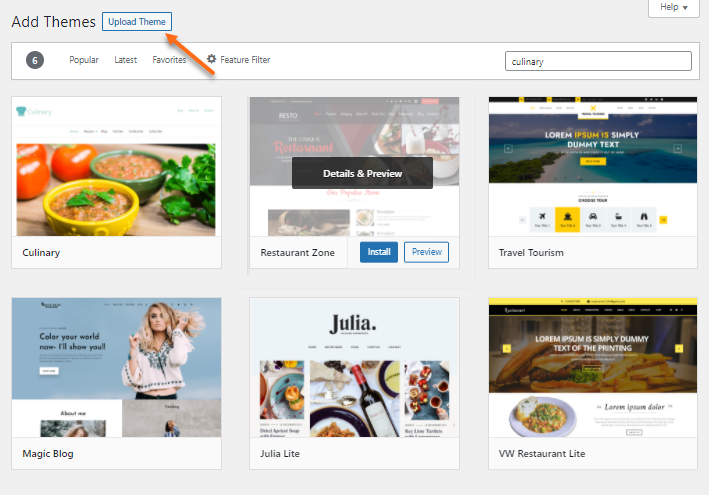
First, open your WordPress dashboard. Look for the Appearance tab on the left. Click on it. Now, find the Themes option. It’s right under Appearance. Click on Themes. You will see many themes here.
To add a new theme, press the Add New button. This button is at the top. Now, search for the theme you like. Use the search bar for this. Once you find it, click on Install. After installation, click Activate. Your new theme is now live.
Choosing A Theme
Picking the right theme is important. A theme changes your site’s look. Hostgator offers many theme choices. Some themes are free, some cost money. Think about your site’s purpose. A business site needs a professional theme. A blog might need a fun theme. Always pick a theme that fits your style. Make sure the theme is easy to use. Check if others like the theme. Read reviews. This helps find a good theme. Themes can be changed later. So, don’t worry too much. But starting with the right one saves time.
Uploading A Theme
First, go to a reliable theme website. Find a theme you like. Click the download button. The theme will download as a ZIP file. Save it on your computer.
Log into your WordPress dashboard. Look for the “Appearance” tab on the left menu. Click on it. Then select “Themes”. Click “Add New” at the top. Next, click “Upload Theme”. Choose your ZIP file from your computer. Click “Install Now”. Wait a few moments. Your theme will upload and install.
Open your FTP client. Enter your Hostgator credentials. Connect to your server. Find the “wp-content” folder. Inside, open the “themes” folder. Upload your theme’s folder here. Make sure you extract it from the ZIP file first. After uploading, log into WordPress. Go to “Appearance” and then “Themes”. Your new theme should be listed.
Activating The Theme
To start, go to your WordPress dashboard. Click on the “Appearance” tab. There, you will see the “Themes” option. Click on it. You will find a list of available themes. Choose your desired theme. Hover over the theme and click “Activate”. Your theme is now active.
Refresh your website. Check if the new theme is working. If you see changes, it means the activation was successful. If not, repeat the steps. Sometimes, themes might not work well. If this happens, try another theme. Remember, you can always switch back. Your old theme is still saved in your dashboard.

Credit: www.youtube.com
Customizing Theme Settings
The WordPress Customizer helps change your theme. It is simple. Find it in the WordPress dashboard. Click on “Appearance” and then “Customize.” Here, you see different options. Change colors, fonts, and layout. Watch changes in real-time. This is fun and easy. Make your site unique!
Widgets add features to your site. Go to “Appearance” and then “Widgets.” Drag and drop widgets where you like. Add a calendar, search bar, or text box. Make your site more useful. Keep it simple and clean. Visitors will love it!
Menus help visitors find pages. Change them easily. Click “Appearance” then “Menus.” Add or remove pages. Change the order of menu items. Create a new menu if needed. Make it clear and helpful. Visitors will find what they need fast!
Testing Theme Installation
Installing a WordPress theme on HostGator is simple. First, log into your WordPress dashboard. Next, navigate to “Appearance,” then “Themes,” and click “Add New. ” Choose a theme and click “Install,” then “Activate. ” Your site now has a fresh look.
Previewing On Desktop
Always check how the theme looks on a desktop. Open your website on a computer. Navigate through different pages. Notice the layout and design. Does it load quickly? Look for any missing images or text. Ensure that buttons work. Colors and fonts should match. This will give a good user experience.
Checking Mobile Responsiveness
Use your phone to view the site. Does it adjust to the screen size? Test all features. Menus should be easy to tap. Text should be readable without zooming. Images should fit the screen. A good theme works well on mobile. A mobile-friendly site is important. Many people use phones to browse.
Troubleshooting Common Issues
Installing a WordPress theme on HostGator can sometimes lead to common issues. Ensure your theme is compatible and updated. Check your internet connection and HostGator settings for smooth installation.
Fixing Installation Errors
Sometimes WordPress themes won’t install. Check your internet connection first. Ensure you have a stable connection. Next, verify your theme file. It should be a .zip file. Large themes might need more time. If the file is too big, try another theme. Go to your HostGator dashboard. Check the PHP limits. Increasing memory can help. If the error remains, contact HostGator support. They can assist further.
Resolving Theme Conflicts
Themes can sometimes clash. Plugins can cause these clashes. Disable all plugins first. Test your theme without them. Activate one plugin at a time. Watch for errors as you do. Some themes need updates. Regular updates fix bugs. Always use the latest theme version. If conflicts persist, choose another theme. HostGator offers many theme options. Find a theme that suits your needs.
Updating Themes
Installing a WordPress theme on Hostgator is simple. Begin by logging into your Hostgator account, then navigate to the WordPress dashboard. Select “Appearance,” click “Themes,” and choose “Add New” to upload your desired theme.
Automatic Updates
Themes can update on their own. This keeps your site safe. Choose automatic updates in your dashboard. Find this in the settings area. Check the theme box for updates. Click “enable auto-updates” to start. Watch your site improve without any work. Simple steps save time.
Manual Updates
Sometimes themes need a manual update. Visit the theme section. Download the latest version. Delete old theme files first. Add new ones from the download. Activate the updated theme. Check your site for changes. This keeps your site fresh and secure. Manual steps take a bit more time.
Credit: www.hostgator.com
Frequently Asked Questions
How To Upload A WordPress Theme To Hostgator?
To upload a WordPress theme to HostGator, first log into your WordPress dashboard. Navigate to ‘Appearance’ and select ‘Themes’. Click ‘Add New’, then ‘Upload Theme’. Choose your theme file and click ‘Install Now’. Once uploaded, activate your theme to make it live on your site.
Can I Install Themes Via Hostgator Cpanel?
Yes, you can install themes via HostGator cPanel. Access your cPanel and navigate to the File Manager. Locate your WordPress installation directory, open ‘wp-content’, then ‘themes’. Upload your theme’s zip file and extract it. Finally, activate the theme from your WordPress dashboard.
What To Do After Installing A Theme?
After installing a theme, customize it to match your brand. Navigate to ‘Appearance’ > ‘Customize’ in the WordPress dashboard. Adjust settings like colors, fonts, and layout. Add essential plugins, configure widgets, and set up menus. Preview changes before saving to ensure your site looks perfect.
Why Is My Theme Not Installing?
If your theme isn’t installing, check the file size and format. Ensure it’s a. zip file and under the upload limit. Verify your WordPress version compatibility. Clear your browser cache and try again. If issues persist, contact HostGator support for assistance with permissions or server settings.
Conclusion
Installing a WordPress theme on HostGator is simple. Follow the steps carefully. You’ll have a great-looking site in no time. First, choose the right theme. Next, upload it to your HostGator account. Activate it to see changes instantly. Customize the theme to match your style.
Use the dashboard for easy adjustments. Regular updates keep your site fresh and secure. With these steps, your WordPress site shines. Enjoy the process. Create a website that stands out. Your online presence begins here. Start today and watch your site thrive.
Happy building!


