
Are you ready to showcase your online presence? Hosting your own website web server is the key to unlocking a world where you have full control over your digital domain.
Imagine the freedom of customizing every detail to fit your unique vision. It might sound complex, but with the right guidance, you can master this essential skill. You’ll discover step-by-step instructions that make setting up your web server straightforward and stress-free.
We’ll break down the technical jargon into simple terms and give you the tools to overcome common challenges. By the end, you’ll not only understand the process but feel confident in your ability to manage your own website hosting. Dive in, and let’s transform your online aspirations into reality!
Choosing The Right Web Hosting
Many people choose shared hosting for their first website. It is the most budget-friendly option. You share a server with others. This can make it slower. But it is easy to set up. Perfect for small sites or beginners.
VPS hosting offers more control than shared hosting. You get a portion of a server. This makes your site faster. It is more expensive than shared. But you get better performance. Good for growing websites.
With dedicated servers, you get a whole server. No sharing with others. This is the best option for big sites. It offers top performance. But it costs more. Only for those who need full control.
Cloud hosting uses many servers to host a site. It is flexible and can handle lots of traffic. This is good for sites that grow fast. Costs depend on what you use. It is a modern solution for many needs.
Registering A Domain Name
Selecting a Domain Name is the first step. Choose a name that is easy to remember. It should reflect your website’s purpose. Avoid using difficult words or numbers. Shorter names are better. Make sure it is unique and not taken.
The Domain Registration Process involves finding a registrar. This is a company that sells domain names. Use their search tool to check if your name is available. Once found, register it by paying a fee. Usually, you register for a year or more.
Consider Domain Privacy Protection to keep your details safe. Without it, your name and address are public. This can lead to unwanted emails. Many registrars offer this service for a small fee.
Setting Up A Web Server
To start, choose a reliable web server software. Options include Apache, Nginx, and IIS. Each has its own features and benefits. Download the software from the official website. Follow the installation instructions carefully. It’s important to ensure everything is set up correctly.
After installation, adjust the server settings to suit your needs. You can change the port number and root directory. Make sure the server can handle the expected traffic. Ensure the server is set to start automatically. Test your settings to confirm everything works.
Keep your web server safe with strong security measures. Use firewalls to block unwanted access. Keep your software updated to fix security holes. Use secure passwords and change them often. Regularly check for vulnerabilities. Monitor server activity for any suspicious behavior.
Credit: www.godaddy.com
Uploading Website Files
FTP clients help in moving files from your computer to the server. They are like bridges between your PC and the web. Popular options include FileZilla and Cyberduck. Begin by entering your server details. Then, drag and drop your files. It’s simple and fast. Always check your connection. Good connection means smooth transfers.
File management tools organize and store your files. Tools like cPanel or DirectAdmin are popular. They make managing files easy. You can upload, delete, or edit files. Use these tools for quick changes. They save time and effort. Always keep your files tidy. This helps in finding them easily.
File permissions decide who can view or change files. Set them carefully. Use numbers like 755 or 644 for permissions. These numbers mean different access levels. 755 is for folders. 644 is for files. Setting them wrong can be risky. Always double-check your settings. This ensures your site stays safe.
Configuring Dns Settings
DNS records help direct users to your website. They act like a map. These records include A, CNAME, MX, and TXT. A records point your domain to an IP address. CNAME is used for subdomains like www. MX records manage email settings. TXT records add extra information. Each record has a specific function. Correct configuration ensures smooth access.
Link your domain to your server. This uses the A record. Input your server’s IP address. This lets the domain find the server. Access your domain registrar’s dashboard. Navigate to DNS settings. Add the server IP to the A record. Save changes to apply them.
Check if DNS settings work correctly. Use online tools to test them. Tools like DNS Checker help verify. Look for any errors or problems. Correct any issues found. Ensure everything points correctly. Testing helps prevent access problems. It’s crucial for user experience.
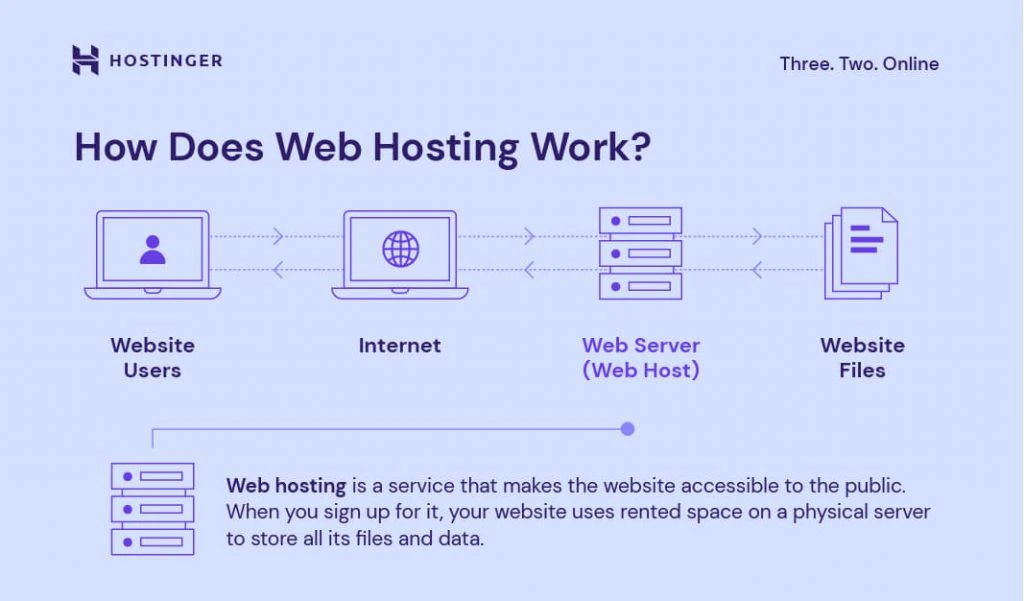
Credit: www.hostinger.com
Ensuring Website Security
SSL certificates keep data safe. They protect user information. Websites with SSL show a lock icon. This icon means the site is secure. SSL makes connections private. It stops hackers from stealing data.
Firewalls block unwanted traffic. They keep out bad visitors. This protects your website from attacks. Firewalls can be hardware or software. They check all incoming and outgoing data. Setting up a firewall is important for security.
Security audits find weak spots. They check for vulnerabilities. Regular audits keep your site safe. They help fix problems fast. Experts look at codes and systems. This ensures your website stays protected.
Monitoring Website Performance
Performance tools help keep your website fast. They check how your site works. Google PageSpeed Insights is a popular tool. It gives your site a score. A higher score means a faster website. Fast websites make people happy. Slow websites can make them leave. Using tools often helps. You can fix issues quickly.
Traffic data shows how many people visit. It tells where they come from. Analyzing this data helps. You can see what pages are popular. This data helps improve your site. Use Google Analytics for traffic info. It is free and easy to use.
Load times are important for users. Faster pages keep users happy. Optimizing load times is easy. Compress images to make them smaller. Use a content delivery network (CDN). This helps load pages quickly. Keep your site simple. Less is often more.
Backup And Recovery Solutions
Automated Backup Systems are easy to use. They save copies of your files. This happens at regular times. You set the schedule. It can be daily or weekly. It helps keep your data safe. Even if you forget, your files are saved.
Manual Backup Methods need you to do the work. You choose what to save. You pick when to save it. This gives you control. You decide what is important. It takes more time. But it keeps your data safe.
Data Recovery Options help you get files back. Sometimes files get lost. These tools find them. You can recover important files. This is helpful when things go wrong. It brings back what you need.
Managing Web Server Resources
Servers need to handle more visitors as your website grows. It’s important to increase RAM and CPU when needed. This helps your website run smoothly. Cloud services can make scaling easy. They let you add more resources quickly. Load balancers can also help. They spread traffic across multiple servers. This keeps everything fast and smooth.
Keeping your server online is very important. Downtime can hurt your website. Use monitoring tools to watch your server. These tools alert you if something goes wrong. Regular checks can help prevent issues. Always know if your server is up or down. Quick action can save your website.
Efficient use of resources is key. Caching reduces load time by storing data. Compression makes files smaller, speeding up load times. Content Delivery Networks (CDNs) deliver content faster by using nearby servers. Optimize your images and code. This saves space and improves speed.
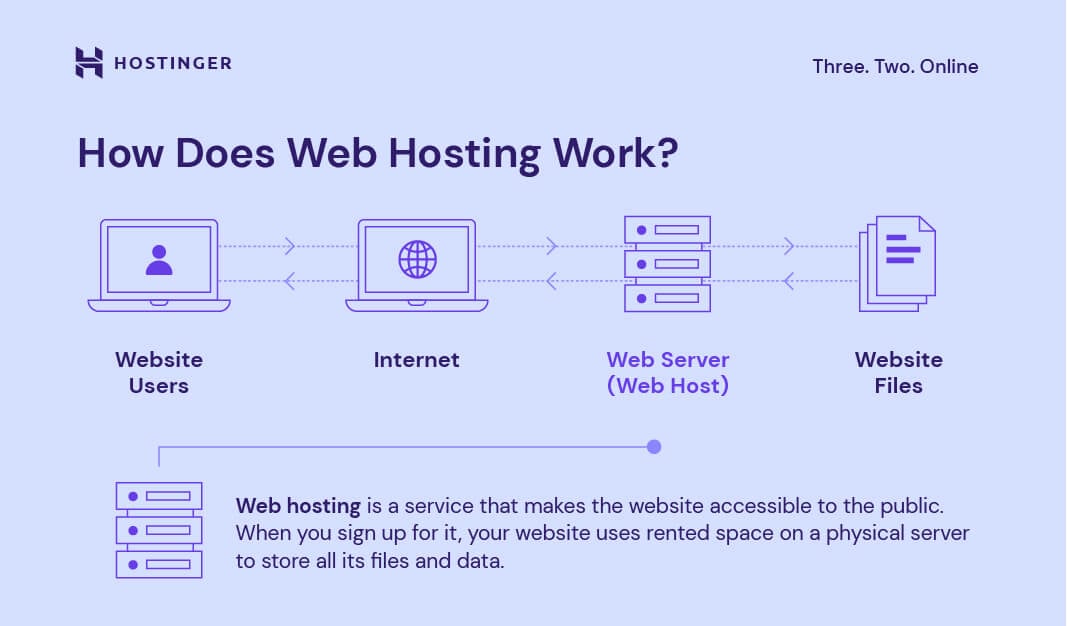
Credit: www.hostinger.com
Frequently Asked Questions
How Do I Host My Own Website Server?
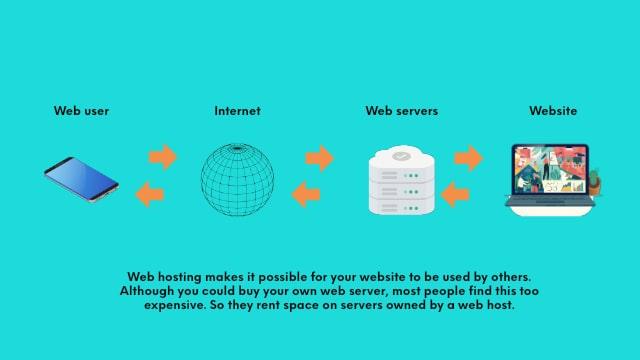
To host your own website server, choose hardware, install server software like Apache, and configure DNS settings. Ensure security with firewalls and regular updates. Monitor server performance and back up data regularly. It’s essential to have a stable internet connection for smooth operation.
Can I Host My Website By Myself?
Yes, you can host your website yourself. You need a reliable computer, stable internet connection, and server software. Ensure your server is secure and regularly maintained. This option requires technical knowledge and time commitment. For ease, consider using a web hosting provider.
How Much Does It Cost To Host A Website Server?
Hosting a website server costs between $2 to $500+ per month. Prices vary based on hosting type and features. Shared hosting is cheaper, while dedicated servers cost more. Consider your needs and budget to choose the right plan.
Do I Need A Server To Host My Website?
Yes, you need a server to host your website. You can choose between shared, VPS, or dedicated hosting. Alternatively, cloud hosting is also an option. Hosting providers offer various plans to suit different needs and budgets, ensuring your site is accessible online.
Conclusion
Choosing the right web server is crucial for your website. It affects speed and security. Consider your needs and budget carefully. Research different options. Make sure to evaluate hosting features and support. A good server ensures your site runs smoothly.
Don’t rush the decision. Take your time to compare. Read reviews and ask for recommendations. Remember, a reliable server enhances user experience. It builds trust with your audience. With careful planning, your website will thrive. Keep learning and stay updated on hosting trends.
Your website’s success starts with the right server choice.


