
Are you looking to enhance your web application’s real-time communication capabilities? Hosting WebSockets on AWS might be your perfect solution.
You’re about to discover how AWS can empower you to set up WebSockets with ease and efficiency. Imagine your application delivering instant updates, seamless interactions, and a user experience that’s second to none. Whether you’re a developer aiming for smoother client-server communication or a business owner seeking to elevate your digital presence, this guide is tailored for you.
Dive into the world of AWS WebSockets and unlock the potential to transform your application into a dynamic powerhouse. Keep reading to unveil the secrets of setting up WebSockets on AWS and elevate your tech game!
Setting Up Aws Account
Start by visiting the AWS website. Click on the “Create an AWS Account” button. Fill out the form with your personal details. Provide your email and choose a strong password. After filling the form, submit it. Then, check your email for a verification link. Click the link to verify your account. Now, your AWS account is ready to use.
Go to the AWS Management Console. Click on the IAM service. Choose “Roles” from the menu. Click on “Create role”. Select the service that will use this role. Follow the prompts to add permissions. Give your role a name. Review your choices, and click “Create role”. Your IAM role is now configured.
Choosing The Right Aws Services
AWS API Gateway helps manage your web socket connections. It acts as a bridge between clients and services. You can use it to create, manage, and secure APIs. This makes it a good choice for handling web socket traffic. API Gateway scales automatically to handle many users. It also supports authentication and authorization. This means your data stays safe.
With AWS Lambda, you can run code without managing servers. It works well with web sockets. Lambda executes your code in response to events. This means you only pay for what you use. It helps keep costs low. Lambda supports many programming languages. This gives you flexibility in how you write your code.
Amazon EC2 offers virtual servers to host web sockets. You have control over the server’s configuration. This means you can customize it to fit your needs. EC2 is good for large applications. It allows you to choose instance types that match your workload. You can scale up or down as needed. This flexibility helps manage costs and performance.
Configuring Websockets
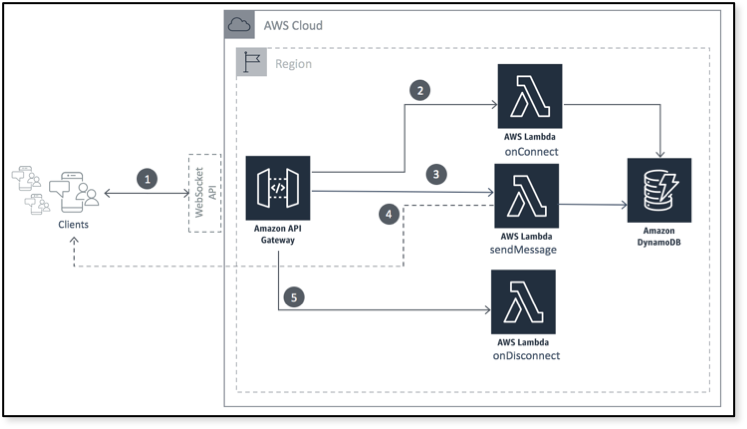
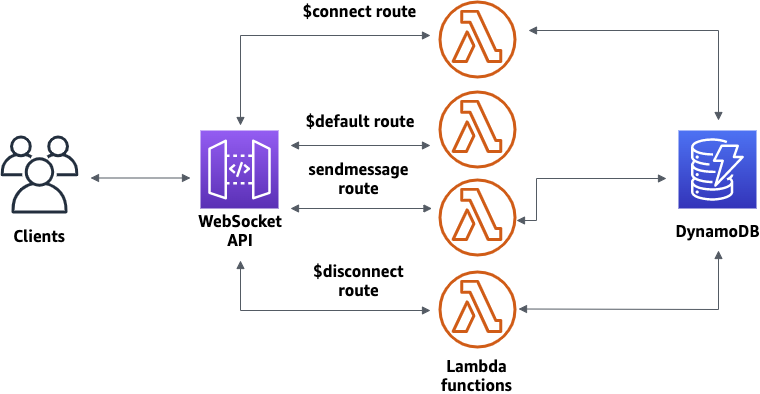
Begin by accessing the API Gateway on AWS. Choose Create API and select WebSocket. Provide a name for your API. Use a simple name. It’s easier to remember. Choose a Route Selection Expression. It helps direct messages. Click Create API. Your WebSocket API is now ready.
Routes help in directing messages. They act like paths. Each message needs a route. Click on Routes in the API Gateway. Use New Route to add a route. Give it a name. Select an Integration for the route. Integrations connect to back-end services. Save your changes. Now, your WebSocket can handle messages.
Credit: medium.com
Deploying Your Websocket Application
AWS Lambda is a serverless option. It helps in running code without managing servers. You pay only for the compute time used. No idle time costs. To deploy on Lambda, you first create a function. Then, upload your code in a ZIP file. Set the right execution role. This controls access to other AWS resources. Next, configure the function’s triggers. This tells Lambda when to run your code. Finally, test your deployment. Make sure everything works smoothly.
Amazon EC2 gives you full control over the server. You choose an instance type. This decides the hardware performance. After selecting, launch the instance. Install the needed software. This includes a web server and your application code. Don’t forget to configure security groups. These act like firewalls. They protect your EC2 instance from threats. Lastly, monitor the server’s health. This ensures your WebSocket application runs well.
Monitoring And Scaling
Hosting web sockets on AWS involves monitoring and scaling for optimal performance. AWS tools like CloudWatch help track performance metrics. Auto Scaling ensures your web sockets handle traffic changes efficiently. This approach maintains a smooth connection experience for users.
Using Cloudwatch For Monitoring
AWS CloudWatch helps you keep an eye on your web socket. It shows you real-time data. You can see how your server is working. If problems occur, alerts notify you. These alerts help you act fast. CloudWatch collects data from your web socket. It shows CPU use, memory, and network activity. You can set goals for your server. If your server goes above or below these, CloudWatch sends a signal. This helps you keep the server running well. Monitoring keeps your web socket healthy and strong.
Scaling With Elastic Load Balancing
Elastic Load Balancing is like a traffic cop for your web socket. It spreads user requests across servers. This makes sure no server gets too busy. It helps your server handle lots of users at once. If many users connect, load balancing adds more servers. It does this automatically. Servers are added when needed. Servers are removed when not needed. This saves resources and costs. Elastic Load Balancing keeps everything smooth. It ensures users have a good experience.
Credit: aws.amazon.com
Security Best Practices
Explore hosting WebSockets on AWS with these security best practices. Secure connections using SSL/TLS encryption to protect data during transmission. Implement IAM roles for user authentication and access control to ensure only authorized users can connect.
Securing Websocket Connections
WebSocket connections need to be secure. Always use HTTPS for your connections. This ensures data is safe. A secure connection stops hackers. Keep your data private.
Implementing Authentication
Authentication is important. It checks who is using the service. Use strong passwords. Change them often. Use tokens for extra security. Tokens are like keys. They open the door to your service. Never share your tokens. Keep them secret.
Cost Management
AWS offers different pricing models. On-demand pricing is flexible. You pay as you go. Reserved pricing offers savings for long-term use. Spot instances can be cheaper but less stable. It’s important to compare these options. Choose the one that fits your needs best. Monitoring your usage helps too. Keep an eye on your spending.
Use auto-scaling to match demand. This saves resources. Turn off unused instances to cut costs. Use monitoring tools to track usage. Optimize your code to run efficiently. This reduces CPU and memory use. Pick the right instance type for your workload. Consider using serverless options for small tasks. They cost less and scale well. Always review your setup.
Credit: docs.aws.amazon.com
Troubleshooting Common Issues
Hosting Web Sockets on AWS can have common issues. Troubleshooting involves checking network configurations and security settings. Ensure your AWS services are correctly integrated for seamless connections.
Handling Connection Problems
Web sockets need strong connections. Sometimes, they face issues. Network congestion can slow things down. Check your server’s settings. Ensure they allow web sockets. Firewall rules may block connections. Adjust them to allow access. Browser compatibility can cause problems. Use updated browsers for best results. Client-side scripts must be error-free. Check them for bugs. Server logs help find issues. Review them carefully. Restart the server if needed. This can fix temporary glitches.
Debugging Api Gateway Errors
API Gateway errors can be tricky. Incorrect configurations often cause these errors. Check your settings. Make sure they match your needs. Missing permissions can block access. Verify all permissions. Error messages provide clues. Read them to understand issues. Service limits might be reached. Increase limits if necessary. Timeout settings can affect connections. Adjust them for longer tasks. CloudWatch logs help trace errors. Use them to find problem areas.
Frequently Asked Questions
Can I Use Websockets In Aws?
Yes, you can use WebSockets in AWS. AWS offers WebSocket support through API Gateway, enabling real-time communication for your applications. This service facilitates bidirectional data exchange, enhancing interactive user experiences. It integrates smoothly with other AWS services, ensuring scalability and security.
How To Deploy A Websocket Server On Aws?
Deploy a WebSocket server on AWS using EC2. Set up a server, configure security groups, and install WebSocket software. Ensure proper firewall settings, then test connections. Consider using AWS Elastic Load Balancing for high availability. Optimize settings for performance and security.
Follow AWS guidelines for best practices.
How To Create An Aws Websocket?
To create an AWS WebSocket, use Amazon API Gateway. Set up a WebSocket API, define routes, and integrate with AWS Lambda. Deploy the API to a stage, and test the connection with a WebSocket client.
Does The Aws Load Balancer Support Websocket?
Yes, AWS Elastic Load Balancer supports WebSocket. It works with Application Load Balancer for seamless WebSocket connections. This ensures reliable, scalable communication between clients and servers using WebSocket protocols. Choose Application Load Balancer for WebSocket support in AWS environments.
Conclusion
Hosting WebSockets on AWS simplifies real-time communication. With clear steps, it becomes manageable. AWS tools ensure reliability and scalability. No more server-side worries. Security features protect your data. Cost-effective solutions suit various budgets. Start small, scale as needed. AWS documentation provides helpful guidance.
Real-time apps enhance user experience. Make your project dynamic and responsive. Understanding basics is key. Efficient management leads to success. Take advantage of AWS resources. Improve app performance with WebSockets. You have the tools to create interactive applications. Dive in.
Explore possibilities on AWS for better connectivity.


