
Are you ready to take your web application live and share it with the world? Hosting your web app in IIS7 might seem like a daunting task, but with the right guidance, you can do it seamlessly.
Imagine the satisfaction of seeing your application up and running, accessible to users everywhere. You don’t need to be a tech wizard to achieve this. This step-by-step guide will walk you through the entire process in a straightforward manner. Whether you’re a beginner or just need a refresher, you’ll find the instructions clear and actionable.
Let’s dive in and transform your web application from a local project to a globally accessible service. Stick with us, and soon you’ll master the art of hosting on IIS7!
Prerequisites
Make sure your computer meets the basic needs for hosting. A Windows Server or Windows 7 operating system is essential. The system should have a minimum of 1 GB RAM and 10 GB free disk space. A stable internet connection is also necessary to ensure smooth operation. Check these requirements to avoid any issues.
Admin access is required to install and configure IIS7. Administrator rights help in managing server settings effectively. Without proper permissions, hosting a web application will be challenging. Always ensure you have the correct access before starting the process.
Install IIS7 on your system. This software is crucial for web hosting. You will also need Microsoft .NET Framework if your application requires it. Ensure all tools are updated to their latest versions. Proper tools make hosting a web application easier and more efficient.
Credit: endjin.com
Installing Iis 7
Open the Server Manager on your computer. This is where you can manage server features. Look for the Roles section. Click on it to see all available roles.
Find and click Add Roles. A wizard will open to guide you. Choose Web Server (IIS) from the list. Follow the steps to install it. Make sure to confirm your choices.
After adding the role, configure Role Services. Select services needed for your web application. Common choices include HTTP Redirection and ASP.NET. Finish by clicking Install.
Preparing The Web Application
First, make a deployment package. This package holds your web app files. Use Visual Studio for this task. Choose “Build” from the menu. Then, select “Package Web.” This will create a .zip file. This file is your deployment package. It keeps everything organized.
Ensure your web app works with IIS7. Check the framework version. It should match IIS7 requirements. Look at your app’s settings. Make sure they align with IIS7. This avoids errors later. Use the IIS compatibility tool. It helps find any issues.
Now, adjust the application settings. Open the web.config file. This file controls your app’s behavior. Set the correct database connection strings. Check security settings too. Make sure all paths are correct. Test these settings locally. This ensures everything works fine.
Creating A New Website In Iis
First, open Control Panel. Find Administrative Tools and click it. Look for IIS Manager and double-click to open. This is where you manage your sites.
In IIS Manager, right-click on Sites. Choose Add Website. Fill in the Site Name. Choose a folder for your files. Click OK to save.
Go to the Bindings section. Click Add. Enter the Host Name you want. Click OK to set it. Now your site has a name.
Deploying The Web Application
First, move the web application files to the server. Use FTP or Windows Explorer. Ensure all files are copied correctly. Double-check the paths and filenames. Missing files can cause errors.
Set up the application pool in IIS7. Choose the right .NET version. Assign the pool to your application. This helps manage resources. Keeps your application running smoothly. Adjust settings as needed.
Adjust file permissions on the server. Right-click the folder, then choose properties. Go to security tab. Add necessary users. Give them read and write permissions. Correct permissions prevent access issues.
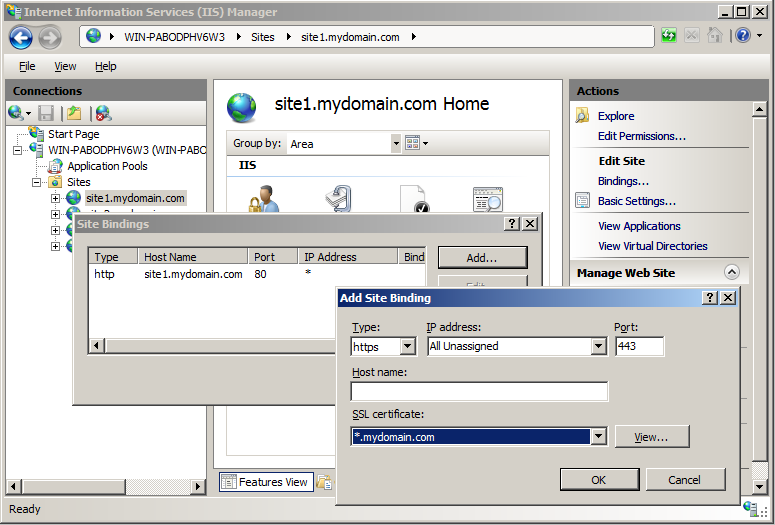
Credit: www.sslshopper.com
Configuring Security Settings
Choose the right authentication method for your web app. IIS7 offers several options. Basic authentication sends passwords as plain text. Windows authentication uses network credentials. Anonymous authentication allows anyone access. Always make sure your choice fits your needs.
SSL keeps data safe between server and client. Get a certificate from a trusted provider. Install it on your server. Make sure to configure IIS7 to use this certificate. This step is crucial for secure connections. Always check for SSL errors.
Firewalls protect your server. Set rules to allow only needed traffic. Block unwanted access by specifying ports. Regularly update these rules. Always ensure your server is safe. Protecting your application is important.
Testing The Web Application
Learn to host a web application in IIS7 with a simple step-by-step guide. This process involves configuring IIS7 settings, deploying your application, and ensuring it runs smoothly on your server. Follow these steps to make your web application accessible to users.
Accessing The Website
First, open your web browser. Type the website URL in the address bar. Press enter to load the site. The homepage should appear. Check if all images and text load properly. If the page doesn’t load, check the internet connection. Also, verify the server is running. This ensures the application is accessible.
Troubleshooting Common Errors
Sometimes, errors occur. A common error is “404 Not Found.” This means the page does not exist. Check the URL for typos. Another error is “500 Internal Server Error.” This indicates a server problem. Review the server logs for details. Also, ensure all files are uploaded correctly. Fix any broken links or missing files. This can solve the problem.
Verifying Application Functionality
Test all buttons and links on the site. Make sure they work. Try submitting forms. Confirm data is saved correctly. Check if any features are missing. Also, test the site on different browsers. Ensure it works everywhere. This checks the application is working right.

Credit: stackoverflow.com
Maintaining The Hosted Application
Setting up a web application in IIS7 involves several steps. Configure your server, install IIS7, and create a new site. After that, deploy your application files and adjust settings for security and performance. Regular maintenance ensures optimal functionality and security.
Monitoring Performance
Check the app’s performance regularly. Look for slow load times. Monitor server health. Use tools like Performance Monitor. Track CPU and memory usage. Ensure the app runs smoothly.
Applying Updates
Keep the app updated. Install the latest patches. Updates fix bugs and add features. Always test updates first. Ensure compatibility with current systems. Schedule updates during low traffic times.
Backing Up Data
Data is important. Regular backups protect your information. Use automated backup tools. Store backups in multiple locations. Keep a schedule for backups. Ensure backups are easy to restore.
Frequently Asked Questions
How To Host A Website In Iis Step By Step?
To host a website in IIS, install IIS via Windows Features. Open IIS Manager, add a new site, set site name and physical path, and bind the site to a hostname or IP. Configure application pool settings. Start the site, and ensure your firewall allows HTTP/HTTPS traffic.
How To Deploy Web Application In Iis Step By Step?
Deploy a web app in IIS: Install IIS via Control Panel. Open IIS Manager and create a new site. Set physical path to your app folder. Assign a unique port number. Bind the site to a domain. Test by accessing the site through a browser.
How To Host Web Api In Iis Step By Step?
To host a web API in IIS, first install IIS and enable necessary features. Deploy your API project files to a folder. Open IIS Manager, create a new website, and set its physical path to your API folder. Configure the bindings and start the website to access your API.
How To Host Asp.net Website In Iis 7 Step By Step?
Open IIS Manager, create a new site, and set the physical path to your ASP. NET folder. Configure bindings and set application pool to. NET version. Deploy your site files, then start the site. Ensure firewall settings allow traffic through port 80.
Test your site by accessing it through a browser.
Conclusion
Hosting your web application in IIS7 is straightforward. Following each step ensures success. First, configure your server settings. Next, deploy your application files. Then, set up the application pool. Finally, test the application to confirm it’s running. Remember, each step is crucial for smooth hosting.
This guide simplifies the process for you. Troubleshooting tips help if issues arise. Hosting your application successfully enhances its accessibility. Users can now access your application easily. This step-by-step approach makes hosting less daunting. Enjoy the benefits of hosting your web application in IIS7!


