
Are you ready to take your Web API to the next level? Hosting your Web API in Microsoft Azure might seem daunting, but it’s simpler than you think.
Azure offers powerful features and a reliable platform that can transform how you manage your APIs. Imagine having the flexibility to scale effortlessly and the security to protect your data—all while maintaining top-notch performance. By the end of this article, you will have the insights and confidence to host your Web API in Azure like a pro.
Dive in, and let’s unlock the potential of your API together!
Azure Account Setup
To start, visit the Azure website. Click on the Sign Up button. You will need an email address. Also, a phone number is required. Follow the steps to create your account.
After signing up, check your email. Look for a confirmation email. Click the link to verify your account. Once verified, you can log in. Now, your Azure account is ready.
Azure offers different subscription plans. Some plans are free. Others require payment. Choose the plan that fits your needs. For beginners, a free plan is a good start. Paid plans offer more features. They also provide more resources.
You can change your plan later. Go to your account settings to update it. Always check your usage. This helps avoid extra charges.

Credit: www.youtube.com
Web Api Preparation
Building your Web API requires careful planning. Start by selecting the right programming language. Popular choices include C# and JavaScript. Test your API using tools like Postman to ensure it works. Tests should cover all functions. Debug any errors you find. This will make your API strong and reliable.
Create a deployment package once testing is complete. This package should have all necessary files. Include the API code, libraries, and configuration files. Compress these into a single ZIP file. This makes uploading to Azure easier. Ensure the package is complete and error-free. A good package saves time during deployment.
Azure App Service
Picking the right App Service Plan is key. It affects cost and performance. Start by understanding your web API needs. Consider how much traffic you expect. Decide if you need a basic or premium plan. Basic plans are cheaper. Premium offers more features. Check your budget and decide wisely. You can change plans later if needed.
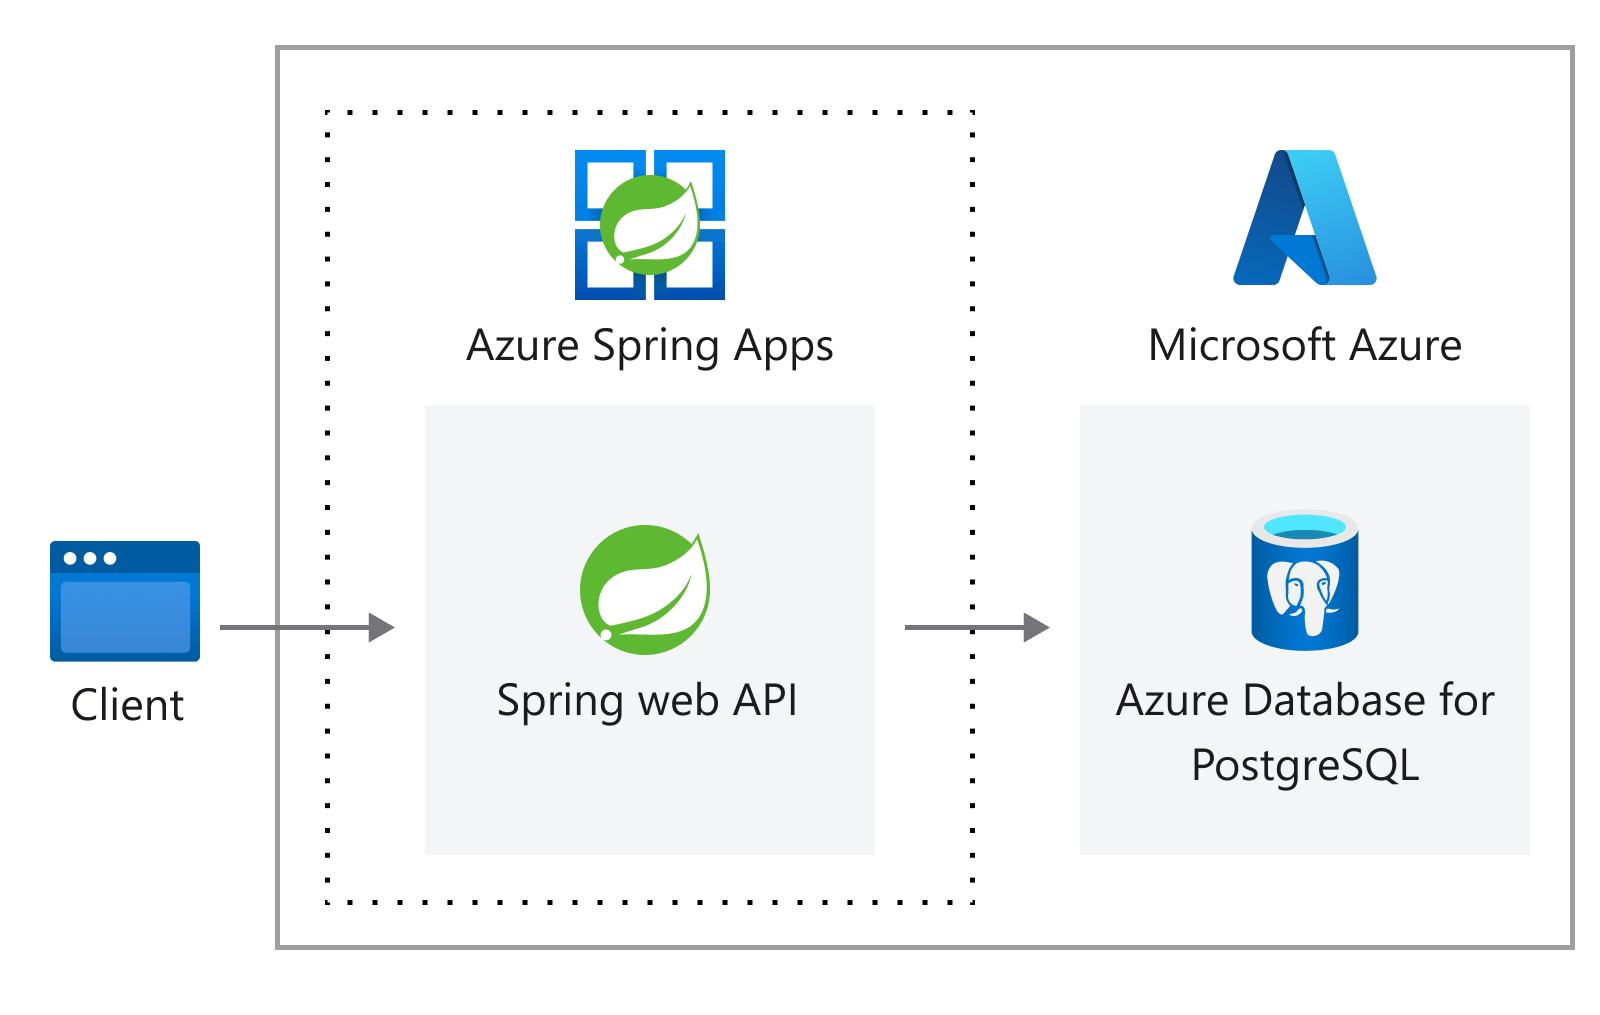
Setting up your App Service requires some steps. First, create a new app in the Azure portal. Choose the correct settings for your app. Set your region to be close to your users. This makes your app faster. Next, deploy your web API to the app service. Test it to ensure it works well. Make sure you have the right configurations. This includes security settings and scaling options. Proper setup ensures your API runs smoothly.
Credit: learn.microsoft.com
Deployment Process
First, open Visual Studio and select your project. Click on Build and then Publish. Choose Azure as your target. Follow the steps in the Wizard to publish. Make sure your Azure account is active. Check the App Service you created earlier. You can see your API live now.
Go to your Azure portal. Open your App Service. Find Deployment Center in the menu. Choose GitHub or Azure DevOps for source control. Follow the steps to set up continuous deployment. Every change in your code will update the API. This keeps your app fresh and working well.
Monitoring And Scaling
Hosting a Web API in Microsoft Azure ensures reliable performance through effective monitoring and scaling. Azure’s tools allow you to track API usage and adjust resources as needed. This scalability helps manage traffic spikes and maintain optimal functionality.
Performance Monitoring
Azure Monitor helps watch over your API’s health. It tracks metrics like response time and error rates. You can set alerts for unusual activity. This ensures quick action on issues. Keep an eye on CPU usage and memory. These metrics show if your API runs smoothly. Azure Monitor’s dashboard presents data clearly. It makes understanding easy for everyone. Use logs to find bugs or problems in code. They provide detailed information. This helps in fixing issues faster. Monitoring keeps your API reliable.
Auto-scaling Configuration
Azure offers auto-scaling to manage traffic. It adjusts resources based on demand. More users need more resources. Auto-scaling adds or removes servers as needed. This saves money and improves performance. Set rules for scaling based on metrics. High CPU usage triggers scaling automatically. Azure manages scaling seamlessly. It ensures your API is always available. This feature handles peak loads efficiently. Auto-scaling keeps your API responsive to user needs.
Security Measures
Deploying a Web API on Microsoft Azure demands robust security measures. Ensure data protection by implementing encryption, firewalls, and secure access controls. Regular monitoring and updates are vital to safeguard against vulnerabilities.
Api Authentication Methods
Protecting your API is very important. Authentication ensures that only the right people can access the API. One common method is API keys. Users get a unique key to use the API. This method is simple but effective. Another method is OAuth. It is more secure and widely used. OAuth allows users to grant access without sharing passwords. JWT (JSON Web Tokens) is also popular. It provides a token that users send with their requests. This helps verify their identity.
Data Encryption Strategies
Data encryption keeps information safe. It changes data into a code. Only authorized users can read it. SSL/TLS is a common encryption method. It secures data between the user and the server. HTTPS uses SSL/TLS to protect web traffic. This ensures data stays private. Another method is AES (Advanced Encryption Standard). It is very secure and used worldwide. RSA encryption is also popular for protecting data. It uses a pair of keys for encryption and decryption.
Cost Management
Deploying a Web API in Microsoft Azure can optimize cost management. Azure offers scalable solutions, allowing you to pay only for what you use. This ensures efficient resource allocation, reducing unnecessary expenses while maintaining high performance.
Estimating Costs
Estimating the cost of hosting a Web API on Microsoft Azure is essential. Azure offers various pricing tiers. Choose the right tier for your needs. Basic tiers are cheaper but have fewer features. Premium tiers cost more but offer better performance. Understand your needs before making a choice. Use Azure’s pricing calculator to get an idea of costs. This tool helps you avoid surprises in billing.
Optimizing Spending
Keeping costs low is important. Monitor your usage regularly. Use Azure’s budgeting tools to set limits. These tools alert you when you near your budget. Optimize resource allocation to avoid waste. Turn off unused resources. Consider using auto-scaling features. They adjust resources based on demand. This helps save money when usage is low.
Credit: learn.microsoft.com
Troubleshooting
Deploying your Web API to Microsoft Azure can sometimes present challenges. Focus on checking your configurations and permissions. Ensure that all necessary services are running properly.
Common Deployment Issues
Deployment can be tricky. It often leads to common issues. Many face errors like missing files or incorrect configurations. Sometimes, you might see authentication problems. These can block access. Another common issue is resource allocation. Too few resources can slow down the service. It’s important to check these areas. Ensure configurations are correct. Verify all files are present. Use Azure’s monitoring tools to help identify issues.
Debugging Techniques
Debugging helps fix errors. First, check the error logs. They show what went wrong. Use Azure’s diagnostic tools. They offer helpful insights. Try using breakpoints in your code. This helps identify specific problems. Test small parts of your web API. This finds errors faster. Review the network settings. Sometimes they cause issues. Debugging is about being patient. Step by step, problems get solved.
Frequently Asked Questions
How Do I Host My Web Api?
Host your web API on platforms like AWS, Azure, or Google Cloud. Choose suitable infrastructure based on your needs. Set up a server with necessary configurations and deploy your API code. Ensure security and scalability to handle traffic efficiently.
How To Register Web Api In Azure?
Register your web API in Azure by creating a new App Service. Use Azure Portal to configure settings. Deploy your API using Git, FTP, or Visual Studio. Monitor performance and scale resources as needed through the Azure Dashboard. Ensure security with Azure Active Directory integration.
How To Set Up An Api In Azure?
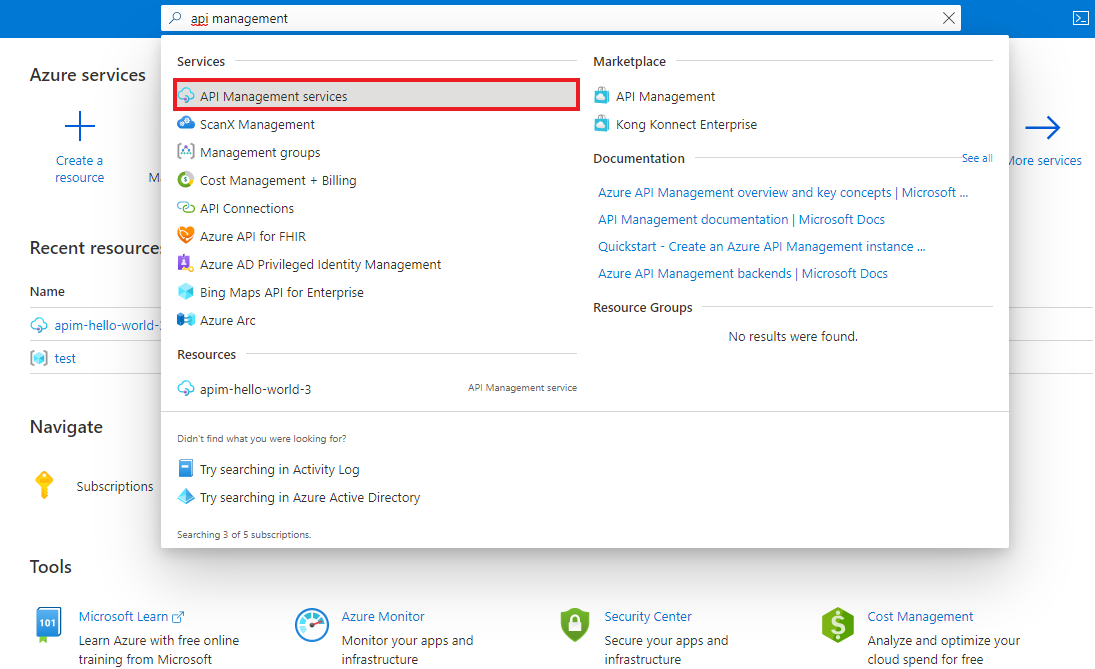
To set up an API in Azure, first create an Azure account. Navigate to Azure API Management. Click “Create API” and choose the API type. Configure the settings, then deploy your API. Test the API using Azure’s built-in tools.
How To Deploy An Api Project In Azure?
Deploy an API on Azure by creating a Resource Group. Set up an App Service Plan. Use Azure Portal to configure deployment settings. Deploy your API using Git, FTP, or Azure DevOps. Monitor performance and adjust settings for scalability. Ensure security with Azure’s authentication features.
Conclusion
Hosting a Web API in Microsoft Azure is straightforward. Azure offers flexibility and scalability. You can deploy quickly with minimal setup. It supports multiple programming languages. Security features keep your data safe. Azure’s user-friendly interface simplifies management. Cost-effective plans fit various budgets.
Developers gain access to powerful tools. Azure ensures high availability and performance. You can expand globally without hassle. Start hosting your Web API today. Benefit from Azure’s robust infrastructure. Enhance your digital presence efficiently. Azure makes web hosting easier. Suitable for businesses of all sizes.
Explore Azure’s potential for your projects.


