
Are you ready to take control of your own digital space? Hosting a web server on Windows might seem like a daunting task, but it doesn’t have to be.
Whether you’re a small business owner looking to establish an online presence or a tech enthusiast eager to dive deeper into web technologies, setting up your own server can be both empowering and rewarding. Imagine the possibilities: faster load times, complete control over your data, and the ability to customize your server to fit your exact needs.
In this guide, we’ll walk you through the process step-by-step, ensuring you have the confidence to get your server up and running smoothly. Get ready to unlock a new level of digital independence and freedom.
System Requirements
A good computer is important for hosting a server. Fast processors help manage tasks quickly. 4GB RAM or more ensures smooth operation. Large hard drives store lots of data. Computers need good cooling systems. Keep them in a cool room. Network cards help connect to the internet. Choose a reliable one. Backup power supplies keep servers running during outages.
Software is crucial for servers. Windows OS is needed. It must be updated regularly. Web server software like Apache or IIS is necessary. They help manage web pages. Security software protects from hackers. Firewalls are important too. Database software like SQL is used for data storage. Install remote access tools for easy management. Monitoring tools help track server health.

Credit: www.youtube.com
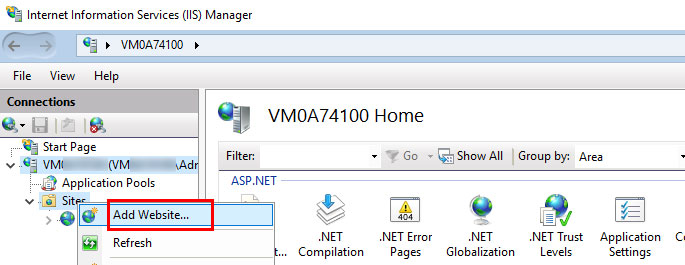
Installation Of Iis
Open the Control Panel on your Windows computer. Find and click on “Programs”. Then, select “Turn Windows features on or off”. A new window will appear. You will see a list of features.
Find Internet Information Services in the list. Check the box next to it. This will enable IIS. Click “OK” to apply changes. Your computer will install the necessary files. It may take a few minutes.
Configuring The Web Server
First, open the IIS Manager. Find the Default Website in the list. Right-click and select Edit Bindings. Set the port number to 80. This makes the site accessible. Click OK to save changes.
Security is very important. Go to Features View under the Default Website. Click on Authentication. Enable Anonymous Authentication for easy access. Disable others if not needed. Then, click on Authorization Rules. Allow all users for testing. This keeps your site safe.
MIME types help the server understand file types. Click on MIME Types in Features View. Add new types if needed. For example, add .json for JSON files. Set the correct type for each file. Save the changes. This ensures files are handled correctly.
Setting Up A Static Website
Start by opening a text editor. You can use Notepad or Visual Studio Code. Type your HTML code. Make sure it is correct and simple. Save the file with a .html extension. For example, use index.html for the main page. This file will show your website’s content. Check the code for errors. Fix any mistakes you find. Good HTML is important for a good website.
You need to upload your HTML files to the web server. Use FTP software like FileZilla. It helps transfer files easily. Connect to the server using the server’s IP address. Enter your username and password. Drag and drop your files into the server folder. Make sure all files are uploaded. Check your website in a browser. It should display correctly. If not, check the uploaded files for errors.
Hosting Dynamic Content
Set up a web server on Windows by installing software like Apache or IIS. Configure settings to support dynamic content. Ensure security measures are in place to protect data and user privacy.
Installing Scripting Languages
To host dynamic content, install scripting languages like PHP or Python. PHP is popular for web development. Python is versatile and easy to learn. Choose the one that fits your needs. Download from the official website. Follow the setup instructions. Ensure the server recognizes the script files. Test by running a simple script. Verify if the server processes the script correctly.
Configuring Database Connections
Databases store dynamic content. MySQL and PostgreSQL are common choices. Install the database software. Set up a new database. Configure user permissions. Connect the scripting language to the database. Use connection strings or libraries. Ensure proper authentication. Test the connection with sample data. Check if data displays correctly on your site.
Credit: www.ionos.com
Managing Domains And Dns
First, choose a unique domain name. It helps people find your website. Domain names are like your site’s address. Use a domain registrar to get one. Some popular ones are GoDaddy and Namecheap. They let you search and buy domain names easily. Make sure the name you pick is easy to remember. Short names are better. Avoid using special characters.
DNS links your domain to your web server. It’s like a phone book for the internet. Start by logging into your domain registrar account. Find the DNS management section. Enter your server’s IP address here. This connects your domain to your server. Check if the DNS changes are correct. It may take a few hours for changes to work.
Testing The Web Server
Check if your web server works on your network. Use your browser to open your server’s IP address. If the server page shows, it’s working. If not, check your firewall settings. Make sure the server is not blocked. Ask someone on the same network to test too. Their computer must open your server’s IP address.
See if people outside your network can view your server. Share your public IP address with a friend. They should try opening it in their browser. The server page must appear for them. If it doesn’t, check your router settings. Port forwarding might be needed. This helps the server connect to the internet.
Troubleshooting Common Issues
Setting up a web server on Windows often presents challenges. Common issues include firewall settings, software conflicts, and incorrect configurations. Addressing these problems ensures smooth server operation.
Resolving Port Conflicts
Ports are like doors to your server. Sometimes, they get blocked. Check if another program is using the same port. Use Command Prompt to find this. Type netstat -a -n -o. Look for the port number. Find the Process ID using it. Close that program if needed.
Change your server port if you can’t close it. Use server settings for this. Choose a new port number. Make sure it is not blocked by firewall. This helps your server run smoothly.
Fixing Access Denied Errors
Access denied errors stop you from using the server. Check user permissions first. Make sure you have admin rights. Right-click the server folder. Go to Properties, then Security. Add your username in the list.
Sometimes, antivirus blocks access. Check antivirus settings. Allow your server program. This fixes many errors. Now you can use your server easily.
Enhancing Security
Boost security by configuring firewalls and using strong passwords when hosting a web server on Windows. Regularly update software to shield against vulnerabilities. Implement SSL certificates for encrypted communication.
Implementing Ssl Certificates
SSL certificates make websites safe. They protect data from bad people. To add an SSL, get a certificate from a trusted provider. Install it on the web server. This keeps data private and secure. Visitors see a lock icon in the address bar. This means the site is safe.
Regularly update your SSL certificates. This ensures ongoing protection. Always choose certificates with strong encryption. This keeps information safe.
Configuring Firewall Rules
Firewalls keep unwanted visitors away. They act like a shield. Set up rules to allow or block traffic. Allow only trusted IP addresses. Block ports that are not in use. This reduces the risk of attacks.
Check firewall rules often. Change them when needed. This keeps the server secure. A well-configured firewall helps protect your web server.
Credit: www.hostgator.com
Frequently Asked Questions
How To Host A Webserver On Windows?
Install a web server like Apache or IIS on Windows. Configure the server settings and directories. Ensure port 80 is open in your firewall. Verify the server by accessing localhost in a browser. Regularly update server software for security.
How Do I Host My Own Website Server?
To host your own website server, choose hardware, install server software, configure DNS, and ensure security. Connect the server to the internet, and set up a domain name. Regularly update software and back up data to maintain performance.
Can I Turn My Pc Into A Web Server?
Yes, you can turn your PC into a web server. Install server software like Apache, Nginx, or IIS. Configure network settings and ensure your firewall allows server traffic. Your PC should have a static IP for external access. Regularly update software for security and performance.
Does Windows Have A Built-in Web Server?
Windows includes a built-in web server called Internet Information Services (IIS). It supports hosting websites and web applications. IIS is available in most Windows versions and provides robust features for developers. To use IIS, you must enable it through Windows Features in the Control Panel.
Conclusion
Setting up a web server on Windows is straightforward. You can do it with basic steps. First, install necessary software. Then configure settings for your needs. Regular maintenance ensures smooth operation. Keep your server secure with updates. Troubleshooting common issues helps avoid downtime.
Follow best practices for optimal performance. This guide simplifies the process for beginners. Now you can manage your web server confidently. Hosting a server on Windows is within reach. Enjoy the benefits of your own server today.


