
Ever wondered how you can transform your computer into a web server using Ubuntu? You’re in the right place.
Hosting a web server on Ubuntu might sound complicated, but it’s simpler than you think. Whether you’re aiming to build your own website or experiment with web technologies, setting up a web server on Ubuntu gives you control and flexibility like never before.
Imagine having the power to customize, optimize, and secure your web environment exactly the way you want. Stick around, because by the end of this article, you’ll have the knowledge to confidently host your own web server, unlocking endless possibilities for your digital projects. Let’s dive in and demystify the process together!
Credit: www.youtube.com
Choosing Hardware And Software
Hardware choice is crucial for a web server. Choose a reliable PC or server. More RAM means better performance. CPU speed affects response time. Storage type is important. SSD is faster than HDD. Consider backup options. Power supply should be stable. Cooling system prevents overheating. Network card must support high speed. Test the hardware before use.
Ubuntu Server is made for servers. No graphical user interface. Uses less system resources. Ubuntu Desktop is user-friendly. Has a graphical interface. Server is better for hosting. Desktop can work for small projects. Choose based on needs. Server for big tasks. Desktop for simple use.
Apache or Nginx for web serving. MySQL for databases. PHP for dynamic sites. Firewall for security. SSH for remote access. Updates are crucial. Backup tools protect data. Monitoring tools check server health. Cron jobs automate tasks. SSL certificates secure connections. Install software after hardware setup.
Installing Ubuntu
First, get a USB drive. Make sure it is empty. Download the Ubuntu ISO file from the official site. Use a tool like Rufus to create a bootable USB. Insert the USB into your computer. Restart and enter the BIOS settings. Change the boot order to USB first. Save the changes and exit BIOS.
Once the computer boots from the USB, choose Try Ubuntu. Click on the Install Ubuntu icon on the desktop. Select your language. Choose the Normal installation option. Decide if you want to install third-party software. Select Erase disk and install Ubuntu. Confirm changes and click Install Now. Follow the prompts to set up your user account.
After installation, restart the computer. Remove the USB drive. Log in to your new Ubuntu system. Open the Terminal. Update the system by typing sudo apt update and sudo apt upgrade. Install essential tools like build-essential. Type sudo apt install build-essential. Your Ubuntu is now ready.
Setting Up A Web Server
Ubuntu makes it easy to install web servers. You can use Apache or Nginx. Open your terminal. Type sudo apt update. This updates your system. Next, type sudo apt install apache2 or sudo apt install nginx. This installs the server you choose. Wait a few minutes. Your server is ready.
After installation, check the server’s default settings. Go to the server’s config file. Use sudo nano /etc/apache2/apache2.conf for Apache. Use sudo nano /etc/nginx/nginx.conf for Nginx. Edit the file as needed. You can change the port or root directory. Save and close the file. Restart the server using sudo systemctl restart apache2 or sudo systemctl restart nginx.
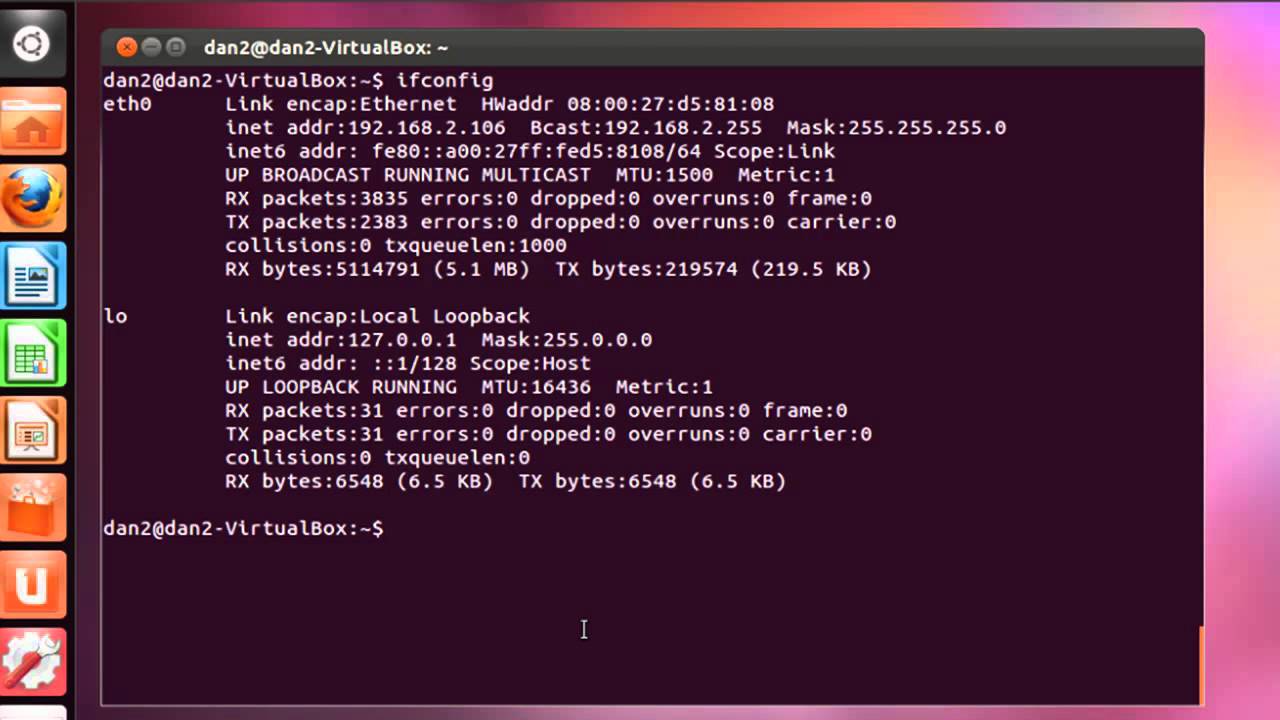
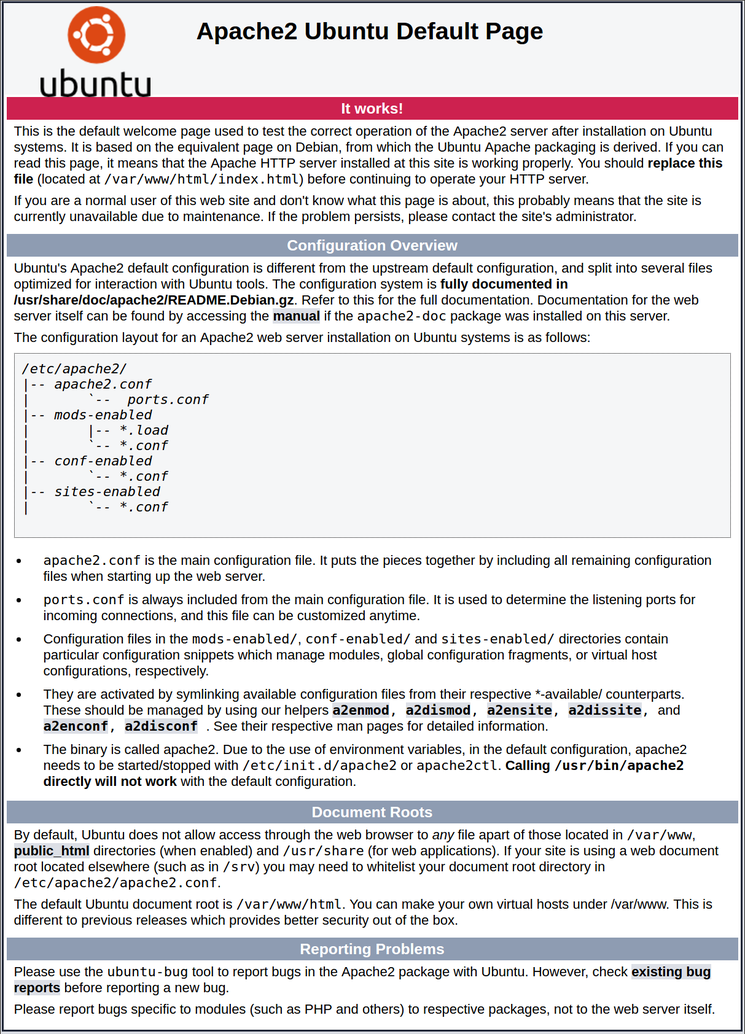
Open your web browser. Type localhost in the address bar. Press Enter. You should see a welcome page. This means your server works. If you don’t see it, check your settings again. Make sure the server is running. You can also test with a different computer. Use your server’s IP address instead of localhost.

Credit: ubuntu.com
Managing Domain Names
Setting up a web server on Ubuntu involves managing domain names effectively. Begin by installing Apache, a popular web server software. Next, configure DNS settings to point your domain to your server’s IP address, ensuring seamless access.
Registering A Domain
Choose a domain name that fits your website. Many websites help you buy a domain. Look for sites like GoDaddy or Namecheap. They are popular choices. You will need to pay a fee each year. Make sure you spell your domain name right. Double-check before you buy.
Configuring Dns Settings
DNS settings help your domain connect to the web server. You will find these settings in your domain account. Look for the DNS section. Enter your server’s IP address there. This step is important for your site to work. Ask for help if you are stuck.
Linking Domain To Server
After DNS setup, link your domain to your server. Use the IP address from the server. Enter it in your domain settings. This links your domain to the server. Now, your website can show online. Check if your site loads. If not, double-check your settings.
Securing Your Web Server
A firewall acts as a guard for your server. It blocks unwanted traffic. Use tools like UFW on Ubuntu. This tool is easy to set up. It helps keep your server safe. Allow only necessary ports for web traffic. This reduces risks of attacks. Regularly check your firewall settings.
SSL certificates keep your data safe. They encrypt information between the server and users. Use tools like Let’s Encrypt for free SSL. This makes your website secure. It also builds trust with users. Follow simple steps to install. Always ensure your certificates are up to date.
Updates keep your server protected. They fix bugs and security holes. Use commands like sudo apt-get update and sudo apt-get upgrade. These commands are easy to use. Schedule regular updates. This ensures your server has the latest protections. Never ignore update notifications.
Credit: www.digitalocean.com
Deploying A Website
Setting up a web server on Ubuntu involves installing necessary software like Apache or Nginx. Configure server settings for optimal performance. Test your website to ensure it runs smoothly and securely.
Uploading Website Files
First, open the terminal on your Ubuntu system. Navigate to the web server’s root directory. Use the FTP or SFTP protocol to upload your files. Tools like FileZilla can help. Ensure all files are in the correct directory. This helps the server find them.
Configuring Virtual Hosts
Virtual Hosts allow multiple sites on one server. Edit the Apache configuration file. Add a new section for your website. Specify the domain name and document root. Save and close the file. Then, enable the site using a2ensite. Restart Apache to apply changes.
Testing Website Functionality
Open a web browser on your computer. Type your website’s domain in the address bar. Press Enter to load the site. Check all pages and links. Ensure everything works correctly. If issues arise, check the error logs. This helps in identifying problems. Fix any errors you find.
Monitoring And Maintenance
Regular checks and updates keep your Ubuntu web server running smoothly. Detect issues early to prevent downtime. Perform routine security scans for safe hosting.
Using Monitoring Tools
Monitoring tools help track your server’s health. They show real-time data like CPU usage, memory, and disk space. Tools like Nagios or Zabbix are popular choices. They alert you if something goes wrong. This helps you fix issues quickly. Keeping an eye on server stats is crucial.
Regular Backups
Regular backups protect your data. They keep a copy of all your files. You can use software like rsync or tar for backups. Backups save you from losing important data. Set a schedule for automatic backups. This ensures you always have a recent copy. Backups are a safety net.
Troubleshooting Common Issues
Common issues can occur with your server. Sometimes, it may not start. Or it might run slowly. Check error logs for clues. Use commands like top or df to find problems. Restarting the server often solves minor issues. Always keep your software updated. Updates fix bugs and improve security.
Frequently Asked Questions
How To Host A Website In An Ubuntu Server?
Install Apache, MySQL, and PHP on your Ubuntu server. Upload website files to the Apache directory. Configure Apache settings and restart the service. Secure your server with a firewall. Test your website to ensure it’s live.
Does Ubuntu Have A Web Server?
Yes, Ubuntu supports web servers. It includes Apache, Nginx, and Lighttpd. Users can easily install these servers via Terminal commands. Ubuntu’s flexibility and security make it ideal for hosting websites and applications. Regular updates ensure robust performance and security enhancements for web hosting.
Is Ubuntu Good For Server Hosting?
Yes, Ubuntu is excellent for server hosting. It offers stability, security, and extensive community support. Ubuntu’s regular updates ensure optimal performance. Many prefer it for its user-friendly interface and robust features. It supports a wide range of server applications, making it a top choice for businesses and developers.
How To Create A Virtual Server In Ubuntu?
Install VirtualBox on Ubuntu. Open VirtualBox, click “New”, and choose the server name and type. Allocate memory and create a virtual disk. Configure settings and install the desired operating system. Start the server to complete the setup.
Conclusion
Hosting a web server on Ubuntu is straightforward. Follow the steps carefully. Install the necessary packages. Configure your server settings. Test your server to ensure it runs smoothly. Troubleshooting tips help solve common issues. Practice enhances your skills. Review security measures.
Keep your server updated. Regular maintenance ensures optimal performance. Use resources wisely. Monitor your server’s health. A well-hosted server boosts reliability. Always stay informed about new updates. Ubuntu offers great flexibility. Enjoy the process and keep learning. Hosting on Ubuntu is a valuable skill.
Perfect for beginners and advanced users alike.


