
Are you ready to take your web application live on Windows Server 2012? Hosting your application on this platform might seem daunting at first, but with the right guidance, you can make it happen smoothly and effectively.
Imagine the satisfaction of seeing your application running seamlessly, accessible to users around the globe, and all powered by your own server setup. You will discover the step-by-step process to host your web application on Windows Server 2012. We’ll cover everything from setting up your server environment to deploying your application, ensuring that you have a clear roadmap to follow.
You’ll gain the confidence to manage and troubleshoot your server, optimizing it for performance and reliability. Get ready to transform your web application into a robust online presence. As you read through, you’ll find practical tips and insights that simplify complex processes, making it easier for you to implement and succeed. Let’s dive in and turn your vision into reality!
Preparing The Server
Ensure your server meets basic needs. Processor should be 1.4 GHz or faster. Use at least 512 MB RAM for smooth operations. You’ll need 32 GB storage space. More is better. Have a network adapter ready. It must support PXE boot. A DVD drive is required for installation. Or use a USB drive.
Begin by inserting the Windows Server 2012 DVD. Boot your server from it. Choose your language and preferences. Click “Install Now”. Enter your product key when asked. Accept the license terms. Select “Custom: Install Windows only”. Choose the partition for installation. Wait as Windows sets up. Reboot your server. Follow the setup prompts. Create a strong password for admin account.
Configuring Iis
First, open the Server Manager on your Windows Server. Find the option to add roles and features. Click it to start. Look for Web Server (IIS) in the list. Select it to install. Make sure to choose all necessary features. This includes HTTP Redirection and ASP.NET. These are important for web apps. Complete the installation process.
Open the IIS Manager from the Start menu. Find the option called Application Pools. Click on it. Here, you can see existing pools. For a new app, click Add Application Pool. Name it something easy to remember. Set the .NET Framework version. Make sure it matches your app’s needs. Click OK to save your changes. Your new pool is ready.
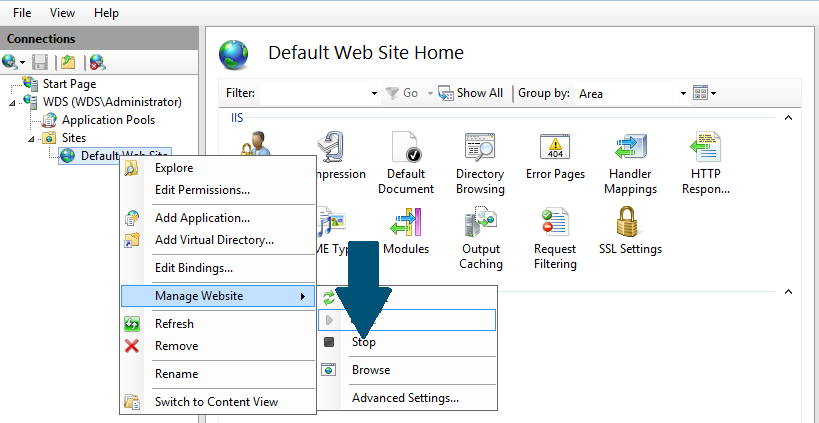
In IIS Manager, find the option to Add Website. Click it to open the setup window. Enter a friendly name for your site. Set the physical path where the app files are stored. Choose the right application pool from the list. Under Binding, set the type to HTTP. Enter the site’s port and IP address. Click OK. Your new website is now added to IIS.
Deploying The Web Application
Start by moving all your web application files to the server. Use a tool like FileZilla. It helps in uploading files easily. Make sure all files are in the right folder. This ensures the server can find them. Do not skip any file. Every file is important for the application.
The Web.config file is crucial. It controls many settings. Open it in a text editor. Check every line. Make sure settings match your needs. Adjust paths for your server. Save changes when done. This ensures the application runs correctly.
Permissions control who can access files. Right-click on the folder with files. Select Properties. Go to Security tab. Ensure the right users have access. Grant read and write permissions. This keeps your application safe. Proper permissions are key for security.
Credit: www.faqforge.com
Database Configuration
First, locate the SQL Server installer file. Double-click to start the installation. Choose the default installation option for ease. Follow the on-screen instructions step by step. Select the required features for your application. Make sure to install the Database Engine Services. This is essential for managing databases. After installation, restart your server. Your SQL Server should now be ready.
Open your web application configuration file. Look for the database connection section. Enter the server name where SQL Server is installed. Provide the database name your application will use. Enter the correct username and password. Save the changes to the configuration file. Test the connection to ensure it works. Your application should now connect to the database smoothly.
Security Measures
Ensure your web application runs securely on Windows Server 2012 by implementing robust security measures. Regularly update software and use firewalls to safeguard against threats. Encrypt sensitive data to maintain privacy and integrity.
Setting Up Firewalls
Firewalls protect your server. They block unwanted traffic. Choose a strong firewall. Make sure it is reliable. Configure rules to allow only trusted connections. Regularly update firewall settings. This keeps threats away. Monitor traffic patterns often. Stay alert for unusual activity. Be proactive with security measures. A strong firewall ensures safety.
Configuring Ssl Certificates
SSL certificates secure data. They encrypt information sent over the internet. This prevents data theft. Get a valid SSL certificate from a trusted source. Install it on the server. Configure it properly to ensure security. Regularly check for certificate updates. Renew certificates before they expire. Secure connections build trust. Ensure all data remains private.
Testing The Application
Open a web browser on your computer. Type the web application’s URL. Press enter. The application should load. Check if all buttons work. Ensure links go to the right pages. Test forms by entering data. Click submit. Check the data saves correctly. Look for errors or broken parts. Fix them if found. Make sure everything works smoothly. This ensures users have a good experience.
Sometimes applications show errors. Check error logs on the server. These logs give clues about problems. Missing files cause errors. Ensure all files are uploaded. Permissions can stop files from working. Check and set proper permissions. Restart the server if needed. This can solve minor issues. Test the application again. Make sure all issues are resolved.
Maintaining The Server
Setting up a web application on Windows Server 2012 involves installing necessary software and configuring settings. Regular updates and security checks ensure smooth operation. Proper monitoring helps maintain performance and minimize downtime, keeping the server reliable for users.
Regular Updates
Keeping your server updated is very important. Install all security patches. This keeps the server safe from threats. Updates fix bugs and improve performance. Check for updates often. Use the Windows Update tool. This tool helps to download and install updates easily. Always restart the server after updates. This ensures changes take effect.
Monitoring Performance
Monitor your server’s performance regularly. This helps in spotting issues early. Use tools like Task Manager. These tools show CPU and memory usage. High usage can slow down the server. Check logs for any unusual activity. Logs can give clues about problems. Set alerts for critical issues. Alerts help in quick action. This keeps the application running smoothly.

Credit: learn.microsoft.com

Credit: stackoverflow.com
Frequently Asked Questions
How Do I Host A Web Application On A Server?
Choose a web hosting provider. Set up server environment with necessary software. Upload your web application files. Configure the server settings. Test and ensure everything works smoothly.
Can I Host A Website On Windows Server?
Yes, you can host a website on Windows Server. It supports IIS, which efficiently manages web hosting. Windows Server provides robust security and integrates well with Microsoft technologies. Ensure proper configuration for optimal performance. Use Windows Server to access powerful features for your website hosting needs.
How To Create A Web Server In Windows Server 2012?
Install IIS from Server Manager. Open Server Manager, click “Manage”, then “Add Roles and Features”. Select “Web Server (IIS)” and complete the wizard. Configure your server by accessing the “IIS Manager” from the Tools menu. Create a website and set bindings to launch your web server.
Where Is Host File In Windows Server 2012?
Find the hosts file in Windows Server 2012 at C:WindowsSystem32driversetc. Edit using a text editor. Ensure administrative privileges for modifications. Use this file to map hostnames to IP addresses. Always save backups before editing to prevent issues.
Conclusion
Hosting a web application on Windows Server 2012 is achievable. Follow the steps carefully for smooth deployment. Choose reliable hosting tools and software. Ensure your server meets all requirements. Regularly update your server for security and performance. Test your application thoroughly after deployment.
This ensures everything runs correctly. Troubleshoot any issues promptly. Keep backups to prevent data loss. Remember, practice makes perfect. With time, hosting becomes easier. Start with these basics, and you’ll gain confidence. Your web application will be live and accessible.
Enjoy the process and learn as you go.


