
Are you ready to elevate your programming skills by hosting a Spring Boot Web API on Linux? Imagine having the power to deploy your web applications seamlessly, with the reliability and flexibility that Linux offers.
Whether you’re a seasoned developer or just getting started, mastering this process can transform how you deliver your projects. Picture your API running smoothly on a robust Linux environment, providing optimal performance and security. In this guide, you’ll discover step-by-step how to accomplish this, making you more efficient and effective in your development endeavors.
Let’s dive in and unlock the potential of your Spring Boot applications!
Prerequisites
Install the Java Development Kit (JDK) on your Linux server. The JDK helps run Java applications. Make sure you have the latest version.
Build your Spring Boot application. Package it into a JAR file. This file will run on the server.
Prepare your Linux server. Ensure it has enough memory and storage. Create a user for running the application. This will keep things secure.
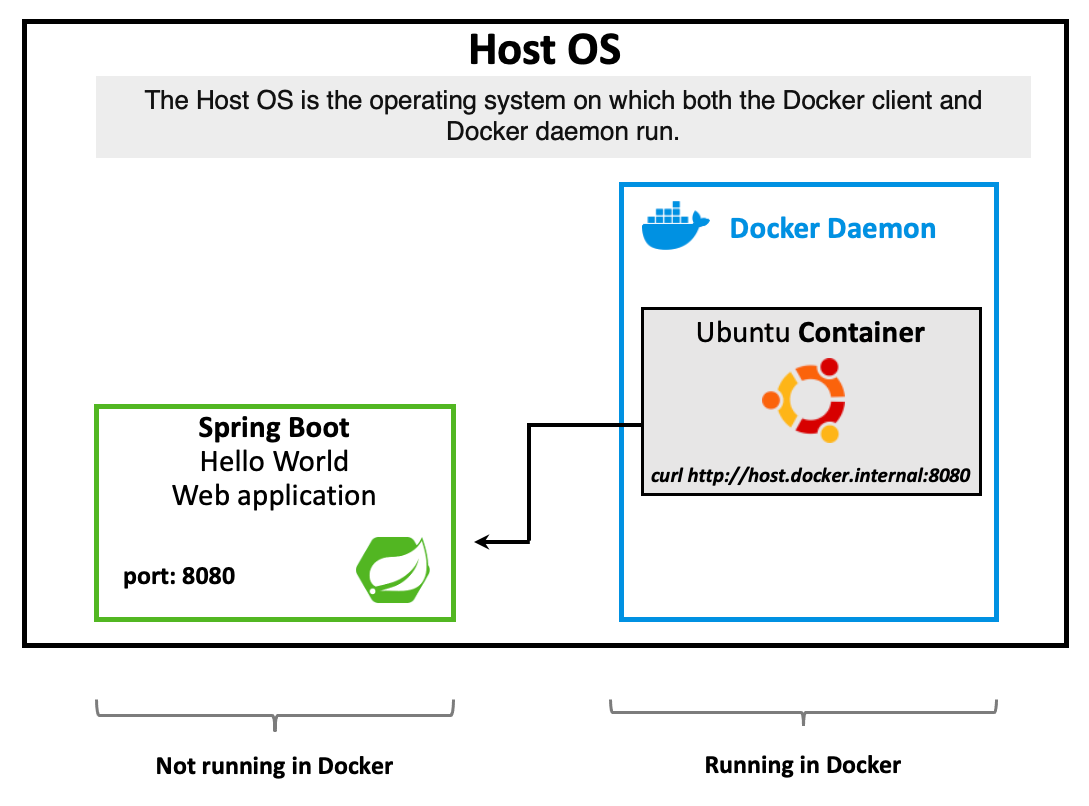
Credit: medium.com
Setting Up The Linux Environment
Java is needed for Springboot. Start by updating your package list. Use the command: sudo apt-get update. Next, install Java with sudo apt-get install default-jdk. Check if Java installed using java -version. It should display the Java version.
After Java installs, set up environment variables. Open the .bashrc file in your home directory. Add the following lines to the end of the file:
    export JAVA_HOME=/usr/lib/jvm/default-java
    export PATH=$PATH:$JAVA_HOME/bin
Save and close the file. Apply changes using source ~/.bashrc. Now, Java can be used easily.
Preparing The Spring Boot Application
Start by creating your Spring Boot application. Use your favorite IDE. It could be IntelliJ or Eclipse. Write your Java code. Make sure it works well.
Use Maven to package the application. First, open the terminal. Type mvn clean package. This command will create a JAR file.
The JAR file is important. It contains all the code. It’s like a magic box. You can run this box on any computer. Easy and simple.
Deploying The Application
Hosting a Springboot Web API on Linux involves setting up a server and deploying the application using command-line tools. Ensure the server has Java installed, and utilize tools like SSH for secure access and management. Configure environment variables properly for seamless application execution.
Transferring Files To Server
Move your Springboot application files to the server. Use secure copy protocol (SCP) to transfer files. Open a terminal. Type the SCP command. Include your server’s IP address. Example: scp myapp.jar user@192.168.1.1:/home/user/. This command sends the myapp.jar file. Files will be in your home directory on the server. Ensure all files transferred properly. Check using the ls command.
Running The Application Jar
Navigate to the directory with your .jar file. Use the Java command to run it. Type: java -jar myapp.jar. This starts your application. Check for any error messages. Make sure the application runs smoothly. If there are errors, review your logs. Ensure all dependencies are in place. Your Springboot app should be up and running.
Configuring Systemd For Spring Boot
First, make a new file for the service. Use the terminal to create it. This file will tell systemd how to run your app. Save it in the /etc/systemd/system/ folder. Name it myapp.service. Use a text editor to write the details. Add the path to your Spring Boot jar file. Also, add a description for your service. Save the file when done.
To enable the service, use the systemctl enable myapp.service command. This makes it start on boot. To start the service now, use systemctl start myapp.service. Check if it’s running with systemctl status myapp.service. If there are errors, read the logs. Use journalctl -u myapp.service to see them. Fix any mistakes and try again.

Credit: www.youtube.com
Setting Up A Reverse Proxy With Nginx
Nginx is a popular web server. It is fast and reliable. Start by updating your Linux system. Use the command sudo apt update. After that, install Nginx with sudo apt install nginx. Wait for the installation to finish. You can check if Nginx is running. Use the command sudo systemctl status nginx. You should see it active and running.
The proxy pass forwards requests. It sends them from Nginx to your Springboot app. Open the Nginx configuration file. It is located at /etc/nginx/sites-available/default. Add the following lines inside the server block:
Save the file. Restart Nginx using sudo systemctl restart nginx. Now, Nginx forwards requests to your app. Your Springboot app is ready to serve users.
Securing The Application
Firewall rules keep bad traffic away. Open ports only that your app needs. Use tools like UFW or iptables. Allow HTTP and HTTPS ports. Block others to stay safe. Test your rules after setting them. This ensures no bad traffic sneaks in. Always check logs for unusual activity. Update your rules often.
HTTPS keeps your web app secure. Use Let’s Encrypt for free SSL certificates. Install Certbot on your Linux server. Follow simple steps to get your certificate. Renew certificates every 90 days. Secure connections build trust with users. Check your HTTPS setup often. Keep data private and safe.
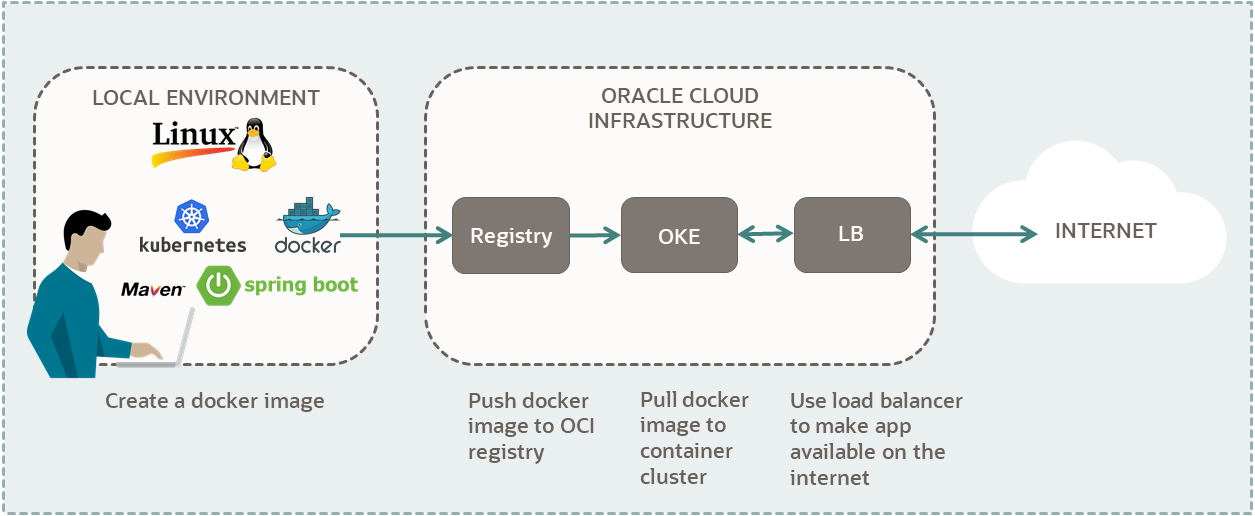
Credit: docs.oracle.com
Monitoring And Logging
Deploying a Spring Boot web API on Linux involves monitoring and logging for performance and issue tracking. These tools help identify errors, optimize resource usage, and ensure smooth operation of your application.
Setting Up Log Rotation
Logs can grow fast. They can fill up space. Log rotation helps. It keeps logs manageable. Old logs get archived. New logs stay small. Use tools like Logrotate. It automates the process. Set rules for log files. Decide when to rotate. Choose how many old logs to keep. Configure it in a config file. This file lists rules. It lists paths to log files. It makes sure logs don’t eat up disk space.
Using Monitoring Tools
Monitoring tools keep track of your web API. They check if it’s running. They alert you if it’s down. Tools like Prometheus can help. It collects data over time. You can see trends. You can spot problems early. Grafana can show data in graphs. It makes data easy to understand. Set alerts for important events. Configure dashboards for quick views. Keep your API healthy with these tools.
Troubleshooting Common Issues
Deploying a Springboot Web API on Linux can encounter issues like server configuration errors and dependency mismatches. Ensure Java is correctly installed and paths are set. Check firewall settings to allow necessary ports. Properly configure application properties for seamless operation.
Debugging Startup Problems
Sometimes, the Springboot API won’t start. This can be frustrating. Check the error logs first. They provide clues. Look for messages about missing files. Ensure all dependencies are installed. Verify the correct Java version is being used. Sometimes, a simple restart can fix the problem. If the application still fails, consider using debugging tools. These tools help find deeper issues. Remember, patience is key when troubleshooting.
Resolving Port Conflicts
Port conflicts happen when two apps use the same port. This is common in web applications. First, check which port your Springboot app uses. Use the netstat command to see active ports. If you find a conflict, change your app’s port. This is done in the application.properties file. Choose a new port number. Ensure it is not used by another app. Save changes and restart your app. This usually solves the conflict.
Frequently Asked Questions
How Do I Host My Spring Boot Api?
Host your Spring Boot API using cloud platforms like AWS, Heroku, or Google Cloud. Deploy with Docker for easy management. Ensure you set up a domain and SSL certificate for secure access. Configure your server to handle traffic efficiently and monitor performance regularly for optimal results.
How To Deploy Spring Boot On Linux Server?
Deploy Spring Boot on Linux by packaging as a jar. Upload to server, set up Java environment, and run using `java -jar yourapp. jar`. Ensure firewall settings allow access. Configure systemd for automatic start on boot. Verify deployment with server logs and application URL access.
How To Run Spring Boot Application In Linux?
Open the terminal and navigate to your Spring Boot project directory. Execute `. /mvnw spring-boot:run` or `java -jar yourapp. jar` to start the application. Ensure Java and Maven are installed on your Linux system for successful execution.
How To Deploy A Java Web Application On A Linux Server?
Install Java Development Kit and Apache Tomcat on the server. Upload your WAR file to Tomcat’s webapps folder. Start Tomcat using the command line. Access your application via the browser using the server’s IP address and port number. Ensure firewall settings allow traffic on Tomcat’s port.
Conclusion
Hosting a Springboot Web API on Linux can be straightforward. Follow the steps carefully. Ensure your system is properly configured. Keep security measures in mind. Regular updates are important for stability. Troubleshoot issues promptly for smooth operation. Explore more features to enhance your API.
Always prioritize performance and reliability. Test thoroughly after deployment for best results. Seek community support for additional guidance. With practice, hosting becomes easier. Linux offers robust support for Springboot applications. Enjoy the benefits of efficient web API hosting. Happy coding and successful deployment!


