
Are you ready to showcase your HTML file to the world but unsure how to host it on an EC2 web server? You’re in the right place!
Hosting files on an EC2 server might seem daunting, especially if you’re new to cloud computing. But don’t worry, this guide will walk you through the process in simple, clear steps. Imagine the thrill of seeing your web creation live and accessible to anyone, anytime.
With Amazon’s EC2, you have the power and flexibility to host your HTML files efficiently and securely. Keep reading, and you’ll learn how to get your file up and running in no time, turning your digital dreams into reality.
Setting Up An Aws Account
First, visit the AWS website to create an account. Click on the “Create an AWS Account” button. Fill in your details like name, email, and password. An email verification will be sent to you. Check your email and click the verification link. This confirms your account.
After verification, log in to your AWS account. Choose the free tier if you are new. The free tier gives you limited resources without cost. Add your billing information to complete the setup. You won’t be charged if you stay within limits. Complete the account setup by following the prompts.
Launching An Ec2 Instance
Start with the AWS Management Console. Find the EC2 dashboard. Click on “Launch Instance”. Choose an Amazon Machine Image (AMI). Select the one that fits your needs. Most people use Amazon Linux. It is free and popular.
Decide how much power you need. Pick the right instance type. Small websites can use t2.micro. It is free for one year. Adjust the network settings. Keep the default VPC. It works for most cases.
Security groups keep your server safe. Allow HTTP and SSH traffic. Add rules for port 80 and port 22. This lets you access your server. Be careful with IP addresses. Only allow trusted ones.
Connecting To The Ec2 Instance
Connecting with SSH is safe. First, find your private key file. This file is used for security. Make sure it is kept secret. Open your terminal. Type the SSH command. This command will connect you. Add the EC2 instance IP address. Press enter. You will see a prompt. Type yes to continue. Now, you are inside the server.
Some use PuTTY. It is a tool for Windows. Download PuTTY. Open it and enter your server’s IP address. Click connect. Follow the steps. Another way is using EC2 Instance Connect. This works from the browser. No need for SSH keys. Just click connect in the AWS console. Easy for beginners.
Credit: community.aws
Installing A Web Server
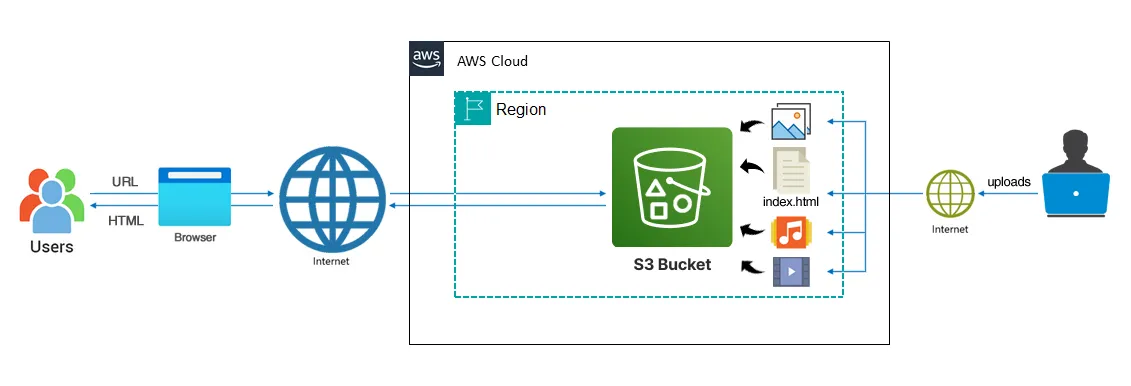
Hosting an HTML file on an EC2 web server is simple. Begin by launching your EC2 instance. Next, transfer your HTML file to the server using secure file transfer protocol. Finally, configure the web server to display your file. Enjoy your hosted website.
Choosing Between Apache And Nginx
Apache and Nginx are popular. Both can host websites. Apache is older and easy to use. Nginx is fast and handles many users well. Choosing depends on your needs. Apache works well with PHP. Nginx is better for static files. Both are free to use.
Installation Process
First, connect to your EC2 instance. Use a terminal or command line. To install Apache, type sudo apt-get install apache2. For Nginx, type sudo apt-get install nginx. Wait for the installation to finish. Check for errors. Fix them if needed.
Starting The Web Server
After installation, start the server. For Apache, type sudo service apache2 start. For Nginx, type sudo service nginx start. Check if the server is running. Open a web browser. Type your server’s IP address. You should see a welcome page. This means the server works.
Preparing The Html File
First, you need an HTML file. Create one if you don’t have it. Use a simple text editor like Notepad. HTML files have a .html extension. You can also select an existing HTML file. Make sure it is ready to be hosted. Check for broken links or errors.
You need to upload your HTML file to the EC2 server. Use a tool like FileZilla. Connect to your server with your credentials. Select your HTML file and drag it to the server directory. Make sure you place it in the right folder. This will make it accessible to visitors.
Configuring The Web Server
Start by checking directory permissions. Use the chmod command. This sets the correct permissions. Your files need to be readable by all. Type chmod 755 for folders. This makes them accessible. For files, use chmod 644.
Permissions are important. They control who sees your files. Proper settings prevent errors. Ensure these settings are correct. It keeps your server secure.
Open the configuration file. Use a text editor like nano or vi. Find the DocumentRoot directive. This points to your HTML files. Change it to your file’s location. Save the changes.
Restart the server to apply changes. Use the command sudo service apache2 restart. This makes sure new settings work. Always check the server status. Use systemctl status apache2 for this.
Testing The Web Server
To see your HTML file, open a browser. Type the IP address of your EC2 instance in the address bar. Press enter. Your page should load. If it doesn’t, check your security settings. Ensure port 80 is open for HTTP traffic.
Accessing The Html File Via Browser
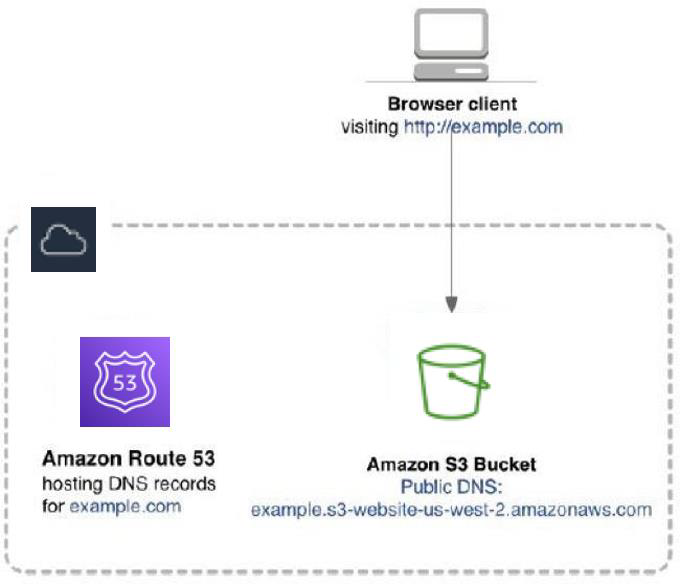
Once the server is set up, you can view the HTML file. Use the public IP address. Type it in the browser. You will see your webpage. If not, verify the file path. Ensure the HTML file is in the right directory.
Troubleshooting Common Issues
Sometimes, issues occur. The page may not load. Check your server settings. Ensure the Apache server is running. Verify file permissions. Make sure you have read access. If errors persist, restart the server. This often solves the problem.
Credit: docs.aws.amazon.com
Securing Your Web Server
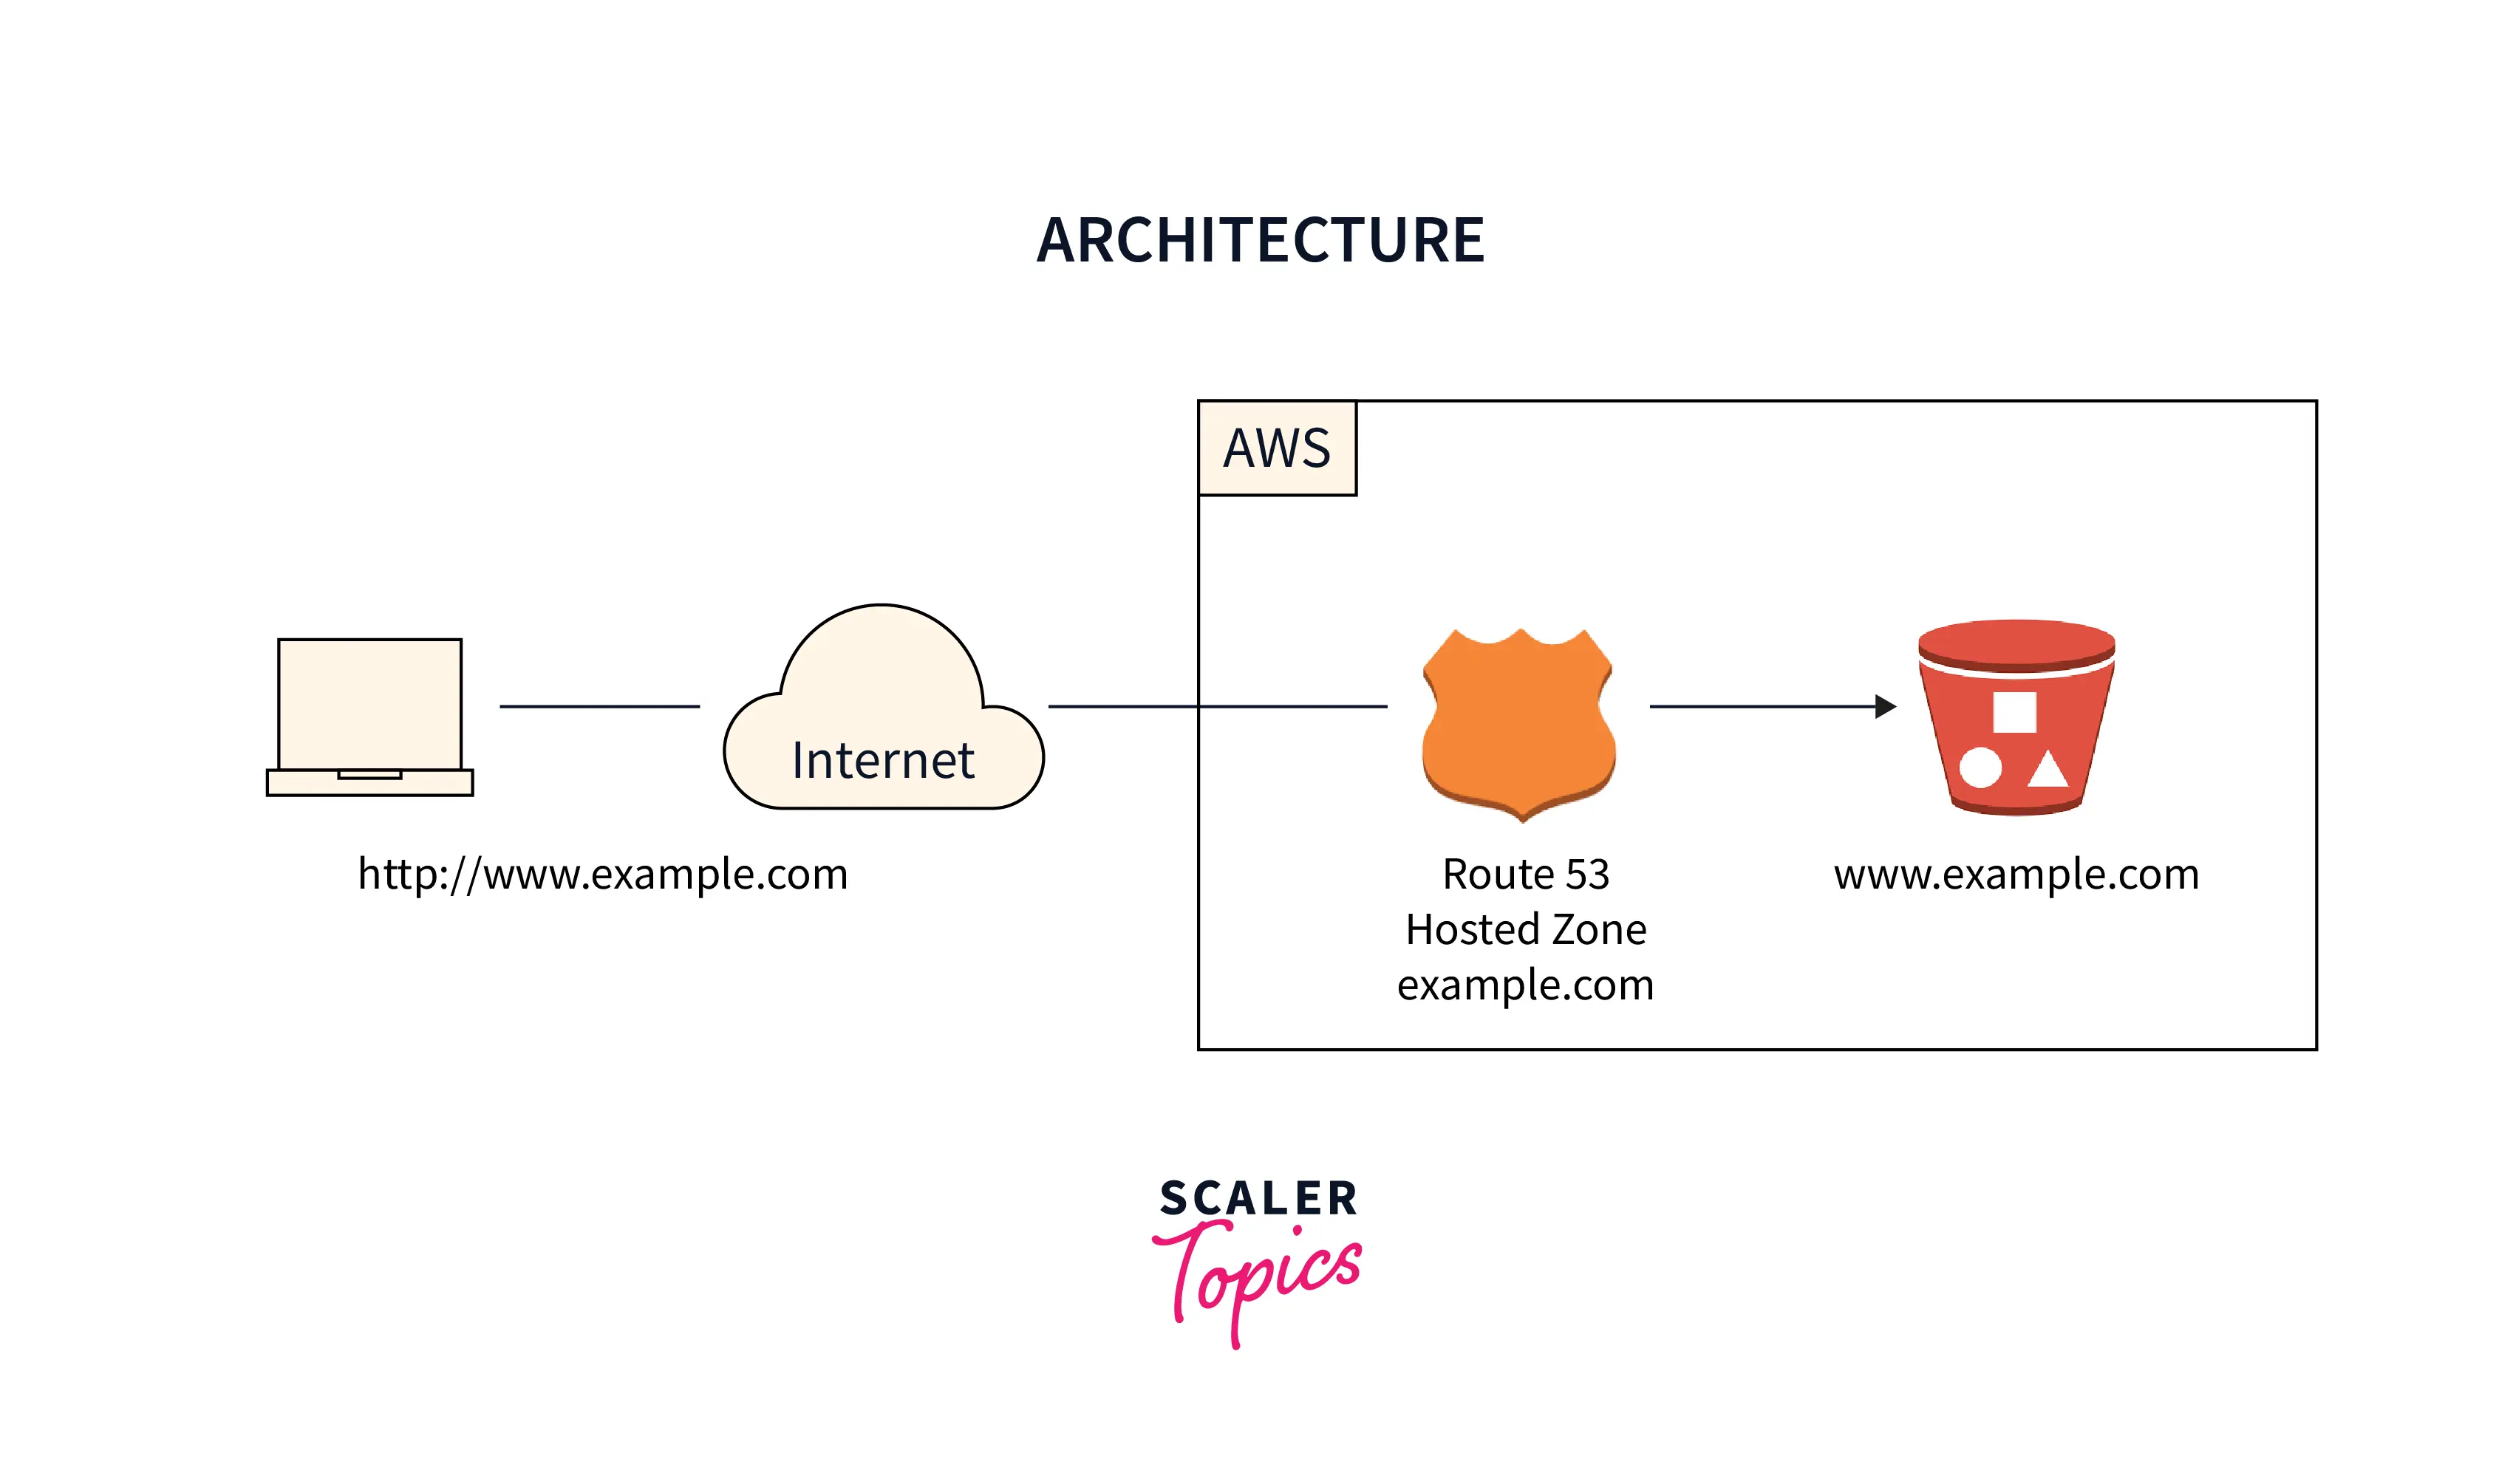
Setting up a web server on EC2 to host HTML files involves a few simple steps. First, launch an EC2 instance and configure security groups for access. Next, install a web server like Apache or Nginx, and upload your HTML files.
Implementing Https
Use HTTPS for your website. It keeps data safe. Hackers cannot steal it easily. Get a SSL certificate. It helps secure the site. Visitors trust a secure site. They will feel safe. Browsers show a lock for HTTPS sites. This means it is secure. Secure sites rank better on search engines.
Regular Security Updates
Keep your server software updated. This prevents old bugs from causing problems. Bugs can let hackers in. Updates fix these bugs. Set updates to run automatically. This way, you will never miss one. Check for updates each week. Ensure firewalls are turned on. They block unwanted access. Always use strong passwords. Change them often.
Credit: www.scaler.com
Frequently Asked Questions
How To Host Html On Ec2?
Launch an EC2 instance, install a web server like Apache, upload your HTML files, and start the server. Configure security groups to allow HTTP traffic. Access your site using the EC2 public IP or domain. Ensure the instance is running and regularly update your server for security.
How Do I Host An Html Website On A Server?
Choose a web hosting provider and sign up. Upload your HTML files using FTP or the hosting control panel. Configure domain settings if necessary. Ensure files are in the public_html directory. Test your website by visiting your domain.
Can I Host My Website On Amazon Ec2?
Yes, you can host your website on Amazon EC2. It provides scalable computing power. You can choose different instance types based on your needs. Amazon EC2 is flexible and cost-effective for web hosting. You need to manage server setup, maintenance, and security yourself.
How To Host An Application In Ec2?
To host an application in EC2, launch an EC2 instance, configure security groups, install necessary software, and upload your application files. Connect via SSH for setup and ensure your application is accessible through the internet by adjusting network settings. Use Elastic IP for a static address if needed.
Conclusion
Hosting HTML files on an EC2 web server is straightforward. First, set up your EC2 instance. Next, transfer your HTML files to the server. Ensure your server settings allow file access. Test the setup by opening the HTML file in a browser.
Troubleshoot any errors promptly. Regularly update your server for security. This process lets you share your web content easily. With practice, it becomes second nature. Now, you’re ready to host and serve your HTML files efficiently. Happy hosting!


