
Are you feeling a bit lost trying to navigate through your Namecheap account to find cPanel? You’re not alone.
Many users, especially those new to web hosting, often face this challenge. But don’t worry; you’re in the right place. This guide will help you locate cPanel within Namecheap effortlessly. By the end of this article, you’ll not only know exactly where to find it, but you’ll also feel more confident managing your website.
Let’s dive in and make your hosting experience smoother and more efficient!

Credit: www.namecheap.com
Accessing Your Namecheap Account
Accessing your Namecheap account is the first step to managing your web hosting. It allows you to find essential tools like Cpanel. This process is straightforward and user-friendly. Let’s explore how you can easily access your Namecheap account.
How To Log In To Your Namecheap Account
Visit the Namecheap website. Locate the login button at the top right corner. Click on it to proceed. Enter your username and password. If you forget your password, use the “Forgot Password” link to reset it.
Navigate To Your Dashboard
Once logged in, you will see your dashboard. This is where you manage your account settings. The dashboard is intuitive and easy to use. It displays all your account information clearly.
Find Your Hosting Services
On your dashboard, locate the “Hosting List” section. Here, you see all your hosting services. It helps you access different settings and features. Click on the service you want to manage.
Access The Cpanel
After selecting your hosting service, look for the “Cpanel Login” button. This button takes you directly to your Cpanel. Ensure your internet connection is stable for a seamless experience.
Credit: www.namecheap.com
Navigating To The Dashboard
Accessing the cPanel in Namecheap is straightforward. Log into your Namecheap account, then select “Hosting List” from the sidebar. Click the “Manage” button next to your domain, and you’ll find the cPanel option.
Navigating to the dashboard in Namecheap is the first step in managing your web hosting services effectively. Whether you’re a seasoned webmaster or new to the world of website management, finding your way to the cPanel is essential. Let’s dive into how you can easily access this important feature. ###Log In To Your Namecheap Account
Start by logging into your Namecheap account. Use your email and password for authentication. If you’ve forgotten your password, use the “Forgot Password?” option to reset it. Once you’re logged in, you’ll find yourself on the dashboard. This is where all your domains and services are listed. ###Access The Dashboard
On the dashboard, locate the “Domain List” on the left sidebar. This section contains all the domains you’ve registered with Namecheap. Next to each domain, you’ll see a “Manage” button. Click on it for the specific domain you want to work with. ###Find The Cpanel
After clicking “Manage,” you’ll be directed to a new page. Here, look for the “Products” section. Under this section, there’s a “Shared Hosting” tab. Click on “Go to cPanel” to enter your control panel. ###Why Finding The Cpanel Matters
Accessing the cPanel allows you to manage your website files, databases, and email accounts. It’s the hub for all technical configurations. What would you do if you couldn’t find your way to cPanel? Consider how much time it might waste. Knowing this simple navigation process saves you from unnecessary frustration. ###Common Issues And Solutions
Sometimes, users struggle to find the cPanel link. Make sure your hosting is active and correctly associated with your domain. If you still can’t find the cPanel, check your email for activation instructions or contact Namecheap support for help. ###Final Thoughts
Navigating to the dashboard and accessing cPanel is straightforward once you know where to look. Take a few minutes to familiarize yourself with the layout. By doing so, you ensure you can manage your website efficiently and effectively. So next time you need to tweak something, you’ll know exactly where to go.Locating The Hosting Section
Accessing the hosting section in Namecheap is straightforward. First, log into your account. Then, locate the “Dashboard” and click “Go to cPanel” under the hosting section. This leads you to the cPanel, where you can manage your website easily.
Navigating through your Namecheap account to locate the cPanel might seem challenging at first, especially if you’re new to website hosting. The key to unlocking the full potential of your hosting service lies in understanding where everything is located. Let’s dive into how you can easily find the hosting section in your Namecheap account, which will lead you directly to the cPanel. ###Understanding Your Namecheap Dashboard
Once you log in to your Namecheap account, you’ll land on the dashboard. This is the control center for all your domains and hosting services. Take a moment to familiarize yourself with the layout. Is it cluttered or easy to navigate? Knowing your dashboard will save you time in the long run. ###Accessing The ‘domain List’ Tab
On the left-hand side of your screen, you’ll see a menu with several options. Look for the ‘Domain List’ tab. Clicking on this will show you all the domains you own. If you’re managing multiple domains, this is where you’ll find them all neatly listed. ###Finding Your Hosting Packages
Right next to the ‘Domain List,’ there should be a ‘Hosting List’ tab. This tab is crucial as it contains all the information about your hosting plans. Once you click on it, you’ll see a list of your hosting packages. Is your package listed as active? Ensuring that your hosting package is active is the first step to accessing your cPanel. ###Clicking On ‘go To Cpanel’
Within the ‘Hosting List,’ you’ll find a ‘Go to cPanel’ button next to each hosting package. This button is your direct gateway to cPanel. A simple click, and you’re in. It’s as easy as finding the right button and trusting that it leads you to your destination. ###Engage With Customer Support For Assistance
Still having trouble? Don’t hesitate to reach out to Namecheap’s customer support. They are available 24/7 and can guide you through the process step by step. Have you ever considered how much time you might save by asking for help instead of struggling alone? Locating the hosting section in your Namecheap account doesn’t have to be a daunting task. Remember, every expert was once a beginner. With these steps, you’re well on your way to managing your website like a pro.
Credit: www.namecheap.com
Identifying Your Domain
Identifying your domain is a crucial first step in accessing cPanel on Namecheap. Whether you’re managing a single website or juggling multiple domains, knowing exactly which domain to focus on can save you time and frustration. It’s easy to overlook this simple step, but it ensures that you’re not wasting effort on the wrong site.
Check Your Account Dashboard
Your Namecheap account dashboard is your central hub for all domain-related activities. Upon logging in, you’ll see a list of all your domains. Take a moment to double-check the domain you want to work on. This prevents any missteps later on.
Imagine working on the wrong site. It happens more often than you think. A quick glance at your dashboard can make all the difference.
Use The Search Bar
If you have multiple domains, finding the right one can feel overwhelming. Namecheap offers a search bar in your dashboard. Type in the domain name you’re looking for. Instantly, you’ll narrow down your options.
Think of it as a shortcut in your digital workspace. One search and you’re ready to proceed.
Domain Management Page
Click on the domain name to access its management page. This page is packed with useful information about your domain, including renewal dates and DNS settings. Familiarize yourself with these details to ensure you’re making informed decisions.
Consider the domain management page as your domain’s blueprint. It’s where all essential data resides.
Verify Domain Status
Before proceeding, ensure your domain is active. An expired domain can lead to unexpected complications. Check the status displayed next to your domain name. If everything is in order, you’re good to go.
Ask yourself: Is my domain ready for action? A quick status check can prevent headaches down the road.
By pinpointing your domain correctly, you set a solid foundation for accessing cPanel. Every click you make from here on out will be purposeful. Are you ready to dive into managing your online presence with clarity and confidence?
Finding The Cpanel Login
Accessing your cPanel in Namecheap is crucial for managing your website. It’s where you can control various aspects of your hosting environment. You’ll need to know how to find your cPanel login. This section will guide you step by step.
How To Access Your Namecheap Account
First, navigate to the Namecheap website. Enter your account credentials. Click on the ‘Sign In’ button. Once logged in, you will see the dashboard.
Locating The Cpanel Login In Your Dashboard
On the dashboard, find the ‘Domain List’ on the left sidebar. Click on it to expand. Look for your domain and click ‘Manage’.
Entering The Hosting Details
Scroll down to the ‘Hosting’ section. You will see a ‘Go to cPanel’ button. Click it to access your cPanel login page.
Using The Direct Cpanel Url
You can also access cPanel directly. Use the URL format: yourdomain.com/cpanel. Enter your cPanel username and password.
Checking Your Email For Login Information
After purchasing hosting, Namecheap sends an email. It contains your cPanel login details. Check your inbox or spam folder for this email.
Contacting Namecheap Support
If you face issues, contact Namecheap support. They can assist with accessing your cPanel. They are available 24/7 for support.
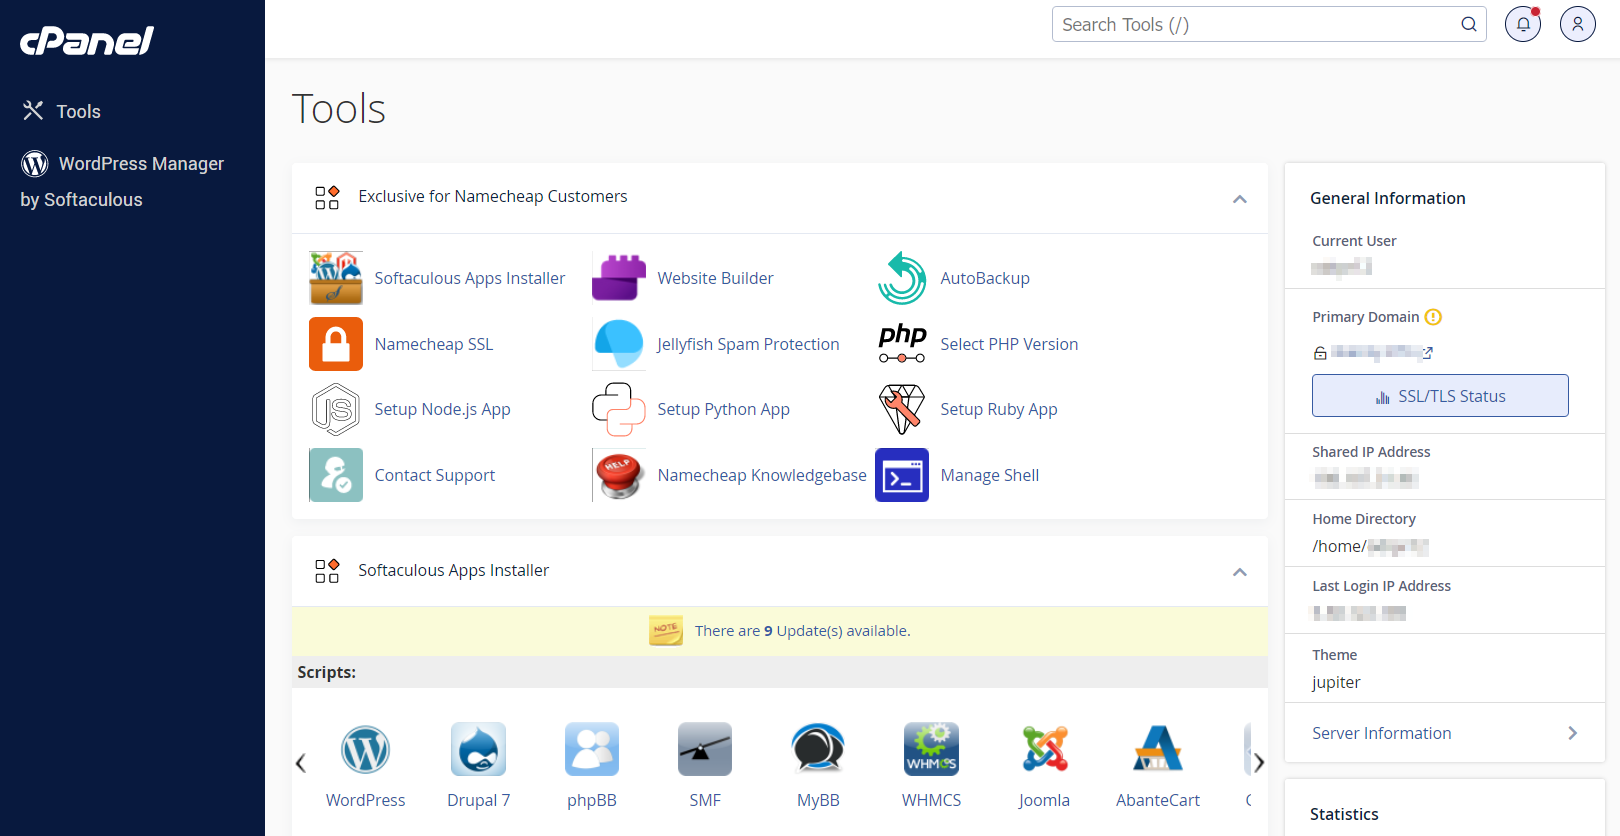
Accessing Cpanel
Accessing Cpanel in Namecheap is essential for managing your website. This intuitive control panel offers many features to help you. From managing files to databases, Cpanel is the go-to tool. You can handle email accounts, backup data, and much more. Let’s dive into how you can access and explore its functionalities.
Entering Your Credentials
First, you need to log in to your Namecheap account. Open your browser and visit the Namecheap website. Click on the “Account” button at the top right. Enter your username and password. These are the credentials you set during registration. Once logged in, you will see the dashboard.
Find the “Account” section in the dashboard. Click on “Dashboard” from the dropdown menu. This will lead you to your list of services. Locate your domain or hosting service. Click on the “Manage” button next to it. Here, you’ll find the option to access Cpanel.
Exploring Cpanel Features
Once inside Cpanel, a world of features awaits. The interface is user-friendly and intuitive. You’ll see icons representing different functionalities. File management is one of the top features. You can upload, edit, or delete files with ease.
Database management is another critical feature. Use MySQL databases for storing website data. Cpanel makes database handling straightforward. Email management is also simple. Create email accounts and set up auto-responders easily.
Security is crucial for any website. Cpanel offers tools to enhance security. Use SSL certificates and password protection. Backup options are readily available. Ensure your data is safe with regular backups.
Each feature is designed to improve website management. Explore Cpanel to make the most out of your hosting experience.
Troubleshooting Common Issues
Sometimes, finding Cpanel in Namecheap can be challenging. Even experienced users may face issues. Troubleshooting these problems can save time and frustration. Here, we address common issues and offer solutions.
Password Recovery
Can’t access your Cpanel due to a forgotten password? No worries. Start by visiting the Namecheap login page. Click on “Forgot Password.” Enter your registered email. Follow the instructions sent to your email. Ensure your email is up-to-date to avoid delays.
Contacting Support
Still having trouble? Namecheap support is ready to assist. Visit their website to access live chat. You can also submit a ticket for complex issues. Support staff are knowledgeable and helpful. They can guide you through the process.
Tips For Efficient Cpanel Use
Accessing cPanel in Namecheap is simple. Log into your Namecheap account. Navigate to the ‘Hosting List’ tab. Click on the ‘Go to cPanel’ button next to your domain.
Finding your way around Cpanel in Namecheap can be a breeze once you learn a few efficient tips. Whether you’re a seasoned pro or a newbie, getting the most out of Cpanel can streamline your website management tasks, saving you time and effort. Let’s dive into some practical tips to enhance your Cpanel experience. You’ll find that small tweaks can make a big difference in managing your online presence.Bookmarking Cpanel Login
One of the simplest ways to streamline your access to Cpanel is by bookmarking the login page. This prevents the hassle of searching for the URL every time you need to log in. Imagine not wasting precious minutes hunting through emails or documents to find your Cpanel login link. Bookmarking is like leaving a trail of breadcrumbs back to your website’s control panel. Consider using browser extensions to manage bookmarks efficiently. These tools can help categorize and quickly access different sites, including your Cpanel. This way, you maintain a clean and organized browser toolbar, ready to whisk you away to your Cpanel dashboard with a single click.Regular Backups
Regular backups are your safety net. They protect your website from unforeseen mishaps like accidental data loss or cyber threats. Ever accidentally deleted an important file? With regular backups, you can restore your site to its former glory without breaking a sweat. Cpanel offers easy-to-use backup features. Make it a habit to schedule backups at regular intervals. This ensures you always have a recent version of your website to fall back on. Explore the automatic backup options if available, so you don’t have to manually initiate backups every time. Think about the peace of mind knowing your work is safeguarded. It’s like having a safety deposit box for your digital assets. When was the last time you backed up your website? If it’s been a while, now’s a good time to start making regular backups part of your routine. By implementing these tips, you can transform your Cpanel usage from a chore into an efficient process. What other strategies do you use to make your Cpanel experience smoother? Don’t just wait for disaster to strike; take proactive steps to ensure your website’s safety and accessibility.Frequently Asked Questions
Where Can I Find Cpanel In Namecheap?
Access cPanel in Namecheap by logging into your account. Click “Hosting List” under “Account Panel. ” Find your domain, then click “Manage” next to it. Select the “cPanel” button to access the control panel.
How Do I Find My Cpanel?
Log into your hosting account’s dashboard. Search for the cPanel login option. Click to access your cPanel.
Does Namecheap Come With Cpanel?
Yes, Namecheap provides cPanel with its shared hosting plans. CPanel allows easy management of your website. It offers features like email setup, file management, and domain configuration. With cPanel, users can effortlessly control various aspects of their web hosting environment, enhancing overall website management and performance.
How Do I Find My Cpanel Server Name?
Log into your cPanel. Locate the “Server Information” section. Find your server name listed there. Alternatively, contact your hosting provider for assistance.
Conclusion
Finding Cpanel in Namecheap is simple. Follow these steps to access it. First, log in to your Namecheap account. Next, go to the “Dashboard. ” Then, locate the “Hosting List. ” Here, you will find the “Go to cPanel” button.
Click it. You can now manage your website easily. Cpanel offers many features. It helps with website management. You can update files, manage databases, and more. Remember, exploring Cpanel enhances your website’s efficiency. Stay patient while you learn. Practice makes perfect.
Enjoy managing your site with these tools. Happy web hosting!


