
Are you ready to take control of your website with HostGator but don’t know where to start? Editing your website can seem like a daunting task, especially if you’re not a tech guru.
But what if I told you it doesn’t have to be complicated? With the right guidance, you can confidently make changes and updates to your site, keeping it fresh and engaging for your visitors. Imagine having the power to tweak your design, update content, and enhance functionality all by yourself.
In this guide, we’ll break down the steps you need to edit your website with HostGator, empowering you to take charge without the headache. Stick around, and discover how simple website management can be, even if you’re a beginner.
Setting Up Your Hostgator Account
First, visit the HostGator website. Click the sign-up button. Choose your plan. Basic plans are good for starters. Enter your email and create a password. Keep your password safe. Next, fill in your personal details. Check your information twice. Select your payment method. Credit cards or PayPal are options. Complete the payment process. Wait for the confirmation email. Your account is now ready.
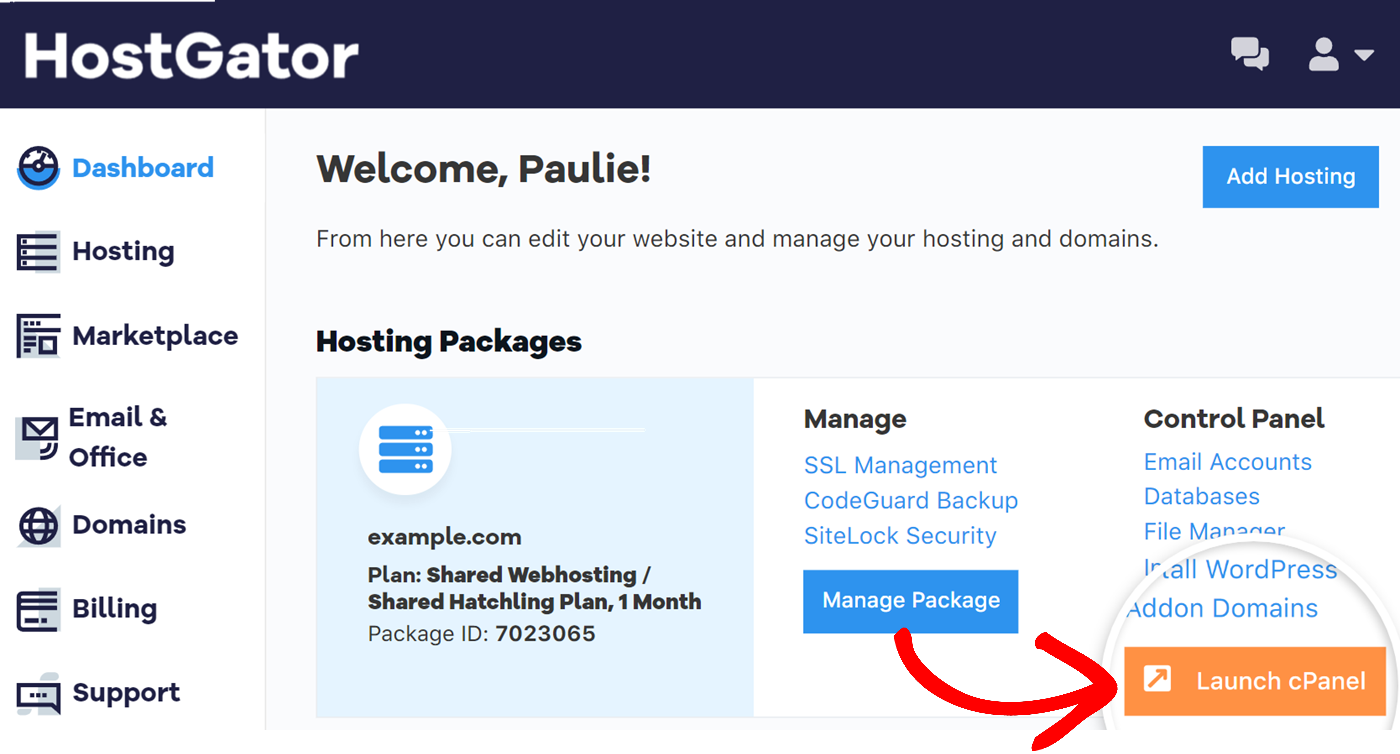
Log in to HostGator with your email. Use the password you created. Find the control panel link. Click to access the panel. The dashboard shows many tools. Look for the “File Manager” tool. It helps you manage website files. You can edit or upload files there. Check the “Site Builder” tool. It helps design webpages easily. These tools are very helpful.
Navigating The Control Panel
The control panel has many tools. The dashboard is the main screen. It shows important information. You can find your account details here. There are sections for email, domains, and files. Each section helps you manage your site. Icons and menus make it easy to navigate. The dashboard is user-friendly. You can learn quickly how it works.
Website tools are in the control panel. The File Manager lets you edit files. The WordPress installer is for WordPress sites. There is a section for backups. You can find these tools under the “Files” tab. Databases have their own section. Each tool has a purpose. Use them to make changes to your site.
Using The Website Builder
First, select a template from the options. Templates are pre-designed layouts for your site. Look for a style that fits your needs. Each template has different features and looks. Click to see how it looks on your site. You can always change it later if needed.
Now, it’s time to customize. Change colors and fonts to match your style. Add images that fit your theme. Use the drag-and-drop tool to move things around. Check each change to see how it looks. Make sure everything is easy to read and nice to look at.
Add new pages for different parts of your site. About, Contact, and Services pages are common choices. Write content that tells visitors about you or your business. Use simple words and clear sentences. Make sure your information is correct and up-to-date.
Editing Html And Css
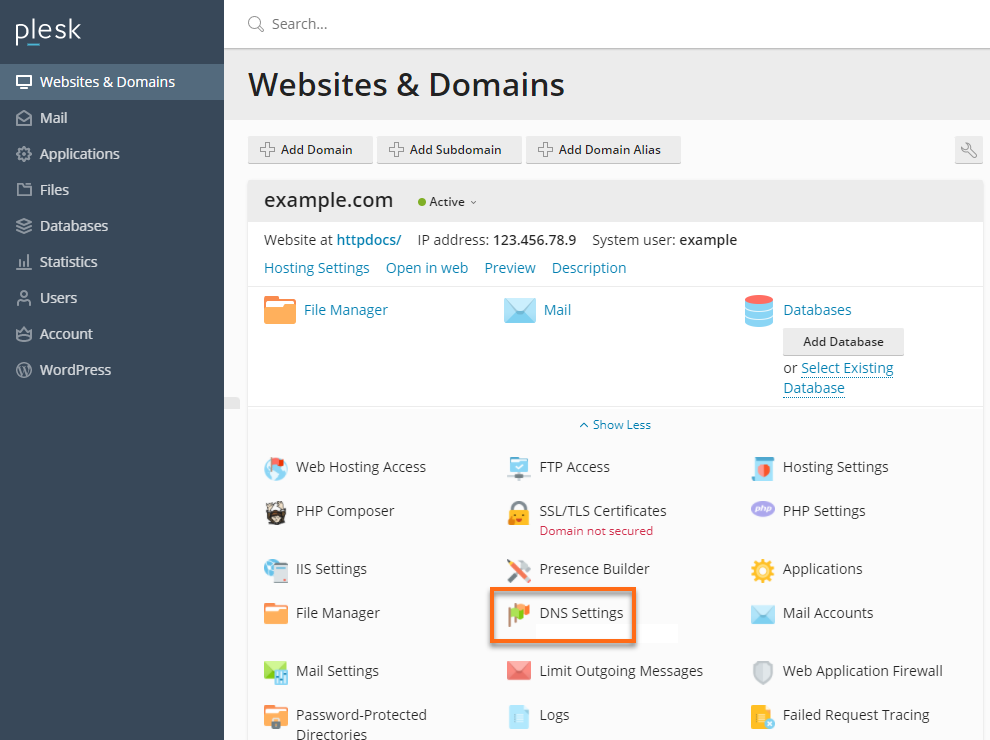
First, log into your Host Gator account. Find the File Manager. This tool lets you see all your website files. Click on it to open. You will see folders and files. Look for the public_html folder. It holds your website files. Click it to open and view HTML and CSS files.
Find your HTML file in public_html. Click the file to open it. You can now see the code. Change the code with the editor tool. Save your changes when done. This updates your website.
CSS files control the look of your site. Find the CSS file in public_html. Click it to edit. Change colors, fonts, or sizes. Use the editor tool to make changes. Save your edits to update the look.
Managing Plugins And Add-ons
Editing a website with HostGator involves managing plugins and add-ons effectively. Access the control panel, navigate to the plugin section, and choose necessary tools. Ensure compatibility to enhance functionality and maintain site performance.
Installing New Plugins
Find the plugin you want to add. Use the search bar in your HostGator dashboard. Click the install button next to your chosen plugin. Wait for the installation to complete. Activate the plugin by clicking the activate button. Your new plugin is now ready to use.
Configuring Plugin Settings
Open the plugin settings from the dashboard. Look for the settings option under the plugin name. Adjust settings to fit your needs. Save changes by clicking the save button. Check if the plugin works as expected. Adjust settings if needed.
Updating And Removing Plugins
Plugins need updates regularly. Go to your dashboard to check for updates. Click the update button if available. To remove a plugin, go to the installed plugins list. Click the delete button next to the plugin. Confirm the removal. Plugin will be removed from your site.
Credit: sendlayer.com
Optimizing Website Performance
Faster websites make users happy. Use fewer images and videos. Compress files to speed up loading. Keep code clean and simple. Check for broken links and fix them. Fast loading helps visitors stay longer. They enjoy browsing more. Speed is important for keeping users engaged.
Caching saves data for quick access. Use browser caching to store files on the user’s device. Server caching speeds up data delivery. This reduces wait time. It makes the website faster. Caching helps keep users on your site longer. They like fast websites.
Most people use phones to browse. Make sure your site works on mobiles. Use a responsive design that adjusts to screens. Easy navigation helps users find what they need. Text should be readable without zooming. Buttons must be big enough to click. Mobile-friendly sites attract more visitors.
Backing Up Your Website
Automatic backups are important for your website’s safety. HostGator offers a simple way to set up these backups. Log in to your control panel first. Find the backup section and turn on automatic backups. Choose how often you want backups to happen. Daily is best for active sites. Save your settings once done. Now, your website data is safe from loss.
Sometimes, creating a manual backup is wise. Go to your control panel. Click on the backup option. Download your website files to your computer. Keep these files safe. This is your backup copy. Manual backups are great before making big site changes.
Restoring files is simple. Open your control panel. Find the restore option. Upload your backup files. Follow the steps to complete the restore. Your site will return to the saved state. This is helpful if something goes wrong.
Credit: www.hostgator.com
Troubleshooting Common Issues
Editing a website with HostGator often leads to common issues. Fixing broken links requires checking URL paths and updating them. Adjusting page layouts involves using the website editor and previewing changes before publishing.
Resolving Login Problems
Forgot your password? Click on “Forgot Password” to reset. Use your email to get a new password. Enter your new password to log in. Check your internet connection if you can’t log in. Contact support if problems persist.
Fixing Broken Links
Find broken links using a link checker tool. Update the link to the correct URL. Replace broken links with working ones. Test all links after fixing them. Ensure all links lead to correct pages.
Handling Error Messages
Read the error message carefully. Understand what it is saying. Check if there is a typo in the code. Confirm the file path is correct. Look for missing files or folders. Contact support if you can’t fix the error.

Credit: www.youtube.com
Frequently Asked Questions
How Do I Edit A Website On Hostgator?
Log into your HostGator account. Access cPanel, then choose the File Manager. Locate your website files. Click “Edit” to make changes. Save your edits.
Does Hostgator Have A Website Builder?
Yes, HostGator provides a website builder called Gator. It offers drag-and-drop functionality, templates, and easy customization. Users can create professional websites without coding skills. The builder is included in HostGator’s hosting plans, ensuring seamless integration. It’s designed to be user-friendly and efficient for beginners and experienced users alike.
How Do I Change My Primary Website In Hostgator?
Log in to your HostGator account. Go to the Billing section. Select “Change Domain” under the primary domain. Follow the prompts to update your primary website. Save changes and verify the update.
How Do I Edit An Existing Website On Godaddy?
Log into your GoDaddy account and open your website builder. Select the site to edit, make changes using the available tools, and save. Publish the updated website to make changes live. Ensure all edits are correct before publishing to avoid errors.
Conclusion
Editing your website with HostGator is simple and efficient. Navigate through user-friendly tools. Update content effortlessly. HostGator provides reliable support for beginners. Customize designs to fit your style. Enhance your site’s functionality with easy plugins. Monitor your website’s performance with built-in analytics.
Secure your site with HostGator’s protection features. Improve user experience with responsive design options. HostGator helps keep your site updated and fresh. Explore the platform to maximize your site’s potential. Stay ahead by regularly updating your content. Keep your audience engaged with fresh information.
Happy editing with HostGator!


