
Have you ever wondered how to host your ASP.NET website efficiently and smoothly? You’re not alone.
Many developers face challenges when it comes to web hosting, especially with ASP. NET applications. But don’t worry, you’ve come to the right place. This guide will help you navigate the ins and outs of web hosting in ASP. NET, ensuring your site runs seamlessly and securely.
Imagine your website performing at its best, attracting and retaining visitors effortlessly. With the right hosting approach, this can be your reality. You might think it’s complicated, but with straightforward steps and practical advice, web hosting in ASP. NET can be simpler than you expect. By the end of this article, you’ll have a clear understanding of how to choose the best hosting service for your needs, configure your server settings correctly, and optimize your ASP. NET application for peak performance. So, let’s dive in and make your web hosting experience stress-free and rewarding!
Credit: www.plesk.com
Basics Of Asp.net Web Hosting
Web hosting stores your website files on a server. It makes your site visible online. You need a domain name to access your site. Hosting gives your site a home on the internet. Different hosting types offer varied features. Shared hosting is often the cheapest. Dedicated hosting is more expensive but offers more control.
ASP.NET is a web application framework. It helps build dynamic websites. It runs on the .NET framework. ASP.NET supports various programming languages. C# and VB.NET are popular choices. This framework is known for its speed and performance. It makes web development easier. Hosting ASP.NET sites often needs a Windows server.
Choosing The Right Hosting Provider
There are various types of hosting services. Shared hosting is affordable. You share a server with others. Dedicated hosting gives you a whole server. It’s more secure and faster. VPS hosting is in between. You get a part of a server. It’s like having your own space. Cloud hosting is flexible. You use multiple servers. It can handle lots of traffic.
Look for reliable uptime. The site should be up 99.9% of the time. Check for good support. Help should be available 24/7. Ensure there is enough storage. Your site needs space for files. Bandwidth is important too. It affects site speed. Security features protect your data. Look for SSL certificates and firewalls.
Setting Up Your Asp.net Environment
First, you need to install Visual Studio. It helps you write code easily. Choose the right version for your computer. Then, install the ASP.NET Core package. This package is important for making web apps. Don’t forget to update Windows. Updates help your computer run better. Finally, download the SQL Server for database needs.
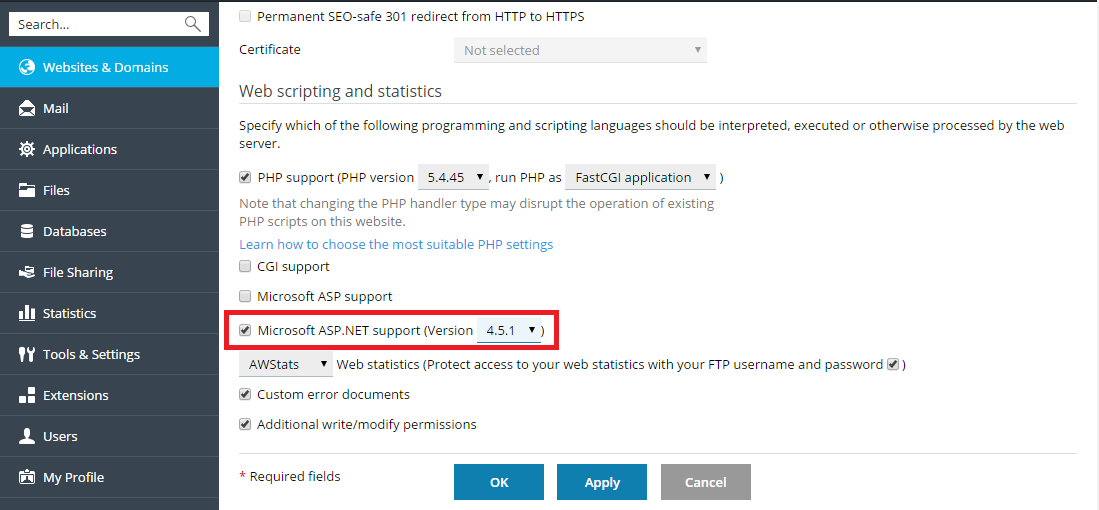
Open the Control Panel on your computer. Find and click on “Programs and Features”. Then, select “Turn Windows features on or off”. In the list, find Internet Information Services (IIS). Check the box to enable it. Open IIS Manager from the start menu. Click on your computer name in the left panel. Then, double-click on “ISAPI and CGI Restrictions”. Make sure ASP.NET is allowed.
Credit: weblog.west-wind.com
Deploying Asp.net Applications
Publishing your website is simple. First, build your ASP.NET application. Use the build menu in Visual Studio. Click “Build Solution.” This makes sure your code is ready. Once built, you can publish it. Choose the “Publish” option. This helps prepare your site for hosting. Follow the steps on the screen. They are easy to follow.
The Web Deploy Tool is helpful for hosting. It transfers your files to the server. To start, set up a profile. This profile saves your settings. Next, enter your server details. This includes your server name and user credentials. After that, click “Publish.” Your application will upload to the server. Check your site to see if it works. If there are problems, review the settings. They might need changes.
Managing Databases
Setting up web hosting in ASP. NET involves configuring server settings and managing databases effectively. Choose a reliable hosting provider, upload your application, and connect it to your database. Ensure proper security measures are in place for smooth operation.
Connecting To Sql Server
Connecting to SQL Server is simple. Use the Connection String. This string tells your app how to talk to the database. Set the server name, database name, and login details. Always keep passwords safe. Use a secure place to store them. Check if the connection works. Fix errors if they show up. Good connection means your app runs smoothly.
Database Backup And Restore
Backing up your database is important. You save all data in a safe place. Use tools like SQL Server Management Studio. It’s easy. Click on the database. Choose Backup option. Follow steps to finish. Restoring is bringing back data from a backup. Do this if data gets lost. Always keep backups updated. It helps to avoid data loss.
Security Best Practices
SSL certificates help keep your data safe. They encrypt the data between users and servers. This makes it hard for hackers to steal information. Always use SSL for your websites. It builds trust with your users. Browsers show a padlock icon for SSL sites. People feel safe when they see this icon.
Websites face many threats online. Hackers try to find weak spots. SQL injection is one common threat. It lets hackers mess with your database. Cross-Site Scripting (XSS) is another threat. Hackers can run harmful scripts on your site. Use firewalls and security tools. They help block these threats. Always update your software. New updates fix security issues.
Performance Optimization
Caching is a key for fast websites. It saves data so users get it quickly. Browser caching stores data on users’ devices. Server caching keeps data on the server. Both methods help reduce load times. Memory caching uses RAM for fast access. Choose the right caching strategy. It depends on your needs. A good strategy improves performance. It makes your website faster. Users will be happy with fast loading pages.
Monitoring tools watch your website. They find problems fast. Analytics tools track user actions. They show what users like or dislike. Regular checks keep websites smooth. Fix issues as soon as they appear. Use data from tools to improve. They help in making smart decisions. Choose tools that fit your needs. A mix of monitoring and analytics boosts performance. Keeps users satisfied.

Credit: www.interserver.net
Troubleshooting Common Issues
Navigating web hosting in Asp. Net involves resolving issues like server configuration, file permissions, and database connections. Ensure smooth operation by checking settings and consulting error logs regularly. Proper setup and maintenance are crucial for efficient hosting performance.
Handling Error Pages
Errors happen on web pages. Custom error pages help users. They show a friendly message instead of a confusing error. Use web.config to set them up. Define error codes like 404 or 500. Add a custom message for each. Users feel better with clear messages. They stay on the site longer. This improves your site’s reliability.
Debugging And Logs
Debugging finds problems in code. It shows what goes wrong. Use tools like Visual Studio. They help spot errors fast. Logs record events on the server. They tell you what happened and when. Check logs regularly. Fix issues before they grow big. Good logs make solving problems easier. Your site works better with proper debugging.
Frequently Asked Questions
Can You Host Asp.net For Free?
Yes, you can host ASP. NET for free. Platforms like Azure and Heroku offer free hosting tiers for developers.
How Do I Set Up A Web Hosting?
Choose a reliable web host and create an account. Select a hosting plan suitable for your needs. Register a domain name or use an existing one. Configure DNS settings to connect your domain to the hosting. Install a website platform like WordPress for easy website management.
Can We Host Asp.net Web Api Without Iis?
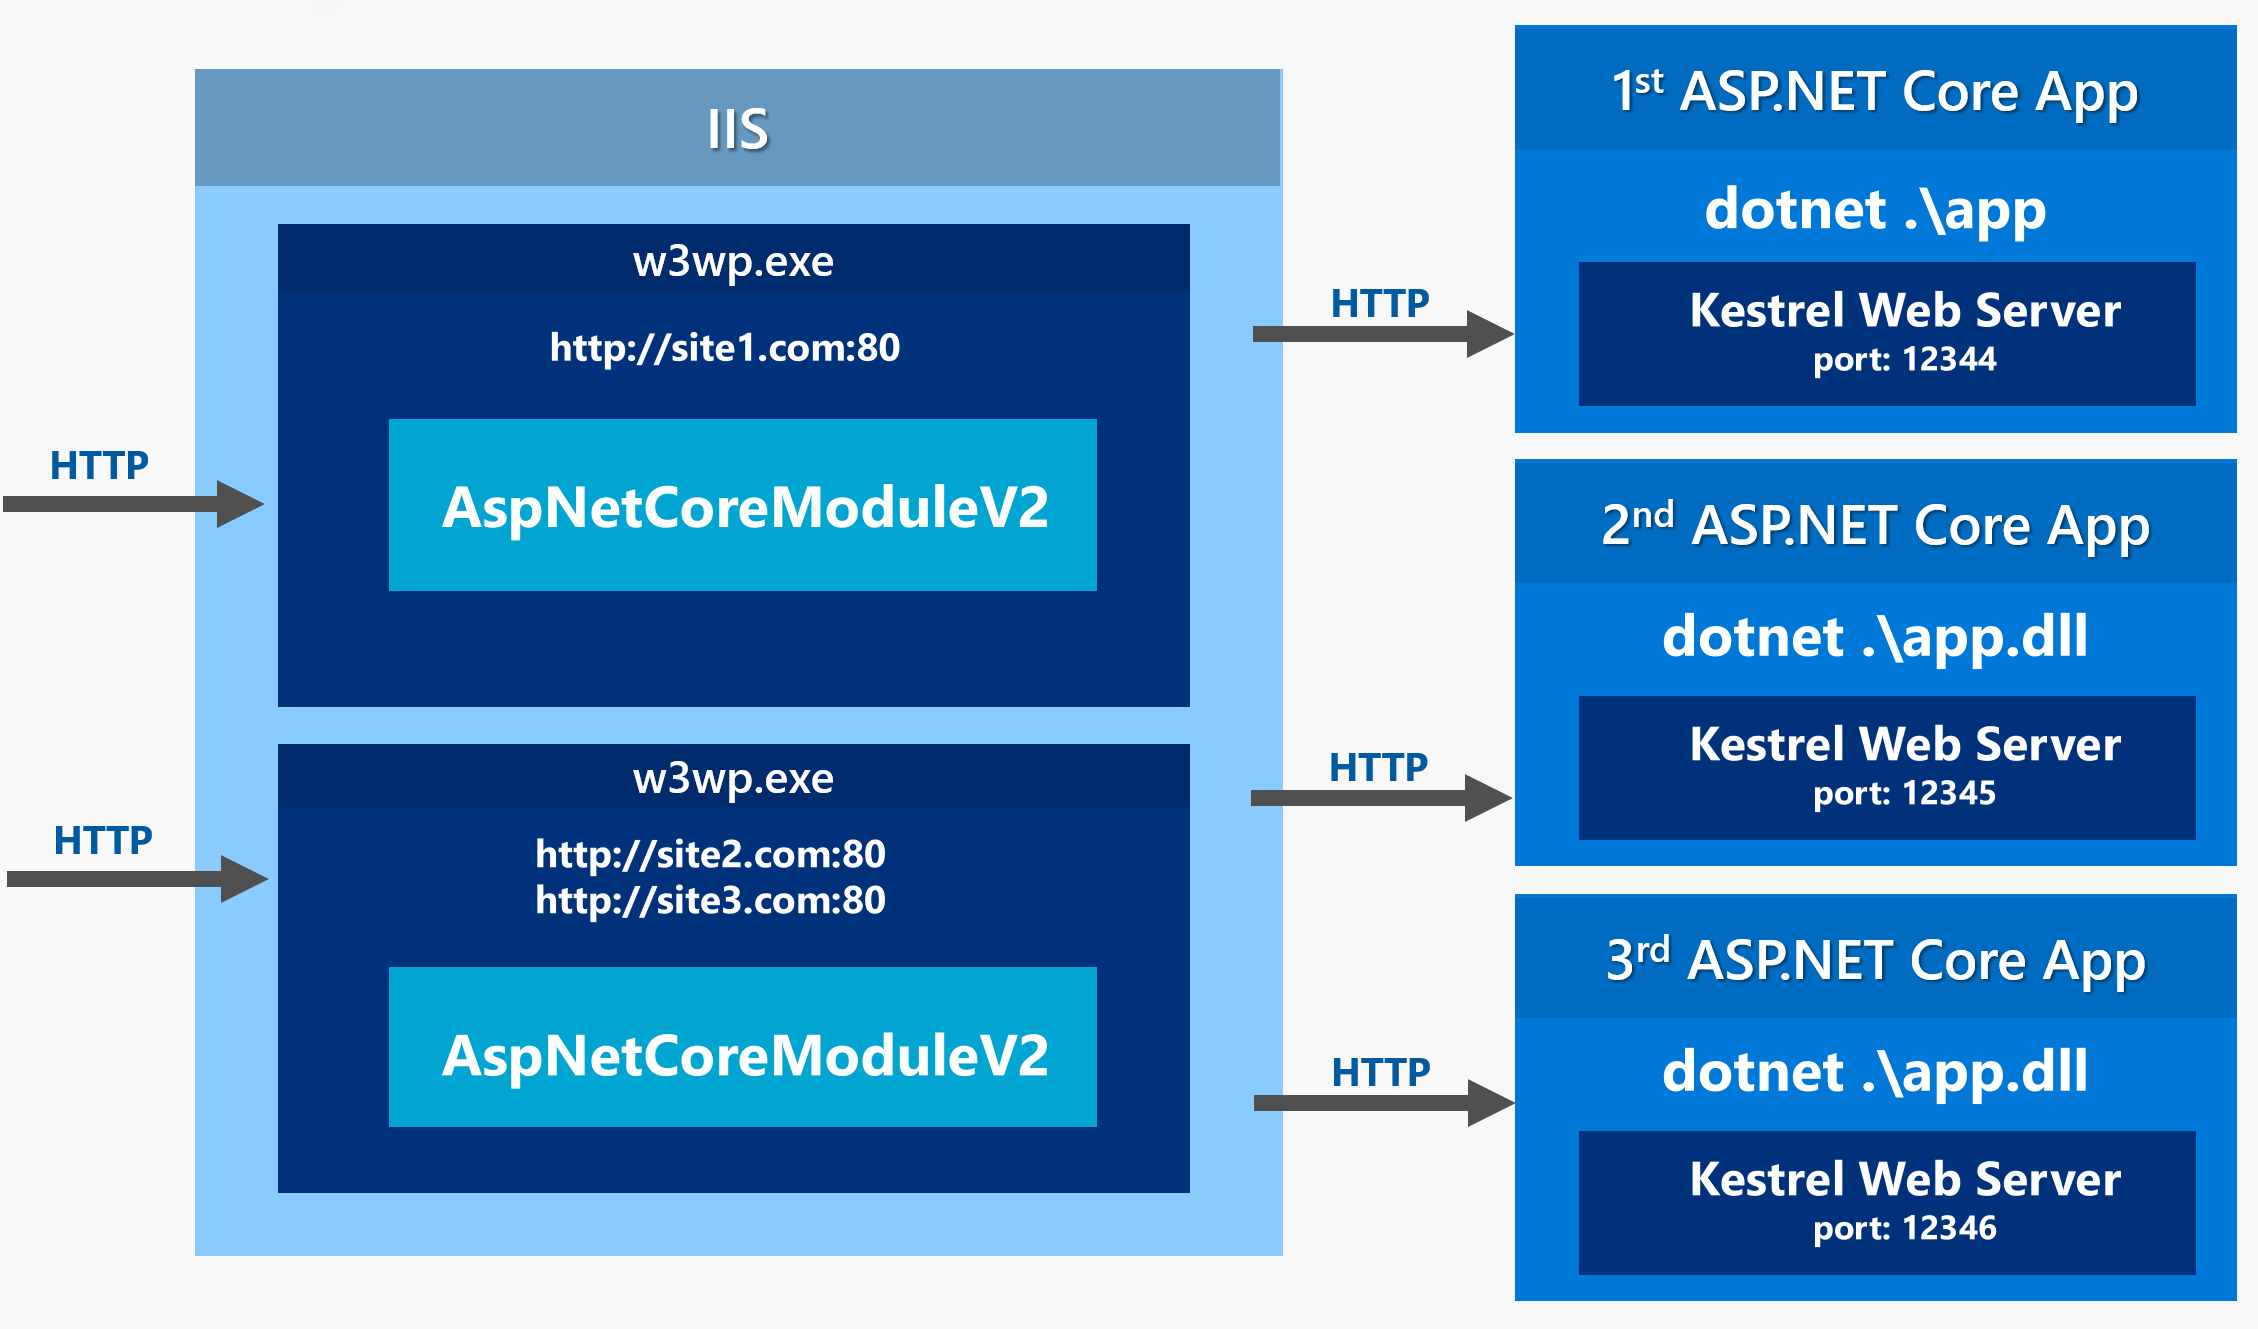
Yes, you can host ASP. NET web API without IIS. Use Kestrel, a cross-platform web server, or self-host using. NET Core. Docker containers provide another option for deploying ASP. NET web APIs independently of IIS.
How To Host Asp.net On Iis?
To host ASP. NET on IIS, install IIS via Control Panel. Configure your website in IIS Manager, set application pool, and deploy your ASP. NET project files. Ensure. NET Framework is installed and compatible with your application. Test your site by accessing it through a web browser using localhost or the server’s IP address.
Conclusion
Mastering web hosting in ASP. NET simplifies your online journey. From setup to deployment, each step enhances site performance. Remember to choose the right server for your needs. Regular updates keep your website secure and efficient. Keep learning and exploring new features.
Practice makes perfect, so dive in and start hosting. With ASP. NET, hosting becomes streamlined and effective. Always aim for clarity and functionality in your web solutions. Your efforts lead to better user experiences and site reliability. Happy hosting!


