
Are you looking to enhance your web server’s efficiency and organization? Creating a host header web application might be the game-changer you need.
Host headers allow you to host multiple websites on a single server, making your digital operations more streamlined and cost-effective. Imagine managing numerous domains without the hassle of multiple IP addresses. Intrigued? In this guide, you’ll discover how simple it is to set up a host header web application, even if you’re not a tech expert.
We’ll break down the process into easy-to-follow steps, ensuring you’re equipped with the knowledge to implement this powerful tool seamlessly. Dive in, and unlock the potential of your server today!
Understanding Host Headers
Host headers tell web servers where to send requests. They help in managing multiple websites on one server. Each website has its own unique host header. This makes it easy to direct traffic correctly. Without host headers, servers would get confused. They wouldn’t know which website to show. This is crucial for shared hosting environments.
Host headers save costs by using one IP for many sites. This is helpful for businesses with limited resources. Host headers also make it easy to manage websites. No need for extra hardware. They improve server efficiency and organization. Websites run smoother and faster. This enhances user experience significantly.

Credit: vschamarti.wordpress.com
Prerequisites For Host Header Setup
Certain tools are essential. A web server is needed first. Apache or IIS can be used. A text editor is also required. Notepad++ or Sublime Text works well. A domain name is important too. Make sure it is registered. Finally, a browser is necessary to test. Chrome or Firefox are good options.
A static IP address is needed. It helps in directing traffic. DNS settings must point to your server. This links the domain to the server. Firewall settings should allow traffic on port 80. This is the default port for web traffic. Ensure network security is in place. This protects your server from attacks.
Configuring Dns For Host Headers
Setting up DNS for host headers involves linking domain names to specific web applications. This process helps direct user requests to the correct server by configuring DNS records to recognize host headers. Proper configuration ensures your web application is accessible via its unique domain name, enhancing user experience and site functionality.
Creating Dns Records
First, open the DNS management tool. Locate the area to add new records. Choose type A for IPv4 addresses. Enter the host name in the name field. Type the IP address of your server. Save the record. Repeat for other host headers. Ensure each has a unique IP. Verify all records are correct.
Testing Dns Configuration
Check if the DNS records work. Use the ping command to test. Type the host name in the command line. Wait for the response. A successful ping means DNS works. If not, check settings. Ensure network connection is active. Double-check the host names. Correct any typos. Retest after changes. Keep testing until all respond well.
Setting Up Web Server
To start, open the IIS or Apache control panel. Find the section for creating new sites. For IIS, this is called “Sites”. For Apache, look for “Virtual Hosts”. Add a new entry for your site. Name it what you like. Enter the host name. This is your site’s address. Save your changes. Your site is now set up.
Virtual hosts allow many sites on one server. In IIS, go to the Bindings section. Add a new binding for your site. Enter the host name. Save it. In Apache, open the httpd-vhosts.conf file. Add a new block for your site. Include the ServerName. Save and restart Apache. Your virtual host is now ready.
Configuring Host Headers In Iis
Host headers help direct web traffic to the right place. Open IIS Manager on your computer. Click on the site you want to configure. Look for the Bindings option. Click it to open a new window. Choose Add and select http or https. Enter the host name in the field provided. Click OK to save changes. This process helps keep web traffic organized.
Binding host headers to sites is important. Start by opening IIS Manager. Click on your site. Look for the Bindings button and click it. A window will appear. Click Add and select a type. Enter the host name. Ensure the IP address is set to All Unassigned. Click OK to bind the host header. This makes your site reachable with a name.
Configuring Host Headers In Apache
Apache needs a special setup for host headers. First, open the Apache configuration file. This file is usually named httpd.conf or apache2.conf. Use a text editor like Notepad or Nano. Search for the section with Virtual Host Directives. It might look like . Each block here is for a different website.
Add a line with ServerName. This tells Apache which name to use. Example: ServerName www.example.com. Save the changes before closing the file. Now, Apache knows about the host headers. Restart Apache to apply these changes. Use the command service apache2 restart in the terminal. Now your host headers should work!
Testing Host Header Configuration
Open your web browser. Type the URL of your web application. Press Enter. Check if the web page loads. A working page means the host header is set correctly. If it doesn’t load, there might be a problem. Try using another browser to confirm. Sometimes settings differ across browsers. Make sure the host name matches your application. It’s important for testing to be accurate. Never skip checking with different browsers.
Sometimes the host header doesn’t work. Check if the DNS settings are correct. Ensure the server is set to recognize the host. Sometimes firewall settings block access. Adjust them if needed. Error messages provide clues about what’s wrong. Read them carefully. They can point you to the solution. Always check the logs for detailed errors. Logs are helpful to find hidden issues. Make sure all configurations are correct. Double-check every setting.
Security Considerations
SSL encrypts data between users and servers. It keeps data safe. Host headers help direct web traffic. They tell servers which site to show. Combining SSL and host headers boosts security. It ensures only the right site shows. Use SSL certificates for each domain. This is very important.
Preventing Host Header Attacks is crucial. Attackers can misuse host headers. They can trick servers. This leads to showing the wrong page. Always validate host headers. Check them carefully. Never trust unchecked inputs. Use firewall rules to block bad requests. Regular updates keep systems safe. Stay alert to new threats. Protect your web apps fully.
Best Practices For Host Header Management
Keep host headers organized for best results. Group similar headers together. This helps you find them easily later. Use clear and simple names. Avoid using complex words. This makes it easier for everyone. Regularly update your list. Remove old or unused headers. Clean lists work best.
Monitor your host headers often. This helps catch problems early. Check logs for errors. Keep an eye on traffic patterns. Look out for unusual activity. Maintenance is key. Update your settings as needed. Test changes carefully. This keeps your application running smoothly.

Credit: www.c-sharpcorner.com
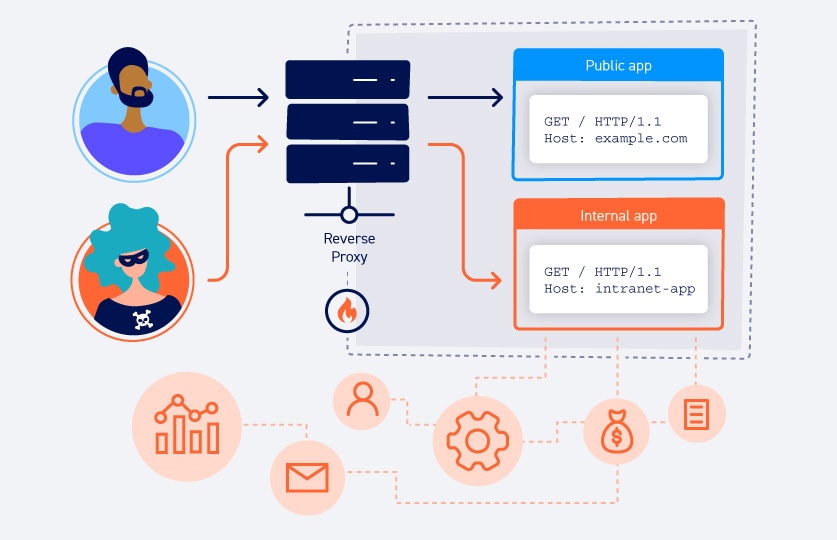
Credit: portswigger.net
Frequently Asked Questions
What Is An Example Of A Host Header?
An example of a Host header is “Host: www. example. com”. It specifies the domain name of the server. This header helps route requests to the correct website hosted on a server. Host headers are essential for accessing different sites on shared IP addresses.
What Is The Host Header Of A Web Server?
The Host header specifies the domain name of the server a client wants to connect to. It helps route the request to the correct server or virtual host. This header is crucial for servers hosting multiple domains. Proper configuration ensures efficient request handling and accurate resource retrieval.
How Do I Change The Host Header?
Open your web server configuration file. Locate the Host header settings. Modify it as needed. Save the changes and restart your server. Check if the new Host header is working correctly. Use tools like cURL for verification.
What Is The Hostname Of A Sharepoint Site?
The hostname of a SharePoint site is typically the domain name followed by the site-specific path. For example, “companyname. sharepoint. com/sites/sitename”. It uniquely identifies the location of your SharePoint site within the organization’s domain.
Conclusion
Creating a host header web application can feel daunting. With careful steps, success is achievable. Start by understanding your server and domain settings. Ensure security measures are in place. Test your application thoroughly. Check for errors and resolve them quickly.
Keep learning and adapting to new technologies. Stay updated with industry trends. Practice makes perfect. With dedication and patience, you can build efficient applications. Remember, simplicity and clarity are key. Always prioritize user experience. Aim to create applications that are easy to navigate and understand.
Your efforts will lead to a reliable and user-friendly web application.


