
Are you looking to enhance your WordPress website with a dynamic menu that captivates your visitors and keeps them engaged? Creating a dynamic menu is not just about aesthetics; it’s about improving navigation and user experience, which can lead to increased time spent on your site and higher conversion rates.
Imagine your visitors easily finding exactly what they’re looking for, all while enjoying a seamless browsing experience. Sounds appealing, right? In this guide, you’ll discover step-by-step instructions to create a dynamic menu in your WordPress theme. This simple yet powerful change can transform your website, making it more interactive and user-friendly.
Let’s dive in and unlock the full potential of your WordPress site!
Understanding WordPress Menus
WordPress menus help users move around your site. They can find pages, posts, and categories easily. A dynamic menu changes based on visitor actions.
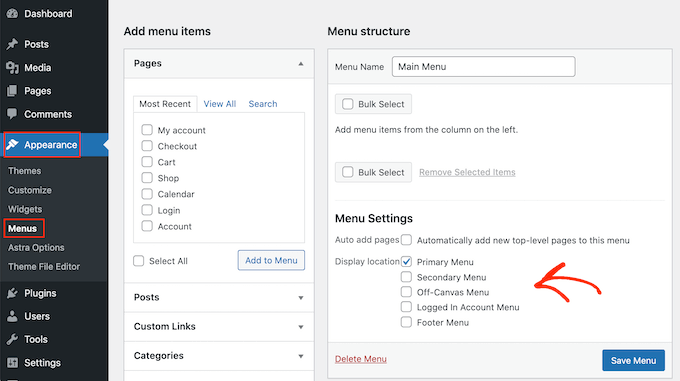
Building a menu starts from the dashboard. Click on Appearance, then Menus. Add pages or links you want. Save changes to see them live.
Use the custom links option for external URLs. Add a label for each link. Always ensure menus are simple and clear. Visitors should find what they need fast.
Credit: pressidium.com
Benefits Of Dynamic Menus
Dynamic menus offer great flexibility. Users can easily find content. These menus adapt to different screens. They work well on phones and computers. This makes websites easy to use. Menus can change based on user actions. Users have a personalized experience. This can keep them engaged longer.
Website owners can update menus quickly. No need for coding skills. This saves time and effort. It helps in managing a site efficiently. Dynamic menus can improve SEO. Search engines find them easier to crawl. This can lead to better rankings. Improved rankings bring more visitors. More visitors mean more potential customers.
Setting Up A WordPress Theme
Start by picking a theme that suits your needs. Look for themes that are simple and clean. Check if the theme is responsive for mobile devices. You want your site to look good on phones and tablets. Read reviews to see what others say. A good theme can make your site look great.
First, go to your WordPress dashboard. Click on Appearance, then Themes. Click Add New to search for your theme. Use the search bar to find it. Once you find the theme, click Install. After installation, click Activate. Now your theme is ready.
Creating A Custom Menu
First, go to your WordPress dashboard. Find the Appearance tab on the left. Click on it to see the Menus option. This is where you create a menu. It’s easy to find and simple to use. You will see a button that says Create a New Menu. Click on it to start your menu.
After creating a menu, you need to add items. Look for a section called Pages. Here, you will see your site’s pages. Click the checkbox next to each page you want in your menu. Once selected, click Add to Menu. The items will appear on the right. Arrange them by dragging and dropping. Save your changes by clicking the Save Menu button. Your menu is now ready!
Implementing Dynamic Features
WordPress themes can have menus that change. Conditional tags help with this. They show different menu items on different pages. For example, use is_front_page() to show special items on the homepage. Another tag is is_single(). It shows items on single posts. Using conditional tags makes menus smart and flexible.
Using Conditional Tags
Conditional tags are easy to use. They make coding simple. They help check conditions. Use them inside wp_nav_menu() function. This function builds menus. It uses tags to show items based on page type. This is useful for customizing menus. It improves user experience.
Integrating Javascript
JavaScript adds dynamic effects to menus. It creates animations. It makes menus interactive. For example, use onclick events. They show dropdowns when clicked. JavaScript can hide or show items. It makes menus fun and easy to use. Mixing JavaScript with WordPress menus is a great idea.
Styling The Menu
Crafting a dynamic menu in a WordPress theme enhances user navigation. Utilize built-in tools to customize and organize menu items effortlessly. Ensure your site remains intuitive with well-structured categories and engaging labels.
Customizing With Css
CSS makes your menu look unique. It changes colors, fonts, and sizes. Use CSS classes to target menu items. This lets you style them differently. A bright color can highlight important links. Bold fonts make text stand out. CSS animations add fun effects. Hover effects change items when you move the mouse over them. This makes the menu interactive. Simple CSS rules can change the whole look of the menu.
Utilizing Theme Options
Many themes have built-in options for menu styling. These options are easy to use. No coding needed. Just click and select your preferences. You can choose different layouts. Some themes allow background images for menus. This can add a special touch. Always check theme documentation for guidance. This helps to make the most of these options.
Testing And Troubleshooting
Create a dynamic menu in a WordPress theme by using the built-in menu editor. Customize it easily through the WordPress dashboard, allowing for seamless navigation updates. Ensure menus enhance user experience and functionality, making your site more interactive and user-friendly.
Ensuring Responsiveness
Menus should fit different screen sizes. Test on phones, tablets, and computers. Check if text is clear on small screens. Buttons must be easy to tap. Resize the browser window. See if the menu adjusts. Use tools like Google’s Mobile-Friendly Test. This helps check mobile view. Ask friends to test on their devices. This ensures everyone sees the menu well.
Debugging Common Issues
Sometimes menus act strange. Maybe they don’t show up. Or links don’t work. Check for plugin conflicts. Sometimes plugins cause problems. Disable them one by one. See if the menu works again. Inspect code for errors. Use the browser’s inspect tool. Look for JavaScript errors. Check CSS for mistakes. Clear the cache. This helps see recent changes. Ask for help on forums. Experts can guide you.
Enhancing With Plugins
Creating a dynamic menu in a WordPress theme becomes effortless with plugins. These tools provide flexibility and ease, allowing you to customize menus without coding skills. Enhance user navigation and improve website functionality by integrating reliable plugins into your WordPress theme.
Choosing The Right Plugin
Finding the right plugin is important. Plugins help you build menus easily. Some plugins are free. Others cost money. Free plugins can do a lot. Paid plugins offer more features. Read reviews before choosing a plugin. Reviews help you know what others think. Check if the plugin works with your theme. Compatibility matters.
Configuring Plugin Settings
Once you have the plugin, open the settings. Settings let you change how the menu looks. You can add links or change colors. Explore each option carefully. Try different settings to see what you like. If you make a mistake, you can reset. Save your changes when done. Don’t forget to save! Refresh your page to see the new menu.
Best Practices For Menu Design
A simple menu is easy to use. People find what they need fast. Avoid too many options. It can confuse users. Keep the menu items clear. Use short words. Make it easy for everyone. Clear menus help users find things quickly.
Use common words. Avoid complex terms. This helps all users. A simple menu looks good too. It makes the site neat. Users like that. A clear menu is a happy menu.
Accessibility means everyone can use the menu. Some users need extra help. Use big fonts. They are easy to read. Use high contrast colors. They help users see well.
Add labels for screen readers. This helps blind users. Test your menu. Make sure it works on all devices. Help everyone enjoy your site. An accessible menu is good for all.
Credit: www.wpbeginner.com

Credit: make.wordpress.org
Frequently Asked Questions
How Do I Add A Dynamic Menu In WordPress?
To add a dynamic menu, navigate to Appearance > Menus in your WordPress dashboard. Create a new menu, add your desired pages, categories, or custom links. Assign this menu to a theme location. This makes your menu dynamic and automatically updates when you modify linked items.
Can I Customize WordPress Menu Styles?
Yes, you can customize menu styles using CSS. Access your theme’s stylesheet via Appearance > Theme Editor. Locate the menu-specific CSS classes and modify styles like colors, fonts, and spacing. Alternatively, use a plugin like “Custom CSS” for easier style changes without altering theme files directly.
What Plugins Help Create Dynamic Menus?
Several plugins assist in creating dynamic menus, such as “Max Mega Menu,” “Responsive Menu,” and “WP Mobile Menu. ” These plugins offer features like mobile responsiveness, drag-and-drop menu building, and customizable design elements. Choose one based on your specific needs for enhanced menu functionality.
How Do I Set Menu Location In WordPress?
Set menu location by visiting Appearance > Menus in your dashboard. After creating your menu, scroll to “Menu Settings” and check the appropriate theme location. Common locations include header, footer, or sidebar menus. Assigning the location ensures your menu displays correctly across your site.
Conclusion
Creating a dynamic menu in WordPress is straightforward. It boosts website navigation. Users find content easier. This helps with engagement. It keeps visitors on your site longer. A well-designed menu improves user experience. It’s crucial for a professional look. Customizing menus can be fun.
It lets you reflect your brand style. Menus should be simple and clear. Avoid clutter for better usability. Regularly update your menu as needed. This keeps your site fresh. You now have the tools. Start enhancing your WordPress theme. Happy designing!


