
Are you ready to unlock the power of web services for your website? Imagine being able to seamlessly connect different applications and platforms, all while enhancing the functionality of your site.
Creating and hosting a web service in IIS (Internet Information Services) might sound complex, but with the right guidance, it’s entirely within your reach. Think about the possibilities: streamlined data exchange, improved efficiency, and a smoother user experience. Whether you’re a seasoned developer or just starting out, understanding how to manage web services can significantly boost your site’s capabilities.
We’ll walk you through the simple steps to create and host a web service in IIS, empowering you to take full control of your web environment. Get ready to demystify the process and elevate your online presence. Keep reading to learn how you can make it happen!
Credit: pleasantsolutions.com
Setting Up Your Development Environment
Set up your development environment to create and host a web service in IIS easily. Install IIS on your Windows machine, then configure it to host your web service. Follow simple steps to ensure your web service is running smoothly and accessible to users.
Installing Visual Studio
Visual Studio is a tool for building web services. First, download Visual Studio from the official website. Choose the Community version for free use. Follow the installation steps on the screen. Choose the .NET workload. This workload is important for web services. After installation, open Visual Studio. Make sure everything works fine.
Configuring Iis For Development
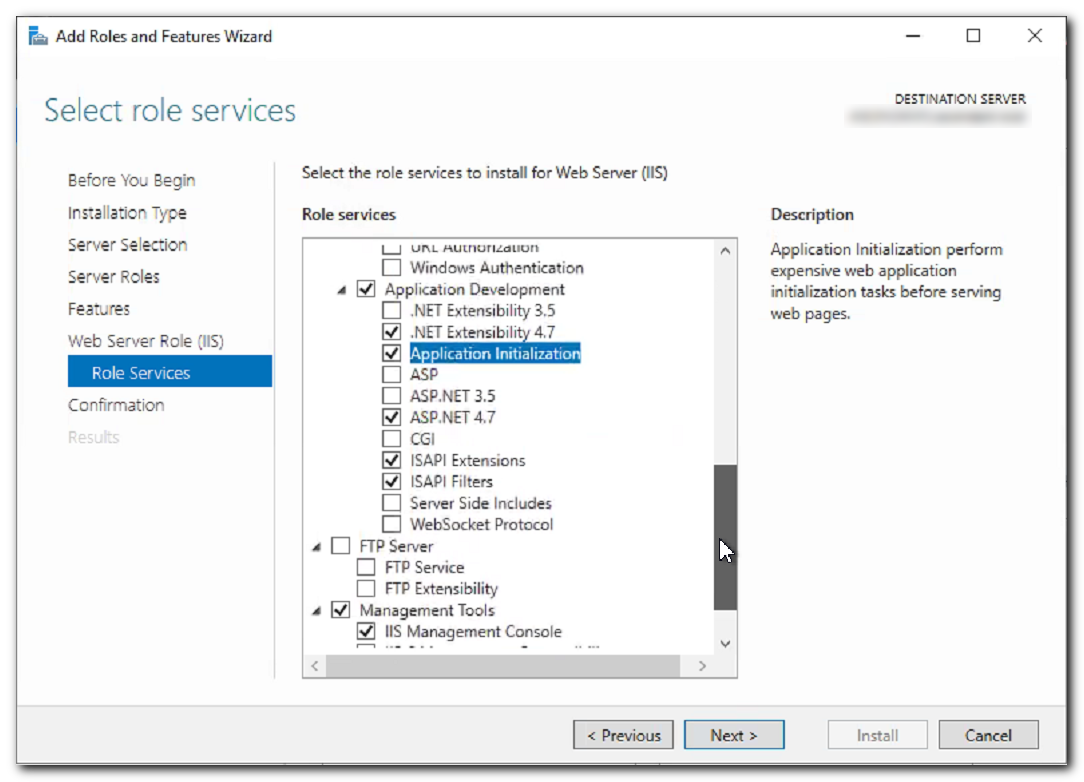
IIS is a server for hosting web services. First, open the Control Panel on your computer. Go to Programs and Features. Click on Turn Windows features on or off. Check the box for Internet Information Services (IIS). Click OK to install IIS. Open the IIS Manager to check if it is installed. Here, you can configure different settings. It helps make your web service available.
Creating A Web Service Project
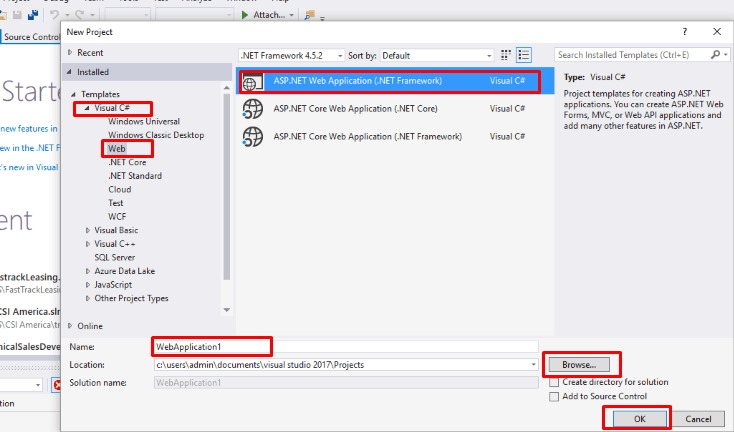
Selecting the correct template is important. It sets the base for your project. Use a simple web service template. This is easy to start with. Avoid complex templates for beginners. Keep it basic to learn better.
Essential parts make the web service work well. Add a service class. This handles requests and responses. Add methods to the class. Methods perform actions when called. Lastly, include a configuration file. This file manages settings for the service. Ensure every part is in place.
Coding The Web Service Logic
Service contracts are like promises. They tell what the service will do. Think of them as rules. These rules help different parts talk to each other. Contracts are very important. Without them, things might not work right. You write them in code. This code tells how to talk to the service. It also tells what the service can do.
Service methods are like tools. They do the work. Each method has a job. Some methods get data. Others change data. You write these methods in code. Code is like a recipe. It tells the computer what to do. With good code, the service works well. Always check your code. Make sure it does what you want.
Testing Your Web Service Locally
Creating and hosting a web service in IIS is essential for local testing. Set up your environment with simple steps to streamline development. Enhance your web service’s performance by configuring IIS for efficient testing and debugging.
Using Built-in Testing Tools
Testing tools help check if your web service works. Use these tools in your computer. Open your web browser. Enter the URL of your service. Check if it shows the right page. If it does, your service is working. If not, there might be a problem.
Debugging Common Issues
Sometimes, services have errors. They stop working right. Check error messages on your screen. They give clues about the problem. Make sure all files are in the right place. Check if your internet connection is stable. Restart your service if needed. This can fix small errors. If problems remain, check for updates. Update your tools and service software. This often helps fix issues.
Configuring Iis For Hosting
Application pools help manage web apps in IIS. They separate apps for better performance. To set up, open IIS Manager. Click on “Application Pools” in the left panel. Choose “Add Application Pool.” Enter a name for the pool. Set the .NET framework version if needed. Click “OK” to create the pool. Assign your website to this pool for better control.
Site bindings connect your site to the web. In IIS Manager, find your site under “Sites.” Right-click and select “Edit Bindings.” Choose “Add” to create a new binding. Enter a host name if necessary. Select the right IP address. Choose a port number. Commonly, port 80 is used. Ensure you have a binding for each way users can access your site. Click “OK” when finished.

Credit: learn.microsoft.com
Deploying The Web Service
Visual Studio makes it easy to publish your web service. First, open your project. Find the Build menu. Click on Publish. Choose your target, like File System. Select a folder on your computer. This is where files will be saved. Press Publish. Visual Studio will copy files to the folder. Now your web service is ready for deployment.
Manual deployment needs some steps. First, collect all web service files. Copy these files to your server. Open IIS Manager on your server. Create a new website. Set the path to your copied files. Choose a port number. Click Apply. Your web service will start running. Test it by opening a browser. Type the server address and port number. Check if the service is working fine.
Managing Web Service Security
Creating and hosting a web service in IIS involves setting up security measures. This ensures data protection and safe access. Configuring security settings in IIS helps safeguard your web service against threats.
Implementing Authentication
Use authentication to keep your web service safe. It checks if users are allowed. Use basic authentication for simple checks. Windows authentication is better for Windows users. Make sure to use SSL certificates. They make data safe by encrypting it. This stops bad people from stealing information.
Setting Permissions
Permissions control who can do what. Give read access to users who only need to see data. Write access is for users who can change things. Be careful with full control. Only trusted users should have it. This stops accidents and keeps data safe. Always review permissions often. This helps keep things in order.
Credit: www.cloudfronts.com
Monitoring And Maintenance
Creating and hosting a web service in IIS requires regular monitoring and maintenance. Ensure smooth operation and quick issue resolution. Regular updates and checks keep the service running efficiently.
Using Iis Logs
IIS logs help in tracking web service activities. They store details about server requests. You can see who accessed your web service. Logs also show the time of access and the pages visited. This information helps in understanding user behavior. It is useful for improving your web service. Regularly check these logs to spot unusual activities. This can help in preventing security issues. Make sure to store logs in a secure place. Protecting log data is important for privacy.
Troubleshooting Performance Issues
Troubleshooting helps in fixing web service problems. Start by checking the server’s resources. Are CPU and memory working well? Poor performance often links to resource issues. Next, look at the network connection. Is the speed fast enough? Slow connections can cause delays. IIS logs can help find the problem. They show errors and warnings. Use this data to fix issues quickly. Keep monitoring to ensure smooth service.
Frequently Asked Questions
How To Host A Web Service On Iis?
To host a web service on IIS, install IIS via Windows Features. Open IIS Manager, add a new site, configure bindings, and point to the web service directory. Ensure the application pool settings match your web service requirements. Test the service by accessing it through the browser.
How To Create A Web Server In Iis?
Open IIS Manager. Select ‘Sites’ and click ‘Add Website’. Enter site name, physical path, and binding details. Click ‘OK’ to create your web server.
How To Host Windows Service In Iis?
Convert the Windows service into a web application. Use a wrapper like TopShelf. Host the web application in IIS.
How To Host The Web Api In Iis?
Host web API in IIS by installing IIS, creating a new site, and deploying API files. Configure application settings, bind domain, and set authentication. Test using a browser to ensure functionality.
Conclusion
Creating and hosting a web service in IIS is straightforward. Start with setting up your environment. Ensure all necessary components are installed. Configure your web service settings carefully. Test your service to ensure it runs smoothly. Troubleshooting common issues can save time and frustration.
Remember, practice helps you get better. Follow these steps, and you’ll succeed. Keep your web services updated for security. Regular maintenance is key. Hosting a web service in IIS can enhance your website’s functionality. Enjoy exploring more possibilities with IIS.


