
Are you looking to maximize the potential of your Apache web server? Configuring virtual hosts is your key to managing multiple domains on a single server.
Imagine effortlessly hosting multiple websites, each with its own unique domain name, without the hassle of setting up additional servers. This powerful feature allows you to streamline your web hosting environment, save costs, and enhance performance. In this guide, you’ll discover the step-by-step process to configure virtual hosts in Apache, making it a breeze to manage different sites simultaneously.
Whether you’re a seasoned developer or just starting out, mastering virtual hosts will elevate your web management skills. Dive in and unlock the secrets to efficient web hosting with Apache, and transform the way you handle your websites. Ready to empower your server and optimize your resources? Let’s get started!

Credit: medium.com
Understanding Virtual Hosts
Virtual hosts help run multiple websites on one server. It is like having different rooms in a house. Each room can have its own design. With virtual hosts, each website gets its own space. This makes managing websites easier. You can have different settings for each site.
Apache web server uses virtual hosts to separate websites. This is useful for hosting companies. It lets them serve many clients from one machine. You can create virtual hosts using simple configuration files. These files tell Apache how to handle each site.
Virtual hosts can be based on IP address or domain name. IP-based hosts use different server addresses. Domain-based hosts use different domain names. Most people use domain-based virtual hosts. It is easier and more common.
Credit: www.arubacloud.com
Benefits Of Virtual Hosts
Virtual Hosts help manage multiple websites. One server can handle many domains. This saves money and resources. Each website can have its own files. Each can have its own settings too. This makes managing websites easier.
Using Virtual Hosts improves security. Each site is separate. If one is attacked, others stay safe. This is important for businesses.
Virtual Hosts also help with organization. Different teams can work on different sites. This boosts efficiency. It reduces errors.
Prerequisites For Configuration
A Linux-based operating system is essential. Ubuntu or CentOS are good choices. The Apache HTTP Server must be installed. Use the command `sudo apt-get install apache2` on Ubuntu. Ensure the latest version of Apache is running. Check with `apache2 -v`.
Root access is needed for configuration changes. Without it, changes won’t save. Use `sudo` for root permissions. Edit permissions for Apache’s configuration files are required. Ensure you have the right permissions to edit files in `/etc/apache2/sites-available/`. Check with `ls -l` to view permissions. Adjust with `chmod` if needed.
Setting Up The Environment
Start by creating a new folder. This folder will hold your web files. Name it something simple like mywebsite. Inside this folder, create two more folders. Name them public_html and logs. The public_html folder will contain your web pages. The logs folder will store log files. Ensure these folders are easy to access. This will help you in the future. Keeping things organized is important.
Open a text editor. Create a simple web page. Use HTML to add content. Save this file in the public_html folder. Name it index.html. This file is your main page. You can add more files later. Test your page in a browser. Make sure it looks good. If it does, your basic setup is done. Your site is ready for the next steps.
Editing The Apache Configuration File
Configuring a virtual host in Apache involves editing the Apache configuration file. This setup allows multiple websites on a single server. Adjust the file to direct traffic to the correct website, enhancing server efficiency.
Locating The Configuration File
The Apache configuration file is usually found in the /etc/httpd/conf or /etc/apache2 directory. It may be named httpd.conf or apache2.conf. This file controls how the web server behaves. Use a text editor to open it. Be careful while editing. Changes may affect the server’s function. Always make a backup before editing. This ensures you can restore it if needed.
Modifying Configuration Directives
Inside the configuration file, look for VirtualHost tags. These tags define settings for specific hosts. Each virtual host needs a ServerName directive. This tells Apache which domain to serve. Add DocumentRoot to specify where the files are. You may also need to define Directory settings. This controls permissions on folders. Save changes and restart Apache to apply them.
Creating A Virtual Host File
Use a clear and simple name for your virtual host file. The name helps you remember its purpose. For example, use the website’s name. If the site is “example.com,” name the file “example.conf”. This makes it easy to find later. Always end the file name with “.conf”. This tells the server it’s a configuration file. It is important to stay organized. It makes managing files easier.
The basic configuration blocks set up the virtual host. Begin with the “” tag. This tells Apache to listen on port 80. Inside, you add your settings. Use ServerName to set the domain name. Use DocumentRoot to point to your website’s files. End with ““. This closes the block. Double-check each line for accuracy. Even a small mistake can cause problems.
Configuring Name-based Virtual Hosts
To set up a virtual host, begin with the ServerName. This is the main domain name. For example, use ServerName www.example.com. It’s the primary address visitors use.
Next, add the ServerAlias. This allows multiple domain names. Add lines like ServerAlias example.com. It helps in redirecting visitors.
The DocumentRoot is the directory where website files reside. Point this to your website’s folder. Use a line like DocumentRoot /var/www/example. Ensure this path is correct.
This is where Apache looks for files to serve. It is important for the website’s functionality. Always check directory permissions. Files must be accessible for proper display.
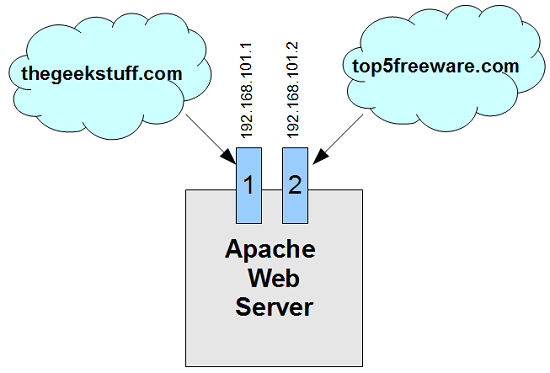
Credit: www.thegeekstuff.com
Enabling Virtual Host Configuration
First, ensure Apache is installed on your system. Edit the Apache configuration file. This file is usually named httpd.conf or apache2.conf. Locate the Virtual Hosts section. You can find this towards the end of the file. Add your new virtual host configuration here. Each virtual host needs a separate block. Define the ServerName and DocumentRoot. These are critical for correct operation.
Always test your configuration before restarting Apache. Use the apachectl configtest command. This checks for syntax errors. A message like “Syntax OK” confirms everything is fine. Fix any errors if reported. It’s vital to ensure smooth operation.
Restart Apache to apply changes. Use the command sudo systemctl restart apache2. This command works on most systems. Check that the server restarts without errors. Visit the site in a browser. Verify that the virtual host is working. If the site loads, your setup is complete.
Troubleshooting Common Issues
Log files help find problems with Apache. Check the error log for messages. The error log shows what went wrong. Also, look at the access log. It shows who visited your website. Logs help fix issues fast. Always keep logs updated.
Apache uses port 80 by default. Sometimes, other programs use this port. This causes conflicts. Check which program uses port 80. Use the netstat command to see open ports. Change the program’s port if needed. Or, change Apache’s port. Make sure no two programs use the same port.
Security Considerations
Limiting who can see your website is crucial. Use IP address restrictions to control access. Only trusted IPs should be allowed. This helps protect your site. You can also block unwanted visitors. Do this by configuring access rules in Apache. Use the Allow and Deny directives. These tools are simple but effective. They help keep your website safe.
SSL makes your website secure. It encrypts data sent between users and the server. This keeps information safe from hackers. Users trust websites with SSL. They see the green lock icon. To add SSL, install an SSL certificate on your server. Configure Apache to use this certificate. Set up HTTPS for your site. This protects user data and builds trust.
Frequently Asked Questions
How To Configure A Virtual Host In Apache?
To configure a virtual host in Apache, edit the httpd.conf file. Add a new directive with the server name, document root, and any necessary configurations. Save changes and restart Apache to apply.
What Is A Virtualhost In Httpd?
A Virtualhost in httpd allows multiple websites on one server. It directs traffic based on domain names, enabling separate configurations for each site. This feature helps manage resources efficiently and supports diverse web applications on a single server. Virtualhost enhances server organization and optimizes site management.
What Is Ip Based Virtual Hosting In Apache?
IP-based virtual hosting in Apache allows multiple websites on a single server using different IP addresses. Each website gets a unique IP, simplifying SSL certificate usage and ensuring dedicated resources. Configure Apache to assign specific IPs to websites, enhancing flexibility and security for hosting multiple domains.
What Does Virtualhost : 80 Mean?
VirtualHost *:80 indicates Apache listens on all IP addresses for HTTP traffic on port 80, the default port.
Conclusion
Configuring virtual hosts in Apache simplifies web server management. It allows hosting multiple websites on a single server. Follow these steps to set up virtual hosts. You will enhance organization and improve server efficiency. Remember to test configurations thoroughly for proper functionality.
Troubleshoot any issues promptly. Ensure each website has a unique configuration file. This practice avoids conflicts and ensures smooth operation. Regularly update your Apache server for security and performance. By mastering these basics, you gain greater control over your web server.
Happy configuring!


