

Want to make your WordPress site stand out? Changing the font is one of the easiest ways to give your website a fresh, unique look that matches your style.
Whether you want a modern, elegant, or playful vibe, picking the right font grabs your visitors’ attention and keeps them engaged. In this guide, you’ll discover simple, step-by-step methods to change fonts in WordPress—no complicated tech skills needed. Ready to transform your site’s appearance and make every word count?
Keep reading to learn how you can customize your fonts quickly and confidently.
Credit: wpmarmalade.com
Change Fonts Using Theme Customizer
Changing fonts in WordPress is simple using the Theme Customizer. This tool lets you update your site’s typography without coding. It works well with most classic themes. The Customizer shows live previews as you make changes. This way, you can see how your text looks before saving.
Access Typography Settings
Start by logging into your WordPress dashboard. Go to Appearance and select Customize. This opens the Theme Customizer panel. Look for a section named Typography or Fonts. Some themes place it under Theme Options. Click to open the typography settings.
Select Fonts For Headings And Body
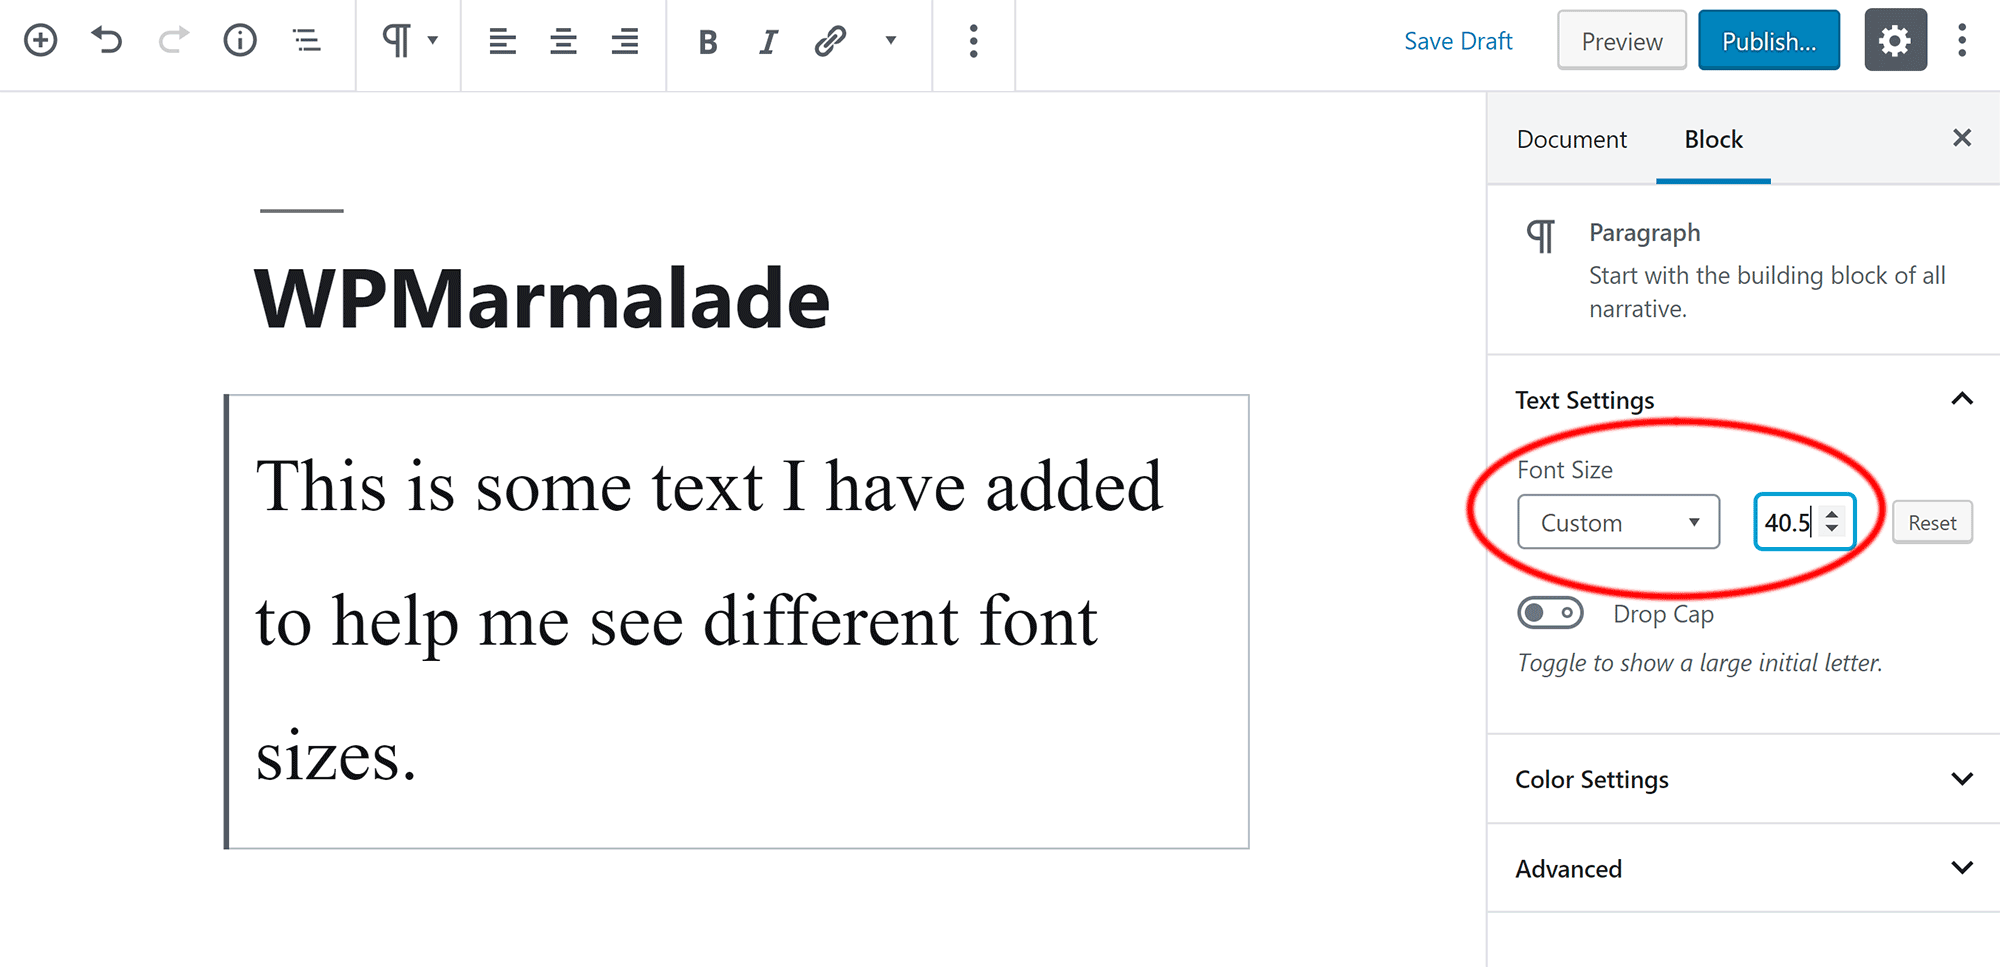
Inside the typography settings, you will see options for Headings and Body fonts. Click the dropdown menus to pick your preferred fonts. Choose styles that match your site’s tone. Fonts like Arial, Georgia, or Open Sans are common choices. Adjust font sizes and weights if the options are available.
Preview And Save Changes
The Customizer shows a live preview of your font changes. Review your headings and body text carefully. Make sure the font looks good on all devices. When satisfied, click the Publish button to save your changes. Your new fonts will apply immediately across your site.
Edit Fonts With Site Editor
Editing fonts with the Site Editor in WordPress gives you direct control over your website’s text style. This method suits block themes and allows easy font customization without coding. You can change fonts for headings, paragraphs, and other elements quickly. The Site Editor offers a visual way to see your changes in real time.
Open Appearance Editor
Start by logging into your WordPress dashboard. Navigate to the left menu and click on Appearance. From the dropdown, select Editor. This will open the Site Editor where you can modify your site’s design. The editor shows a live preview of your site on the right side. You can access different parts of your site to edit fonts and styles.
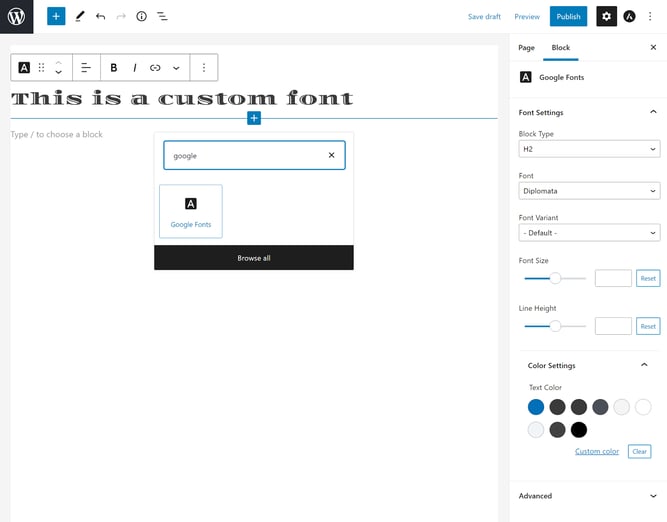
Modify Styles And Typography
Inside the Site Editor, find the Styles icon, usually a half-filled circle or paintbrush. Click it to open the style settings panel. Look for the Typography section here. This section controls font family, size, weight, and line height. Choose the font you want from the dropdown menu. Adjust size and weight to match your design goals. The changes show immediately in the preview.
Apply Font Changes To Elements
Select the text element you want to change, such as a heading or paragraph block. In the right sidebar, you will see typography options specific to that block. Use these options to override the global font settings if needed. This lets you customize fonts for different parts of your site individually. Save your changes by clicking the Save button in the top right corner. Your new font styles will now appear live on your site.
Use Plugins For Font Customization
Using plugins for font customization in WordPress makes changing fonts simple and fast. Plugins offer many font choices without coding skills. They help personalize your website’s look to match your style.
Plugins also let you preview font changes before publishing. This way, you see how your text looks on different devices. Most plugins work well with any WordPress theme, giving you flexibility.
Install And Activate Font Plugins
Open your WordPress dashboard. Go to Plugins > Add New. Search for font plugins like “Easy Google Fonts.” Click Install Now, then Activate to enable the plugin. After activation, the plugin appears in your dashboard menu.
Configure Fonts In Plugin Settings
Access the font plugin from your dashboard. Choose the font family, style, and size for headings and body text. Many plugins let you change fonts for specific sections. Adjust settings until the fonts look good on your site.
Publish Updated Font Styles
Save your font settings in the plugin. Clear your website cache if needed. Visit your site to check the new fonts live. The font changes apply instantly and improve readability. Update fonts anytime through the plugin settings.
Credit: blog.hubspot.com
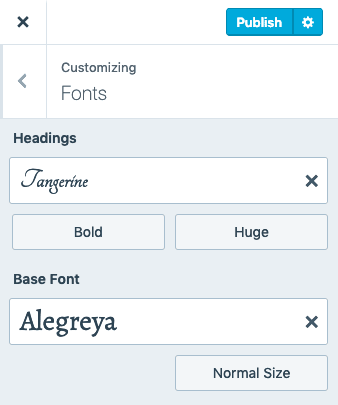
Add Custom Fonts Manually
Adding custom fonts manually in WordPress gives you full control over your site’s typography. This method lets you use unique fonts not available in standard font libraries. It involves uploading font files, writing CSS rules, and assigning fonts to elements. The process requires basic file management and CSS editing skills. Follow the steps below to add custom fonts manually to your WordPress site.
Upload Font Files To Theme Folder
First, prepare your font files in web-friendly formats like .woff or .woff2. Access your website’s file manager or use an FTP client. Navigate to your active theme folder under /wp-content/themes/your-theme/. Create a new folder named fonts if it does not exist. Upload all your font files into this folder. Make sure the files have clear names for easy reference in CSS.
Edit Css With @font-face Rules
Next, open your theme’s main stylesheet, usually style.css. Add @font-face rules at the top of the file. Each rule defines a font family and links to the uploaded font files.
@font-face { font-family: 'CustomFont'; src: url('fonts/customfont.woff2') format('woff2'), url('fonts/customfont.woff') format('woff'); font-weight: normal; font-style: normal; } Replace CustomFont and file names with your actual font details. These rules load your fonts into the website.
Assign Fonts Via Css Selectors
Finally, apply the custom font to your site elements using CSS selectors. For example, to change all paragraph texts:
p { font-family: 'CustomFont', Arial, sans-serif; } Use the font family name from your @font-face rule. You can target headings, menus, or other parts of your site the same way. Save changes and refresh your site to see the new fonts in action.
Change Fonts For Menus
Changing the font for your WordPress menus improves site design and user experience. Menu fonts guide visitors through your pages clearly. Adjusting these fonts helps match your site’s style and branding. Follow simple steps to customize menu typography effectively.
Locate Menu Typography Options
Start by logging into your WordPress dashboard. Go to Appearance and select Customize. Look for the Typography or Menu section. Different themes place menu font settings in various spots. Explore the options to find font controls for menus.
Choose Fonts For Menu Items
Once you find menu typography options, open the font selector. Pick a font that fits your website style. Select font size and weight for clarity and balance. Use readable fonts to make navigation easy. Preview font changes live in the customizer panel.
Save And Review Menu Appearance
After selecting your fonts, click Save & Publish or Publish. Visit your website to check the menu look on different devices. Adjust font size or style again if needed. Ensure the menu text is clear and matches your brand colors.
Credit: wordpress.com
Frequently Asked Questions
How Do I Change The Style In WordPress?
To change style in WordPress, go to Appearance > Customize or Appearance > Editor. Select Typography or Fonts, choose your preferred fonts or styles, then save and publish changes. For advanced options, use plugins like Easy Google Fonts or edit theme code directly.
How Do I Change The Font Style Of A Text?
To change a text’s font style, go to Appearance > Customize in WordPress. Select Typography or Fonts, choose your desired font, then save changes. Alternatively, install a font plugin for more options or edit theme code for advanced customization.
How To Use Custom Fonts In WordPress?
Go to Appearance > Customize in your WordPress dashboard. Select Typography or Fonts. Choose and apply your custom font. Alternatively, use plugins like Easy Google Fonts for more options. For advanced users, upload fonts via theme code editing. Save changes to update your site’s fonts.
How Do I Change The Font In WordPress Menu?
To change the font in your WordPress menu, go to Appearance > Customize > Typography. Select the menu font option and choose your desired font. Save and publish the changes. Alternatively, use a plugin like Easy Google Fonts for more font options.
Conclusion
Changing the font in WordPress is simple and quick. You can customize your site’s look to fit your style. Use the built-in tools or plugins for more options. Experiment with different fonts to find what suits your content best. Keep your font choices clear and readable for all visitors.
Now, you have the confidence to update your site’s typography easily. Enjoy making your WordPress site more unique and attractive.


