
Are you feeling overwhelmed by the task of updating your WordPress menu? You’re not alone.
Many website owners find themselves stuck when trying to personalize their site navigation. But imagine if you could easily guide your visitors exactly where you want them to go. A well-organized menu does just that, enhancing user experience and keeping your audience engaged.
In this guide, you’ll discover simple steps to change your WordPress theme menu without the stress. It’s time to take control and make your website truly yours. Ready to transform your site? Let’s dive in.
Accessing The WordPress Dashboard
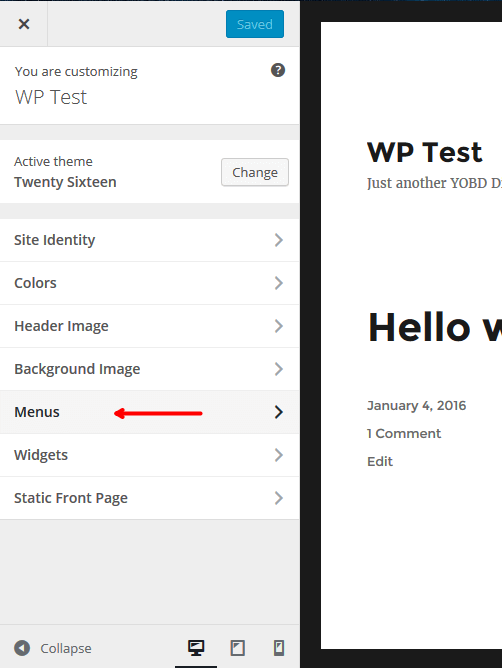
First, log in to your WordPress account. Use your username and password. Once logged in, find the sidebar on the left. Click on the Dashboard. This is your main control center. Here, you can manage your site easily. Look for Appearance in the menu. Click on it to see more options. Find the Menus link. Click on it to open the menu settings. This is where you can make changes.
If you want to add a new menu, it’s simple. Just click on the Create a New Menu button. Name your menu and click the Create Menu button. Now, you can add pages to it. Use the checkboxes to select pages. Then, click Add to Menu. Arrange them by dragging them up or down.

Credit: ultimateblocks.com
Navigating To The Appearance Section
First, access the WordPress dashboard. It is the control center for your site. Look on the left side. You will see many options listed. Find and click on Appearance. This section lets you change how your site looks. Inside Appearance, find Menus. This is where you manage your site’s navigation. Menus help visitors find content on your website easily.
You can create new menus or edit existing ones. Use the options provided to adjust the links. Always remember to save changes after editing. This ensures updates reflect on your site. The Appearance section is key for site design.
Opening The Menus Option
To change your menu, start by logging into your WordPress dashboard. Find the Appearance option on the left side. Click on it. A drop-down menu will appear. Choose Menus from the list. This is where you can make changes. You will see your current menus listed. Choose the menu you want to change. Click Select to open it. Now, you can add or remove items. You can also rearrange them. Use the drag and drop feature. Make sure to save your changes. Find the Save Menu button at the top. It’s important to always save your work. This will update your website menu. Now, visitors will see the new menu.
Creating A New Menu
To create a new menu, go to the WordPress dashboard. Find the “Appearance” tab. Click on “Menus.” You will see an option to create a new menu. Click on it. A field will appear to name your menu. Choose a simple name. This helps you identify it later.
Names should be short and clear. Good names are easy to remember. Avoid long or confusing names. A good name helps you find the menu quickly. It also helps others understand your website better.
After naming, start adding items to the menu. Select pages or posts you want to include. You can also add links. Drag items to arrange them. Place important items at the top. This makes them easy to find. Remember to save changes. Look at your website to see the new menu.
Editing An Existing Menu
To change the order of items, go to your dashboard. Find the Appearance tab. Click on Menus. Drag menu items to new spots. This changes the order. Save your changes. Your menu now shows items in the new order.
Removing items is easy. Go to the Appearance tab. Click on Menus. Find the item you want gone. Click the small arrow next to it. You will see a Remove link. Click it. Your item is now removed. Save your changes. Your menu is now updated.
Credit: www.hostpapa.com
Setting Menu Location
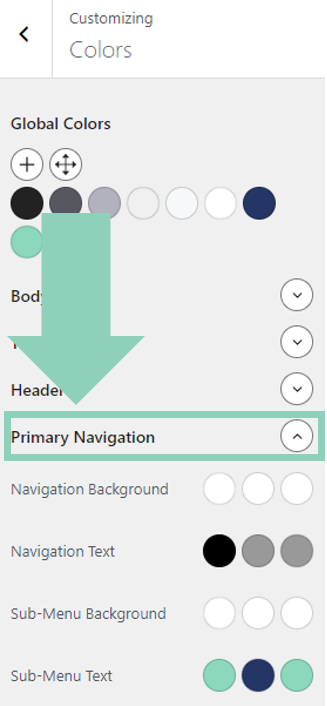
To set your primary menu, go to your WordPress dashboard. Click on Appearance and then select Menus. You’ll see a list of menus. Choose the one you want as your primary. Find the Menu Settings box. Check the box labeled Primary Menu. This will make it show on your main site.
The secondary menu is often in the footer or sidebar. Select a menu from the list. Look for the Menu Settings section. Check the box for Secondary Menu. This makes it appear in the secondary location. You can have different menus in primary and secondary spots. This gives your site a better navigation experience.
Customizing Menu With Widgets
Widgets help change your WordPress menu easily. First, go to your dashboard. Find the Appearance tab. Click on Widgets. This opens the widget area. Look for the Menu widget. Drag it to your desired sidebar. You can also place it in the footer. After dragging, choose the menu you want. Set it as your primary menu. Save the changes.
Widgets let you add more menus. Add a different menu for each page. Users find it easier this way. You can arrange the menu items too. Simply drag and drop them. This makes navigation simple. Kids can do this with ease.
Credit: nichetwins.com
Saving Menu Changes
After making changes to your menu, click the Save Menu button. This button is often at the top or bottom of your screen. It is important to save your work. Unsaved changes will be lost. You will need to start over if you forget to save.
Before saving, check your menu items. Ensure each link goes to the correct page. Wrong links can confuse visitors. Neat and tidy menus make sites easy to use.
After saving, view your site. Check if the menu looks right. If something is wrong, go back and fix it. Saving again updates your site. Enjoy your new menu!
Troubleshooting Common Issues
Struggling with changing your menu in a WordPress theme? Navigate to the Appearance tab in your dashboard. Select Menus and adjust items as needed. Save changes to update your website’s navigation.
Menu Not Displaying
Menus can sometimes disappear. This is frustrating for users. First, check if the menu is set up. Go to the WordPress dashboard. Click on “Appearance”, then “Menus”. Ensure your menu is listed there. If it’s missing, recreate it. Sometimes, themes conflict with menus. Switch your theme temporarily. See if the menu appears. If the issue persists, update your theme. Themes often have updates. These fix bugs and improve performance. Also, check plugin conflicts. Disable plugins one by one. See if the menu returns. This helps identify problematic plugins. Keep your WordPress version updated. Updates fix many issues. Lastly, clear browser cache. This sometimes solves display problems.
Responsive Design Problems
Responsive design ensures menus look good on all devices. If menus look strange, check theme settings. Some themes have responsive options. Adjust these settings. Use browser tools to inspect menu elements. This helps find CSS issues. CSS affects menu appearance. Try resizing your browser window. This tests menu responsiveness. Check mobile view separately. Use a smartphone or tablet. Menus should be easy to use on small screens. If problems persist, seek theme support. Developers can provide specific solutions. They know their theme well.
Frequently Asked Questions
How Do I Access The Menu Settings In WordPress?
To access menu settings, log into your WordPress dashboard. Navigate to “Appearance” and then click on “Menus”. Here, you can create and manage your site’s menus. This section allows you to add, remove, and organize menu items to suit your website’s structure.
Can I Change Menu Order In WordPress?
Yes, you can easily change the menu order in WordPress. In the “Menus” section under “Appearance”, simply drag and drop the menu items into your desired order. Once you’re satisfied with the arrangement, click “Save Menu” to apply the changes.
How Do I Add A New Menu Item?
To add a new menu item, go to “Appearance” and click “Menus”. On the left, you’ll see options to add pages, posts, and custom links. Select the items you want to add, click “Add to Menu”, and then arrange them in your desired order.
Can I Create Multiple Menus In WordPress?
Yes, WordPress allows you to create multiple menus. In the “Menus” section, you can create a new menu by clicking “create a new menu”. This feature is useful for sites that need different menus for different sections or pages.
Conclusion
Changing your WordPress menu is easier than it seems. Follow the steps above to make your website neat and organized. Customize menu items for better user experience. Remove or add links to suit your needs. Preview changes before saving. This ensures everything looks good.
Remember, a clear menu helps visitors find what they need. Practice often to get comfortable with these settings. A well-organized menu boosts your site’s usability. Start small, then explore more options. Your website can look professional with just a few clicks.
Keep learning and improving your skills. Your WordPress site will thank you!


