
Struggling with a header image that just doesn’t fit right in your Primer WordPress theme? You’re not alone.
A header image is often the first thing visitors notice on your website, and its size can make or break that crucial first impression. Whether it’s too large and overpowering or too small and underwhelming, getting the dimensions right is essential.
Imagine transforming your website’s look with just a few tweaks, instantly capturing your audience’s attention and keeping them engaged. Intrigued? Let’s dive into the straightforward steps that will show you exactly how to change the header image size in your Primer WordPress theme, so your website stands out for all the right reasons.
Credit: www.abrightclearweb.com
Accessing The WordPress Dashboard
To access the dashboard, open your browser. Type your website URL. Add “/wp-admin” to the end. This opens the login page. Enter your username and password. Click the login button. Now, you’re in the dashboard.
The dashboard is where you make changes. Look for the Appearance option. It’s on the left side. Click it to see more options. Find the Header option. This is where you can change the header image size. It’s easy to find once you know where to look.
Navigating To The Appearance Section
Start by opening your WordPress dashboard. Look for the Appearance tab. It’s usually on the left side. Click on it. Find the Customize option. Click to open it. This area lets you change your site’s look.
Search for Header Image. Click to see options. You can change its size here. Adjust the width and height. Make it fit your site. Preview changes before saving.
If unsure, use the Preview button. This shows how changes look. You can go back anytime. Don’t worry if it’s not perfect. Practice makes better.
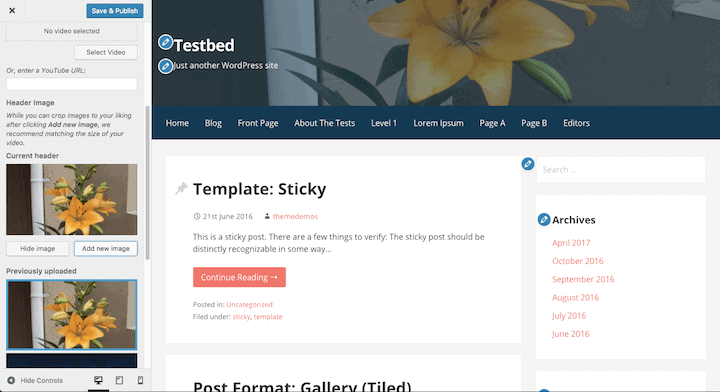
Locating The Header Image Settings
First, open your WordPress dashboard. Find the Appearance section. It is on the left side. Click on it. Now, choose Customize. This will open the theme customizer. Look for Header Image settings. It should be easy to find. Once located, click on it. You can now see the options. Here you can change the header image size.
Use the slider to adjust the size. Make sure it fits well. Preview changes before saving. This helps avoid mistakes. If you like the new size, click Publish. Now your header image looks just right. Enjoy your updated site!

Credit: visualmodo.com
Adjusting Image Dimensions
Change the header image size in the Primer WordPress theme easily. Access the dashboard, navigate to Appearance, then Customize. Adjust the dimensions under the Header section to fit your design needs.
Selecting The Right Image Size
Choosing the correct image size is important. It helps your site look good. Large images can slow down your site. Too small images might look blurry. A good balance is key. Check your theme’s recommended size. This ensures the image fits well. Make sure your image is clear and sharp. This makes your site more appealing. Your readers will enjoy this.
Using Custom Css For Precise Control
Custom CSS gives you more control. You can change the size exactly as you like. Add the CSS code to your theme. Use the “Additional CSS” section in the Customizer. This is found in the WordPress dashboard. Here, you can add your CSS rules. For example, set width to “100%” to fit the screen. This helps your site look neat and tidy.
Saving And Previewing Changes
After you change the header image size, click the Save button. This will store your changes. You can see how your site looks now. Click the Preview button. This shows the new image size. If you like it, keep it. If not, you can make more changes. The preview helps you decide.
Always check if everything looks good. The header image is important. It is the first thing people see. Make sure it fits well. Good images make the site look nice. Bad images can confuse visitors. Adjust the size until it feels right. Your site should be easy to view.

Credit: wpengine.com
Troubleshooting Common Issues
Images can look stretched or squished. This happens when the image aspect ratio changes. It’s important to keep the original image ratio. Use image editing tools to crop and resize. This helps preserve the image quality and ratio. Check the theme settings. Sometimes, wrong settings cause distortion. Adjust the settings to fit the image correctly. Preview the changes to see if they look good. Save the settings to apply the changes.
Sometimes, changes don’t work as expected. Reverting to default settings helps fix issues. Find the settings menu in the dashboard. Look for an option to reset or revert. Click to restore default settings. This often solves unexpected problems. Default settings are designed to work smoothly. They ensure images display correctly. Always back up before resetting. This keeps your work safe.
Utilizing WordPress Plugins
Adjusting the header image size in the Primer WordPress theme is simple with plugins. Install a plugin like “Simple Image Sizes” to customize dimensions effortlessly. Navigate to “Settings” and modify sizes without coding hassles.
Recommended Plugins For Image Management
WordPress plugins help change image sizes easily. Some plugins offer simple ways to adjust header image sizes. Smush is popular. It resizes and optimizes images. Another useful plugin is Regenerate Thumbnails. It helps update image sizes without hassle. Simple Image Sizes lets you create new image sizes. These plugins are user-friendly. They save time.
Installing And Activating Plugins
First, go to your WordPress dashboard. Click on Plugins. Search for your desired plugin. Click Install Now. Wait for the installation to finish. After installing, click Activate. Plugin is now ready to use. Check settings to adjust image sizes. Follow instructions given by the plugin. Changes will appear instantly. Easy as pie!
Tips For Optimizing Header Images
Adjusting header image size in the Primer WordPress theme enhances visual appeal. Navigate to the Appearance menu, select Customize, and then Header Image. Modify dimensions to fit your design needs, ensuring a polished and engaging website look.
Ensuring Fast Loading Times
Header images should load quickly. Slow images can frustrate users. Compress images to make them smaller. Use formats like JPEG or PNG. Smaller files load faster. Fast loading makes visitors happy. Happy visitors stay longer.
Selecting High-quality Images
Choose images that look clear. Blurry images confuse visitors. Use photos with good lighting. Good lighting makes images pop. Pick images that fit your theme. Images should be relevant. Relevant images tell a story. Stories help users understand content.
Frequently Asked Questions
How Do I Resize Header Image In Primer?
To resize the header image in Primer, go to ‘Appearance’ and select ‘Customize’. Navigate to ‘Header Image’, and adjust the dimensions. Save changes to update the header image size, ensuring it fits your design needs.
Can I Use Css For Header Image Resizing?
Yes, you can use CSS to resize the header image. Add custom CSS under ‘Appearance’ > ‘Customize’ > ‘Additional CSS’. Use appropriate width and height properties to adjust the image size according to your preferences.
What Are Ideal Header Image Dimensions?
Ideal header image dimensions vary based on design goals. Common sizes are 1200×600 pixels for desktop and 800×400 pixels for mobile. Ensure your image is optimized for speed and clarity across devices.
Does Resizing Affect Image Quality?
Resizing can affect image quality if not done correctly. Ensure you use high-resolution images and maintain aspect ratio. This helps in preserving clarity and prevents distortion when resizing.
Conclusion
Changing your header image size in Primer is simple. Follow the steps outlined. Customize the dimensions to fit your theme. Enhance your site’s visual appeal effortlessly. Always remember to save your changes. Check how the new size looks on your site.
Adjust as needed for the perfect look. Enjoy the flexibility and improved aesthetics of your WordPress site. With practice, this becomes second nature. Happy customizing!


