
Are you looking to add a new user role in WordPress but don’t know where to start? Managing user roles is key to controlling who can do what on your website.
Whether you want to give a team member limited access or create a custom role with specific permissions, understanding how to add user roles can save you time and keep your site secure. In this guide, you’ll learn simple steps to add and customize user roles, even if you’re not a tech expert.
Keep reading, and you’ll gain the confidence to manage your WordPress users like a pro.
WordPress User Roles Basics
Understanding WordPress user roles is key to managing your website effectively. User roles control what different users can see and do. They help keep your site safe and organized. Assigning the right role ensures users have access only to what they need.
Each user role has specific permissions called capabilities. These define the actions a user can perform. Knowing the basics of these roles and capabilities helps in customizing user access properly. This knowledge is essential before adding new roles or modifying existing ones.
Default User Roles
WordPress comes with five default user roles. Each role has a different level of access and control.
- Administrator: Full control over the website.
- Editor: Can publish and manage posts of all users.
- Author: Can write, edit, and publish their own posts.
- Contributor: Can write and edit their own posts but cannot publish.
- Subscriber: Can only manage their profile.
These roles cover most website needs without extra setup.
Role Capabilities
Capabilities are the specific actions allowed for each role. They control tasks like creating posts, editing pages, or managing plugins.
For example, an Editor can edit others’ posts, but an Author cannot. A Subscriber cannot write posts but can read all content.
You can customize capabilities for custom roles or existing ones. This customization helps tailor access to your website’s needs.
Why Add Custom User Roles
Adding custom user roles in WordPress helps control who can do what on your site. It lets you give specific permissions to different users. This improves site security and organization. Custom roles match your site’s needs better than default roles. They keep tasks clear and simple for every user.
Use Cases For Custom Roles
Some sites need special roles beyond default ones. For example, a site with many authors may need an editor role with limited powers. A membership site might want roles for subscribers with different access levels. Online stores often create roles for customer support or inventory managers. Custom roles fit different jobs and make managing users easier.
Benefits Of Role Customization
Custom roles improve site security by limiting access. Users only see what they need to do their job. This lowers the risk of mistakes or hacks. Custom roles also help organize your team. Each person knows their tasks and permissions. It saves time and reduces confusion. Overall, role customization makes your WordPress site safer and more efficient.
Methods To Add User Roles
Adding user roles in WordPress helps control what users can do on your site. There are two main ways to add roles. You can use a plugin or write some code yourself. Each method has its own benefits. Choose the one that fits your skills and needs best.
Using A Plugin
Plugins make adding user roles easy. You do not need to write any code. Just install a plugin like “User Role Editor” or “Members”. These plugins have simple interfaces. You can create new roles or change existing ones with a few clicks.
Plugins also let you set specific permissions. For example, control who can edit posts or manage comments. This method is perfect for beginners or those who want a quick setup.
Manual Code Approach
Adding user roles with code gives you more control. You use WordPress functions like add_role(). This method requires editing your theme’s functions.php file or a custom plugin.
With code, you define the role name and capabilities. For example, add_role(‘custom_role’, ‘Custom Role’, array(‘read’ => true, ‘edit_posts’ => true));. This creates a new role with specific permissions.
This approach suits developers or users comfortable with coding. It lets you customize user roles exactly how you want.
Adding Roles With Plugins
Adding user roles with plugins simplifies WordPress management. Plugins offer easy tools to create, edit, and assign roles. They save time and avoid coding. This method suits beginners and busy site owners.
Choosing The Right Plugin
Pick a plugin that fits your needs. Check user reviews and ratings. Make sure it updates often for security. Look for features like role creation, editing, and permission control. Popular choices include User Role Editor and Members.
Step-by-step Plugin Setup
First, go to your WordPress dashboard. Click on “Plugins” and then “Add New.” Search for your chosen role plugin. Click “Install Now” and then “Activate.”
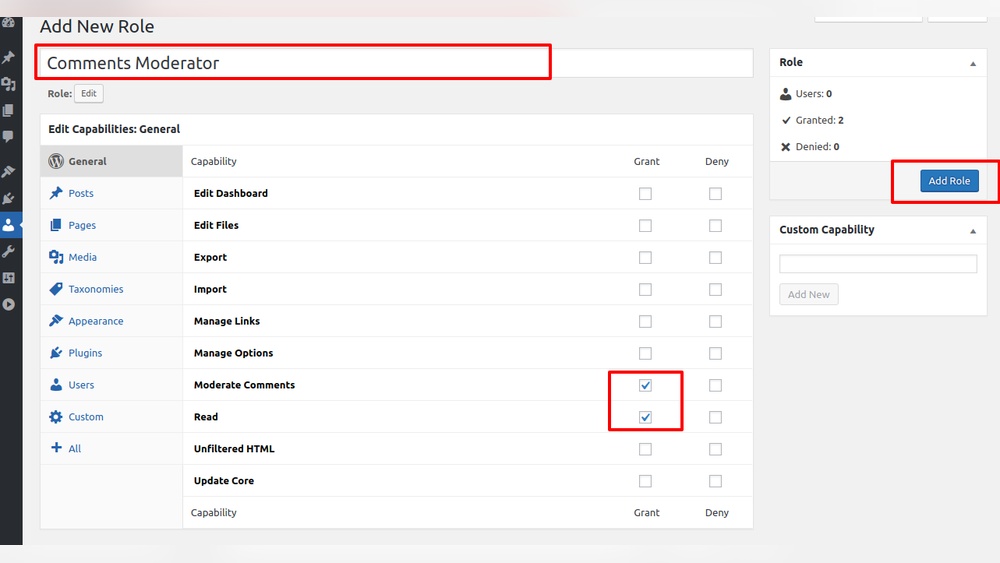
Next, open the plugin settings. Find the option to add a new role. Name the role clearly. Set permissions by checking or unchecking capabilities. Save your changes.
Assign the new role to users from the “Users” menu. Select a user and edit their role. Choose the new role from the dropdown. Save the update.
Adding Roles With Code
Adding user roles with code in WordPress gives full control over site permissions. This method suits users who want custom roles beyond default options. It allows defining capabilities tailored to specific needs.
You can add roles by editing your theme’s functions.php file. This file runs every time WordPress loads, making it ideal for role management. Writing the right code here creates new roles quickly and safely.
Using Functions.php
Open your active theme folder and find functions.php. Use a text editor or WordPress theme editor to access it. Always back up the file before making changes.
To add a role, use the add_role() function. It needs three parts: role name, display name, and capabilities array. Capabilities tell what the role can do on the site.
Sample Code Snippet
function add_custom_user_role() { add_role( 'custom_editor', 'Custom Editor', array( 'read' => true, 'edit_posts' => true, 'delete_posts' => false, 'publish_posts' => true, ) ); } add_action('init', 'add_custom_user_role'); This code adds a new role called “Custom Editor”. It can read, edit, and publish posts but not delete them. The add_action hook runs the function on WordPress initialization.
Assigning Capabilities To New Roles
Assigning capabilities to new roles in WordPress controls what users can do. Each role has specific permissions, called capabilities. These decide if a user can write posts, edit others’ content, manage plugins, or perform other tasks. Setting capabilities carefully keeps your site safe and organized.
WordPress has many built-in capabilities. You can use these or create custom ones to fit your needs. Assigning the right capabilities helps you manage who can do what on your site.
Common Capabilities
Common capabilities include:
- edit_posts: Allows users to write and edit their own posts.
- publish_posts: Lets users publish their posts.
- edit_others_posts: Lets users edit posts by others.
- delete_posts: Allows deleting their own posts.
- manage_options: Gives access to site settings.
- moderate_comments: Permits managing comments.
- upload_files: Lets users upload media files.
These capabilities are the building blocks of roles like Author, Editor, or Administrator.
Custom Capability Examples
Sometimes, built-in capabilities are not enough. You can add custom capabilities for special tasks. Examples include:
- manage_events: For users who handle event calendars.
- edit_products: For managing e-commerce items.
- view_reports: To allow access to analytics or reports.
- publish_newsletters: For sending newsletters.
Custom capabilities help tailor roles to your site’s unique needs. Use plugins or code snippets to create and assign these capabilities easily.
Managing Users With New Roles
Managing users with new roles helps control what each user can do on your WordPress site. You can create specific roles for different tasks. This keeps your site organized and secure. Assigning the right roles makes teamwork smoother. Editing permissions lets you fine-tune what each role can access.
Assigning Roles To Users
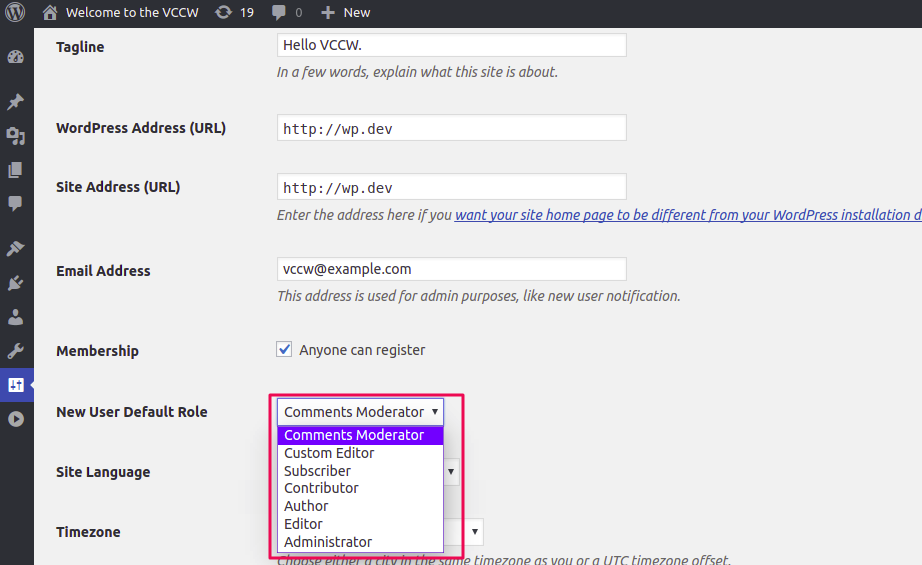
Go to the WordPress dashboard and open the Users section. Select the user you want to assign a role to. Find the Role dropdown menu on their profile page. Choose the new role from the list. Save the changes by clicking the Update button. The user now has the permissions of the new role.
Editing User Permissions
To change what a role can do, use a plugin like “User Role Editor.” Install and activate the plugin. Go to the plugin’s settings in the dashboard. Select the role you want to edit. Check or uncheck capabilities to adjust permissions. Save the changes to update the role. This controls access without creating new roles.

Credit: wedevs.com
Troubleshooting Role Issues
Sometimes, adding or changing user roles in WordPress does not work as expected. Troubleshooting role issues helps fix common problems fast. Understanding these errors saves time and keeps your site secure. This section covers typical mistakes and how to solve permission conflicts.
Common Errors
Errors can occur when assigning user roles. A common mistake is entering a role name incorrectly. WordPress will not recognize a misspelled role. Another issue is missing capabilities for custom roles. Users may lack the rights they need. Conflicts arise if plugins override default roles. These errors cause confusion and limit user actions.
Fixing Permission Conflicts
Permission conflicts happen when roles share overlapping rights. Start by reviewing the capabilities for each role. Remove any unnecessary or duplicate permissions. Use plugins like User Role Editor to manage roles clearly. Resetting roles to default can resolve conflicts quickly. Testing changes on a staging site avoids risks on the live site.
Best Practices For User Roles
Managing user roles in WordPress needs care and clear rules. Assigning roles properly helps keep your site safe and organized. Best practices guide you to set roles that match each user’s task and avoid confusion. This section explains key tips for setting user roles right.
Security Considerations
Limit user permissions to only what they need. Avoid giving admin rights to users who do not require full control. Use strong passwords for all accounts. Change default usernames like “admin” to prevent easy hacks. Regularly review user roles and remove unused accounts. This reduces the risk of unauthorized access to your site.
Maintaining Role Consistency
Keep roles clear and consistent across your site. Define roles based on specific tasks and stick to those rules. Use the same role names and permissions on all sites if you manage more than one. Train users about their roles and what they can do. This ensures smooth teamwork and fewer mistakes.
.jpg?width=650&height=324&name=How%20to%20Edit%20%26%20Customize%20User%20Roles%20in%20WordPress-1%20(1).jpg)
Credit: blog.hubspot.com
Credit: wedevs.com
Frequently Asked Questions
How Do I Add A New User Role In WordPress?
To add a new user role, use a plugin like “User Role Editor” or add custom code in your theme’s functions. php file. This lets you define capabilities and assign the role to users easily.
Can I Customize Permissions For WordPress User Roles?
Yes, you can customize permissions using plugins like “User Role Editor. ” It allows precise control over what each role can access and modify on your site.
What Is The Difference Between WordPress User Roles?
WordPress user roles define what users can do. Examples include Administrator, Editor, Author, Contributor, and Subscriber, each having different access levels and capabilities.
Is It Safe To Add Custom User Roles In WordPress?
Yes, adding custom roles is safe if done correctly. Use trusted plugins or carefully coded functions to avoid security risks or conflicts.
Conclusion
Adding user roles in WordPress helps control website access. It keeps your site safe and organized. You can give users only the permissions they need. This makes managing your site easier and clearer. Follow the steps carefully to avoid mistakes.
Regularly check user roles to keep things updated. With these tips, your WordPress site stays secure and user-friendly. Simple changes can make a big difference. Start adding roles today and improve your site’s management.


