
Want to know exactly how visitors find your WordPress website? Adding a tracking code is the key.
It helps you see who’s visiting, what they’re clicking, and how they interact with your site. But if you’re not tech-savvy, the thought of inserting code can feel overwhelming. Don’t worry—you’re about to learn a simple, step-by-step way to add tracking code to your WordPress site.
By the end, you’ll have powerful insights that can boost your traffic and grow your business. Ready to unlock this game-changing tool? Let’s dive in!
Why Add Tracking Code
Adding tracking code to your WordPress website helps you understand visitor behavior. It shows how people use your site and what they like. This data helps improve your website and grow your business. Tracking code collects important information automatically.
Benefits Of Tracking
Tracking helps you see which pages get the most visits. You learn where visitors come from and how long they stay. It shows what content interests users and what does not. This helps you make better decisions about your website. You can fix problems and improve user experience. Tracking also helps measure your marketing efforts and return on investment.
Popular Tracking Tools
Google Analytics is the most popular tracking tool. It gives detailed reports on website traffic and user behavior. Facebook Pixel tracks visitors from Facebook ads. It helps improve ad targeting and measure ad success. Hotjar shows heatmaps and visitor recordings. It helps understand how users interact with your site. These tools are easy to add and use on WordPress websites.
Credit: help.ortto.com
Prepare Tracking Code
Preparing your tracking code is the first step to monitor your website traffic. This code collects data about visitors and sends it to your analytics platform. Getting this code ready carefully ensures accurate tracking and reporting. Follow the simple steps below to prepare your tracking code for your WordPress site.
Get Code From Analytics Platform
Start by logging into your analytics platform account. Most sites use Google Analytics, but others like Matomo or Adobe Analytics work too. Find the section for tracking or measurement code. Usually, it is under “Admin” or “Setup.”
Look for a tracking ID or tracking code snippet. This code is unique to your website. It allows the platform to gather data from your site visitors. Copy this code carefully to avoid errors later.
Copy Tracking Snippet
Once you locate the tracking snippet, highlight the entire code block. Use your mouse or keyboard shortcuts to copy it. The snippet is often in JavaScript format. It must be copied exactly as it appears.
Do not modify the code. Small changes can break tracking. Keep it safe on your computer or clipboard. You will paste this snippet into your WordPress site in the next steps.
Add Tracking Code Manually
Adding tracking code manually to your WordPress site helps you collect important visitor data. This method gives you full control over where the code goes. It works well for tools like Google Analytics or Facebook Pixel. Editing the theme files directly places the code in the right spot, usually the header.
Edit Theme Header File
To add tracking code manually, start by opening your WordPress dashboard. Go to Appearance > Theme Editor. Find the header.php file in the right sidebar. This file controls the header section of your site.
Paste the tracking code just before the closing tag. This ensures the code loads on every page. Save the changes after pasting the code. Check your website to confirm the tracking code works.
Use Child Theme For Safety
Editing the main theme file can cause problems during updates. Your changes may disappear after a theme update. To avoid this, use a child theme.
A child theme lets you customize your site safely. Copy the header.php file to the child theme folder. Add your tracking code in this copied file. Activate the child theme to keep changes safe.
This method protects your edits and keeps your site stable.

Credit: www.hostinger.com
Use Plugins To Add Code
Plugins make adding tracking code to WordPress simple and safe. They let you insert code without touching your theme files. This keeps your site secure and easy to update. Plugins also help manage multiple tracking codes in one place. This method suits beginners and those who prefer a quick setup.
Top Plugins For Tracking
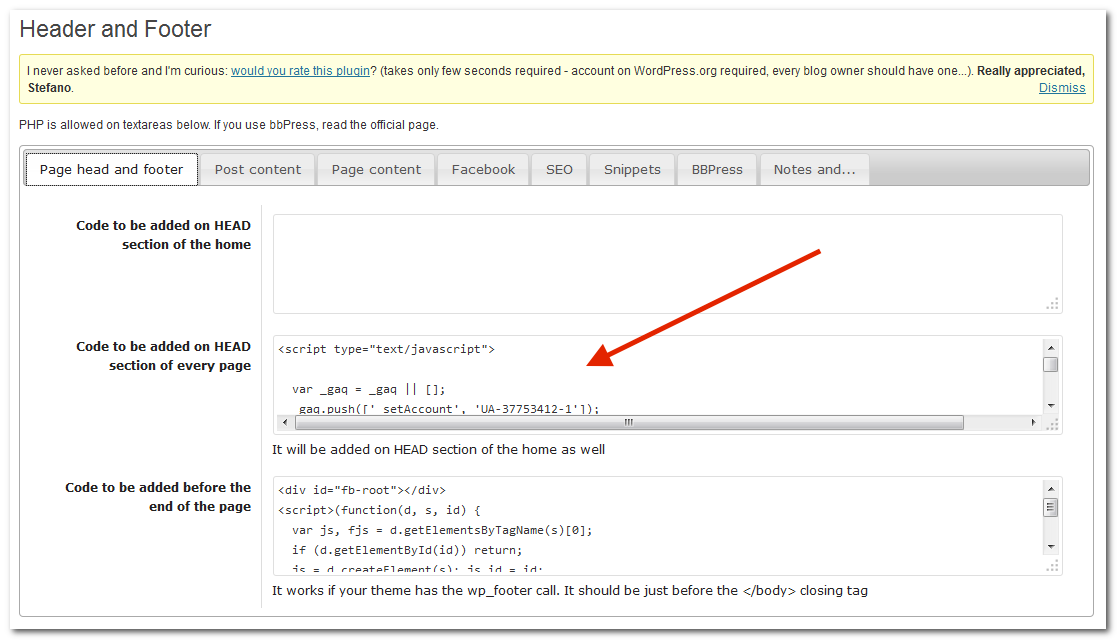
Several plugins work well for tracking code. “Insert Headers and Footers” is popular for easy code placement. “Google Site Kit” connects Google Analytics and other tools directly. “Header Footer Code Manager” offers organized control over scripts. These plugins support various tracking codes from Google, Facebook, and more.
Step-by-step Plugin Setup
First, log in to your WordPress dashboard. Go to Plugins > Add New. Search for your chosen plugin and click Install Now. After installation, click Activate to start using it. Find the plugin’s settings in the dashboard menu.
Paste your tracking code into the designated box, usually labeled “Header” or “Footer.” Save your changes to apply the code. Visit your tracking service to confirm the code works. Using plugins keeps your tracking organized and your site safe.
Verify Tracking Installation
After adding a tracking code to your WordPress website, verifying its installation is essential. This step ensures your analytics tool collects accurate data. You can confirm the code works by using simple methods. These checks help avoid missing important visitor information.
Use Browser Tools
Open your website in a web browser like Chrome or Firefox. Right-click on the page and select “Inspect” or “Inspect Element.” This opens developer tools. Go to the “Network” tab and refresh the page. Look for the tracking script file or requests related to your analytics provider. If you see them, the code is active. Another option is checking the “Console” tab for any tracking errors. No errors mean the code runs correctly.
Check Analytics Dashboard
Log in to your analytics account dashboard. Find the real-time report section. Visit your website on a different device or browser. Watch the real-time dashboard for your visit. If it shows your activity, the tracking code works. This method confirms data flows from your site to analytics. It also ensures no delay in tracking visitor actions.
Troubleshoot Common Issues
Troubleshooting is key after adding tracking code to your WordPress site. Problems might stop the code from working well. Fixing these issues helps you get accurate data about your visitors.
Check your work step-by-step. Small mistakes can cause big problems. Use simple methods to find and solve errors quickly.
Code Not Appearing
Sometimes, the tracking code does not show on your site. This can happen if the code is placed in the wrong spot. Make sure it is inside the header or footer area as needed.
Clear your browser cache to see recent changes. Cached pages may show old versions without the new code. Try using a private browser window to test.
Check for plugin conflicts. Some plugins can block code from loading. Disable plugins one by one to find the problem.
Data Not Showing
Even if the code appears, data might not show in your analytics. Verify your tracking ID is correct. A small typo will stop data collection.
Give your analytics tool some time. It may take a few hours to start showing data. Refresh the analytics dashboard regularly.
Use browser tools like the console to check for errors. Errors can stop data from sending. Fix these errors to restore tracking.
Credit: www.hostinger.com
Frequently Asked Questions
How Do I Add Tracking Code To WordPress Manually?
To add tracking code manually, go to your WordPress theme editor. Insert the code in the header.php file before the closing tag. Save changes and verify the tracking code is active on your website.
Can I Use Plugins To Add Tracking Codes In WordPress?
Yes, plugins like “Insert Headers and Footers” simplify adding tracking codes. Install the plugin, paste your code in the header section, and save. This method avoids editing theme files directly, reducing errors.
Where Should I Place Tracking Code In WordPress?
Place tracking codes in the header section of your WordPress site. This ensures the code loads on every page, allowing accurate data collection and better tracking performance across the entire website.
Is It Safe To Edit Theme Files For Tracking Code?
Editing theme files is safe if done correctly. Always back up your website before making changes. Use a child theme to avoid losing edits during theme updates.
Conclusion
Adding tracking code to your WordPress site helps you see visitor behavior. It gives useful data to improve your website. The process is simple and quick to follow. Use plugins or insert code manually as shown. Check that the tracking works after adding it.
Keep your site updated and track results regularly. This small step can guide your website’s growth. Stay patient and watch your data grow over time. Tracking helps you make smart decisions for your site.


