
Are you looking to make your WordPress site more engaging and easy to share? Adding social media buttons is one of the simplest and smartest ways to do that.
These buttons let your visitors connect with your content instantly, boosting your reach and traffic. In this guide, you’ll discover how to add social media buttons quickly and effectively, even if you’re not a tech expert. Keep reading, and you’ll learn the exact steps to make your site more interactive and shareable right away.
Choose The Right Social Media Buttons
Choosing the right social media buttons for your WordPress site helps visitors share your content easily. The right buttons increase engagement and bring more traffic. Focus on simple, clear icons that match your site’s style. Avoid clutter by selecting only the most useful buttons. Think about your audience and the platforms they use the most.
Types Of Buttons
There are many types of social media buttons. Some show just the icon, while others display the icon with text. You can choose buttons that show share counts to build trust. Floating buttons stay visible as users scroll down your page. Inline buttons fit inside your content without breaking the flow. Pick the style that fits your website design and user experience.
Popular Social Platforms
Focus on the most popular social platforms for better reach. Facebook, Twitter, and Instagram are common choices. LinkedIn works well for professional content. Pinterest is great for images and ideas. YouTube buttons help with video sharing. Choose buttons for platforms where your audience spends time. This ensures your content gets shared widely and effectively.
Select A Plugin
Selecting the right plugin is the first step to add social media buttons on WordPress. Plugins help you place buttons easily without coding. They offer different styles and features. Choose one that fits your site’s needs and budget. Consider how simple it is to use and how well it works with your theme. Check if the plugin updates regularly and supports popular social networks.
Free Vs Premium Options
Free plugins offer basic social media buttons. They usually support popular networks like Facebook, Twitter, and Instagram. These plugins suit small blogs or simple sites. Premium plugins provide more features. They may include advanced button designs, more networks, and analytics. Some premium options offer faster support and regular updates. Think about your site’s goals before choosing. Free might be enough for simple needs. Premium works better for business sites or heavy traffic.
Top Plugins To Consider
Several plugins stand out for adding social buttons. “Simple Social Icons” is easy to use and free. “Social Snap” offers both free and premium versions. It supports many networks and looks modern. “Monarch” is a popular premium plugin with many design options. “AddToAny” is a free plugin that works well for most sites. Test a few plugins to see which fits your style and needs best. Always check reviews and update history before installing.
Install And Activate The Plugin
Adding social media buttons to your WordPress site starts with installing the right plugin. Plugins make it simple to display social icons without coding. The first step is to find and install a plugin that fits your needs. After installation, activating the plugin allows you to customize and use its features.
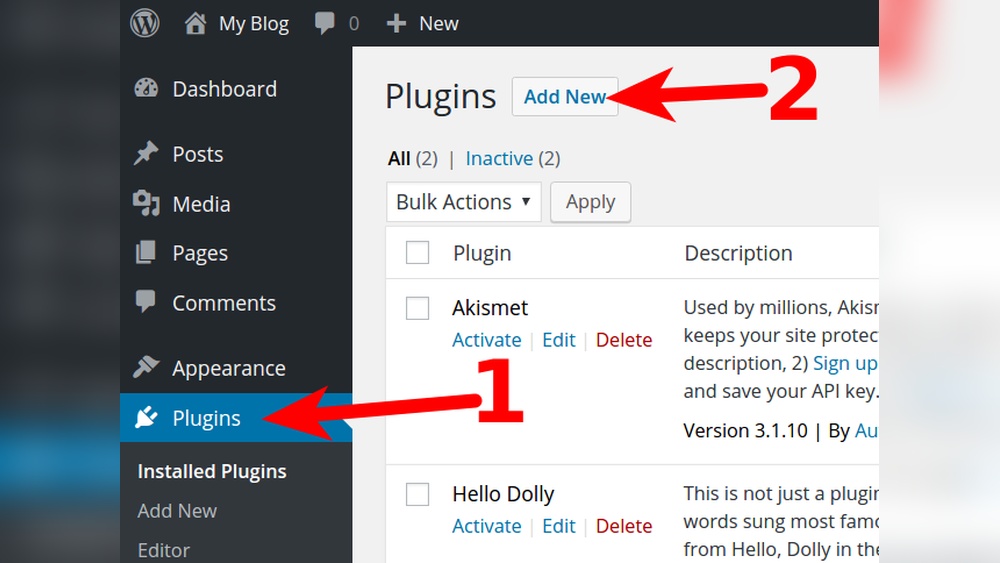
Step-by-step Installation
Log in to your WordPress dashboard. Go to the left menu and click “Plugins.” Select “Add New” at the top. Use the search bar to find a social media button plugin. Choose one with good reviews and recent updates. Click “Install Now” to begin the process. Wait for the installation to finish. Avoid installing multiple similar plugins to prevent conflicts.
Plugin Activation Tips
After installation, click the “Activate” button. Activation enables the plugin’s functions on your site. Check for any setup prompts or instructions after activation. Some plugins ask for basic settings like button style or placement. Save your settings to apply changes. Refresh your site to see the buttons appear. Keep the plugin updated to maintain security and performance.
Configure Button Settings
Configuring your social media buttons is an important step. It lets you control how the buttons look and where they appear on your site. This helps visitors easily find and use them. Proper settings improve user experience and increase sharing.
Customize Appearance
Start by choosing the style of your buttons. You can pick from different shapes, sizes, and colors. Match the buttons with your website’s design for a neat look. Some plugins let you add animations or hover effects. Simple and clear buttons work best for all users.
Set Button Placement
Decide where the buttons should show on your pages. Common spots include above or below posts, in sidebars, or in the footer. Place buttons where visitors are most likely to see them. Avoid cluttering your page with too many buttons. Test different spots to find the best results.
Add Buttons Manually
Adding social media buttons manually gives you full control over their look and placement. This method uses simple code and fits well on any WordPress site. It helps you create custom buttons that match your style perfectly.
Using Html And Css
Start by writing the HTML code for each social media button. Use anchor tags with links to your social profiles. Inside the tags, add icons using either images or font icons like Font Awesome. Style the buttons with CSS to match your site’s colors and shape. You can change size, color, and hover effects easily. Paste this code into the WordPress editor or a custom HTML block.
Adding To Widgets And Menus
To add buttons to a widget, go to Appearance > Widgets in your WordPress dashboard. Choose a Custom HTML widget and paste your button code inside. Place the widget in the sidebar or footer area. For menus, use the Custom Links option in Appearance > Menus. Add your social media URLs as custom links. Change the link text to the social site name or icon code. Save the menu and check your site for the new buttons.
Credit: wpdatatables.com
Test And Optimize
After adding social media buttons to your WordPress site, testing and optimizing is key. This step ensures the buttons work well and do not slow your site. A smooth experience keeps visitors happy and engaged.
Check Button Functionality
Test each social media button on different devices and browsers. Make sure they link correctly to your social profiles. Click the buttons to see if they open the right pages. Check if sharing options work as expected. Fix any broken links or errors you find.
Improve Loading Speed
Social media buttons can slow down your site. Use lightweight plugins or code to add buttons. Avoid too many buttons on one page. Compress images and scripts related to buttons. Test your site speed after adding buttons. Fast loading keeps visitors on your site longer.
Maintain And Update Buttons
Maintaining and updating social media buttons on your WordPress site is important. It keeps your site safe and your buttons working well. Old buttons may stop working or look outdated. Updated buttons help visitors share your content easily.
Keep Plugins Updated
Plugins control your social media buttons. Update them often. Updates fix bugs and add new features. Outdated plugins can cause errors or slow your site. Check for updates in the WordPress dashboard. Install updates as soon as possible.
Monitor Social Media Trends
Social media platforms change frequently. Button styles and features also change. Watch for new trends on popular platforms. Update your buttons to match new designs. This keeps your site fresh and relevant. Users will recognize and trust current button styles.

Credit: wordpress.com
Credit: happyaddons.com
Frequently Asked Questions
How Do I Add Social Media Buttons In WordPress?
To add social media buttons in WordPress, use plugins like Social Icons Widget or Jetpack. Install, activate, and customize button styles. Then place them in widgets, posts, or pages for easy sharing and increased engagement.
Which Plugin Is Best For WordPress Social Buttons?
Popular plugins include Social Icons Widget, Monarch, and Simple Social Icons. Choose based on ease of use, customization options, and compatibility with your theme. These plugins offer responsive, attractive buttons to boost your social presence.
Can I Add Social Buttons Without A Plugin?
Yes, you can add social buttons manually by embedding HTML code or using theme options. This method requires basic coding knowledge but keeps your site lightweight and fast without extra plugins.
Where Should I Place Social Media Buttons On WordPress?
Place buttons in visible areas like the header, sidebar, or footer. Adding them to blog posts and pages increases sharing chances. Strategic placement improves user interaction and social media traffic.
Conclusion
Adding social media buttons helps visitors share your content easily. It boosts your website’s reach and engagement. Choose buttons that fit your site’s design and audience. Test them to make sure they work well on all devices. Keep your social media links updated to stay connected.
This small step can make a big difference for your WordPress site. Start adding buttons today and watch your online presence grow. Simple, effective, and user-friendly.


