

If you want to improve your website’s visibility and control how search engines crawl your WordPress site, adding a robots.txt file is a must. But maybe you’re wondering, “How do I create and add this file without messing things up?” Don’t worry—you’re in the right place.
In this guide, you’ll learn exactly how to add a robots. txt file to your WordPress site step-by-step. By the end, you’ll have the power to guide search engines the way you want, helping your site get noticed faster and avoid unwanted pages being indexed.
Ready to take control of your site’s SEO? Let’s dive in.
Credit: wpengine.com
Role Of Robots.txt In Seo
The robots.txt file plays a key role in SEO for WordPress sites. It guides search engines on which pages to crawl and index. This helps control what content appears in search results. Proper use of robots.txt improves site visibility and ranking.
Understanding how this file works helps site owners manage search engine access. It also prevents crawling of duplicate or private pages. This keeps your site structure clean and focused on important content.
What Robots.txt Does
The robots.txt file tells search engines which parts of the site to visit. It blocks access to certain folders or files. This prevents search engines from wasting time on unimportant content. It also protects sensitive information from being indexed.
Impact On Search Engine Crawling
Robots.txt controls the crawl budget by limiting pages crawled. Search engines use this file to decide where to spend their time. Proper settings help search engines focus on valuable pages. This improves crawl efficiency and SEO performance.

Credit: qodeinteractive.com
Preparing Your Robots.txt File
Preparing your robots.txt file is an important step for managing how search engines crawl your WordPress site. This file tells search engines which parts of your site to scan and which parts to ignore. A well-prepared robots.txt file helps improve your site’s SEO and protects sensitive content.
Before creating the file, you should understand the basic rules and common commands used. This knowledge ensures your file works correctly and avoids blocking important pages.
Basic Syntax And Rules
The robots.txt file uses a simple text format with clear rules. Each rule starts with a user-agent line, which names the search engine robot. Use User-agent: to apply rules to all robots.
Next, add directives like Disallow or Allow. These tell robots which parts of your site to avoid or access. Each directive applies to the user-agent above it.
Lines beginning with a hash () are comments and ignored by robots. Keep your file clean and organized for easy updates.
Common Directives To Include
Most WordPress sites block access to folders like /wp-admin/ and /wp-includes/. These areas contain files not useful for search engines.
Allow access to the admin-ajax.php file inside /wp-admin/ to keep some functions working properly. Use Allow: /wp-admin/admin-ajax.php.
Block crawl of duplicate content such as tag and category pages to avoid SEO issues. Use rules like Disallow: /tag/ or Disallow: /category/.
Include a link to your sitemap file at the end of robots.txt. This helps search engines find all your important pages quickly.
Methods To Add Robots.txt In WordPress
Adding a robots.txt file to your WordPress site helps control how search engines crawl your pages. There are several easy ways to add or edit this file. Each method fits different needs and skill levels. Choose one that works best for your website.
Using Seo Plugins
Many SEO plugins offer a simple way to create or edit robots.txt files. Plugins like Yoast SEO or All in One SEO let you manage this file without coding. Just go to the plugin’s settings and find the robots.txt editor. You can add rules to allow or block search engines from specific parts of your site. This method is safe and user-friendly for beginners.
Editing Via Cpanel Or Ftp
Access your website files through cPanel or an FTP client. Look for the root folder, usually called public_html. Here, you can upload a new robots.txt file or edit the existing one. This method requires basic knowledge of file management. Be careful while editing to avoid errors that can block search engines from your site.
Creating A Virtual Robots.txt
WordPress can generate a virtual robots.txt file automatically. This file is not stored on your server but created on the fly. You can add rules by editing your theme’s functions.php file or using a custom plugin. This method suits users who want to avoid managing physical files. It lets you control crawling without uploading a file.
Step-by-step Guide With Seo Plugins
Adding a robots.txt file helps control how search engines crawl your website. SEO plugins make this process easy and quick. This guide shows simple steps to create and edit the file using popular WordPress plugins. Follow along to improve your site’s SEO and protect sensitive pages from indexing.
Installing A Plugin
First, log in to your WordPress dashboard. Go to the “Plugins” menu and click “Add New.”
Search for SEO plugins like “Yoast SEO” or “All in One SEO.” These tools include robots.txt management.
Choose the plugin you prefer and click “Install Now.” After installation, activate the plugin.
Once active, the plugin will add new SEO options to your dashboard. You are ready to configure robots.txt settings.
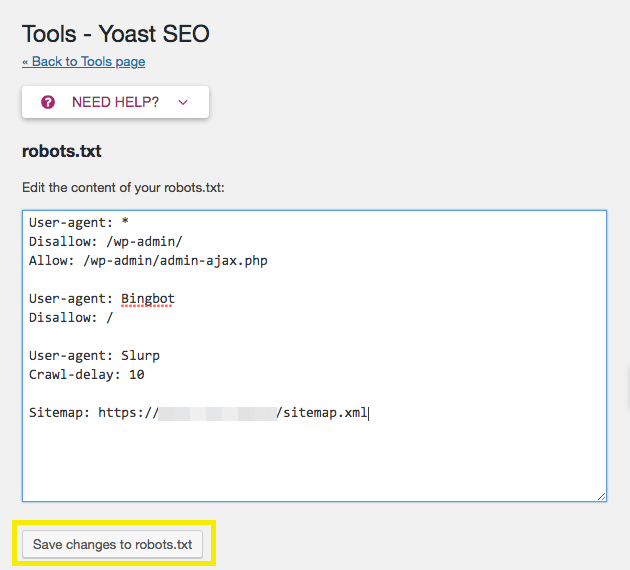
Configuring Robots.txt Settings
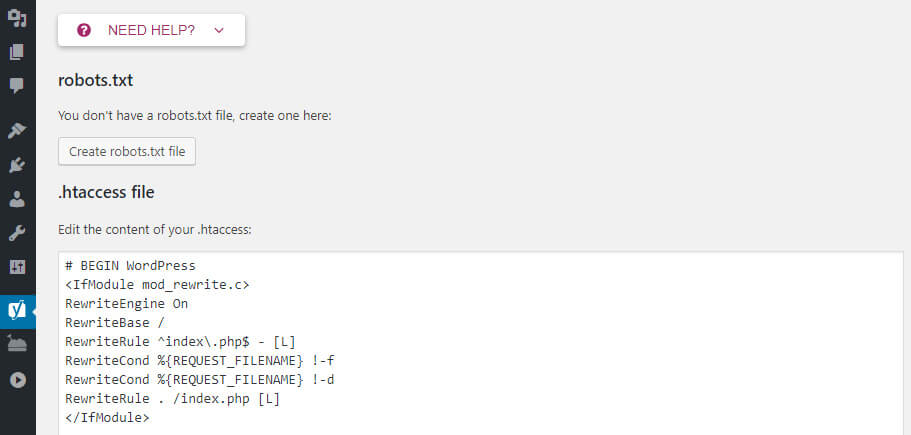
Access the SEO plugin’s settings from the WordPress menu. Look for the “Tools” or “File Editor” section.
Here, find the robots.txt editor. It shows the current file or allows you to create one.
Add rules to block or allow specific bots. Use simple commands like “Disallow” and “Allow.”
For example, block admin pages by adding: Disallow: /wp-admin/. This stops search engines from indexing those pages.
Save your changes. The plugin will update your robots.txt file automatically.
Check your robots.txt by visiting yourwebsite.com/robots.txt in a browser.
Editing Robots.txt Via Hosting Access
Editing the robots.txt file through your hosting access gives direct control over your website’s crawl settings. This method is useful for precise changes and quick updates. You handle the file directly on your server, avoiding plugin limitations.
Accessing the robots.txt file via hosting requires basic knowledge of file management. You can locate, modify, and upload the file using your hosting control panel or an FTP client. This process is straightforward and effective for managing site visibility on search engines.
Locating The File
Log in to your hosting control panel or FTP client. Navigate to the root folder of your WordPress installation, usually named public_html. The robots.txt file is in this root directory. If you do not see the file, you might need to create one. Some hosts hide system files, so enable “show hidden files” in your file manager.
Modifying And Uploading
Download the robots.txt file to your computer for editing. Open it with a simple text editor like Notepad or TextEdit. Make your changes carefully. Save the file in plain text format. Upload the edited robots.txt file back to the root directory on your server. Overwrite the old file if prompted. Check your website to confirm the changes are live.
Testing And Validating Robots.txt
Testing and validating your robots.txt file is a crucial step after creating it. This file guides search engines on which pages to crawl or avoid. A small mistake can block important pages or expose sensitive content. Checking the file ensures it works as intended and helps maintain good SEO health.
Testing also improves your website’s visibility. It helps search engines understand your site better. This leads to more accurate indexing and better search rankings.
Using Google Search Console
Google Search Console offers a simple tool to test your robots.txt file. You can enter your site’s URL and see if Googlebot can access pages. The tool highlights any blocked URLs. It shows errors or warnings in your file. This helps you fix problems quickly.
Use the “Robots Testing Tool” inside Search Console. Paste your robots.txt content there. Then test specific URLs to check if they are allowed or blocked. This real-time feedback is valuable for maintaining correct settings.
Common Errors To Avoid
Incorrect syntax is a common robots.txt mistake. Even a missing space or wrong character can cause issues. Avoid using uppercase letters; the file is case-sensitive. Ensure you use the right commands like “Disallow” and “Allow.”
Blocking the entire site by using “Disallow: /” can harm your SEO. It stops search engines from crawling all pages. Forgetting to update the file after site changes also causes problems. Keep your robots.txt file current and error-free for best results.
Best Practices For Robots.txt In WordPress
Managing the robots.txt file in WordPress is important for controlling search engine access. This file guides search engines on which pages to crawl or ignore. Following best practices ensures your site stays visible and well-organized.
Proper use of robots.txt can improve your site’s SEO and protect sensitive content. Careful setup prevents accidental blocking of valuable pages. Regular updates keep the file aligned with your site’s changes.
Avoiding Blocking Important Pages
Do not block pages that you want search engines to index. Avoid disallowing your homepage, blog posts, or key category pages. Check your robots.txt for any rules that block CSS or JavaScript files. Blocking these can affect how search engines view your site.
Use the robots.txt tester in Google Search Console to find mistakes. Test before applying changes to avoid harming your SEO. Keep the file simple and clear to prevent confusion.
Keeping The File Updated
Update your robots.txt whenever you add or remove important pages. Reflect site structure changes to guide search engines properly. Review the file at least every few months.
Remove rules for pages that no longer exist or are now public. Add new disallow rules for pages you want hidden from search engines. Regular updates keep your SEO strategy on track.
Credit: www.hostinger.com
Frequently Asked Questions
What Is A Robots.txt File In WordPress?
A robots. txt file guides search engines on which pages to crawl. It helps control indexing and improves SEO by blocking unwanted content.
How Do I Create A Robots.txt File In WordPress?
You can create a robots. txt file using a plugin or manually via FTP. Save it in your site’s root directory for proper functionality.
Why Should I Add A Robots.txt File To WordPress?
Adding robots. txt helps manage search engine bots, prevent duplicate content indexing, and protect sensitive pages. It boosts site SEO and crawl efficiency.
Can I Edit Robots.txt File From WordPress Dashboard?
Yes, some SEO plugins like Yoast allow easy robots. txt editing directly from the WordPress dashboard without FTP access.
Conclusion
Adding a robots. txt file helps control search engine access. It guides crawlers on which pages to visit or skip. This improves website visibility and protects private content. WordPress makes adding this file simple and quick. Regularly check and update your robots.
txt for best results. Keep your site organized and easy to find. Now, your site can communicate better with search engines. A small step with a big impact on SEO.


