Are you looking for a simple way to make your WordPress posts cleaner and more engaging? Adding a “Read More” button can help you do just that.
It lets you show a preview of your content, inviting your readers to click and discover the full story. This not only keeps your blog pages neat but also encourages visitors to spend more time exploring your site. In this guide, you’ll learn exactly how to add the “Read More” feature to your WordPress posts quickly and easily—no tech skills needed.
Let’s dive in and give your blog a professional touch that keeps readers coming back for more!
Credit: www.hostpapa.com
Why Use Read More In WordPress
The Read More feature in WordPress helps manage how much content shows on your blog page. It breaks long posts into short previews. Visitors see a snippet and click to read the full article. This keeps your site clean and easy to scan. It also helps visitors find what interests them quickly.
Boosting Post Engagement
Read More invites readers to click and explore your posts. It creates curiosity with a short preview. Visitors spend more time on your site reading full articles. This can increase comments and shares. Engaged readers are more likely to return for new content.
Improving Page Load Speed
Showing only part of each post reduces page size. Smaller pages load faster on any device. Faster sites improve user experience and reduce bounce rates. Search engines also rank faster sites higher. Read More helps keep your blog quick and smooth.
Enhancing Blog Appearance
Read More creates a neat and organized blog layout. Instead of long, scrolling posts, visitors see clean previews. This makes your blog look professional and easy to browse. A tidy appearance encourages visitors to explore more posts.
Different Methods To Add Read More
Adding a Read More link helps keep your WordPress posts neat and tidy. It allows readers to see a preview and click to read the full content. WordPress offers several ways to insert this feature. Each method suits different users and needs. Choose the one that fits your editing style and goals.
Using The Built-in Read More Tag
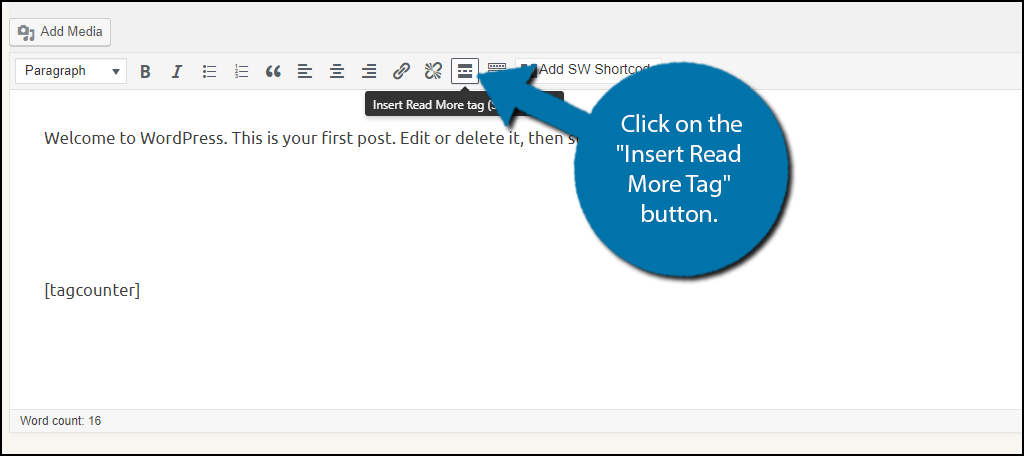
WordPress has a simple Read More tag. Place it in your post where you want the break. The content before the tag shows on the main blog page. Readers click the link to see the full post. To add it, use the “Insert Read More tag” button in the editor toolbar. This method is fast and does not need extra tools.
Inserting Read More With Gutenberg Block Editor
The Gutenberg editor uses blocks to create content. It includes a specific Read More block. Add this block where you want the preview to end. This block works like the classic tag but is easier to manage visually. Drag and drop it inside your post. This method fits users who prefer block editing.
Adding Read More Via Classic Editor
The Classic Editor is the old WordPress editor. It also supports the Read More tag. In the editor toolbar, find the “Insert Read More tag” button. Click it to insert the tag at the cursor. The editor shows a dashed line where the break appears. This method suits those who prefer the traditional editor.
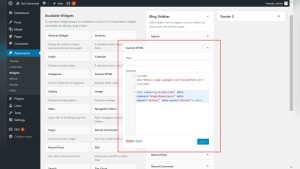
Employing Plugins For Advanced Features
Plugins offer extra control over Read More links. Some let you customize text and style. Others provide options for animation or load more buttons. Plugins work well for users needing more than the default tag. Search the WordPress plugin library for Read More plugins. Install and configure them to match your site’s look and feel.
Step-by-step Guide For Built-in Tag
Adding a “Read More” tag in WordPress helps keep your posts tidy. It shows only a part of your content on the main blog page. Readers can click to see the full post. This step-by-step guide explains how to use WordPress’s built-in Read More tag.
The process is simple and quick. You do not need any plugins or coding skills. Just follow the steps below to improve your blog’s look and user experience.
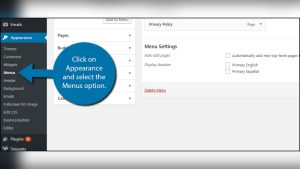
Locating The Read More Button
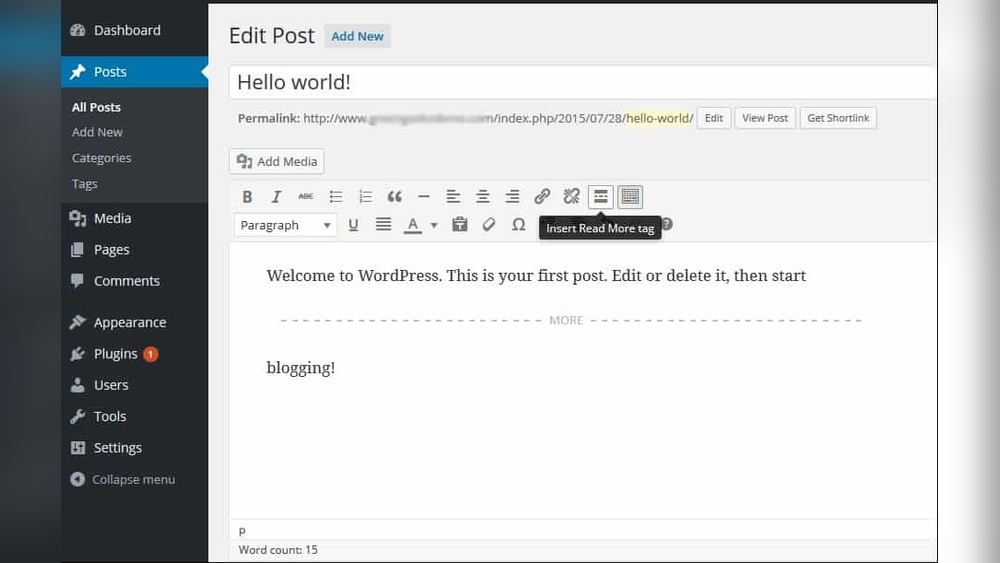
Open the WordPress editor for your post. Look at the toolbar above the text area. The Read More button looks like two horizontal lines with a dotted line between them. In some themes, it may say “More.” You can find it near other formatting tools like bold and italic.
Inserting The Tag In Your Post
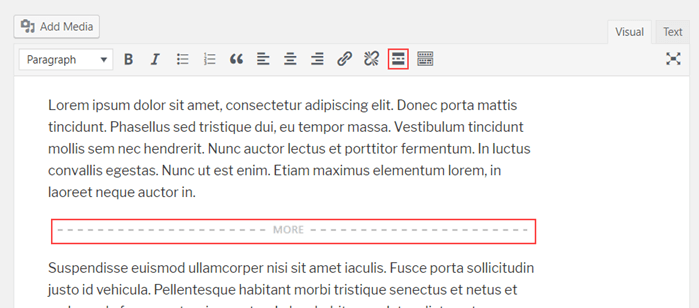
Place your cursor where you want to split the content. Usually, after a few sentences or a paragraph. Click the Read More button. WordPress adds a visible line labeled “More” in the editor. This marks the point where the post breaks on the blog page.
Previewing The Read More Effect
Save or update your post. Click the Preview button to see the changes. The blog page now shows the content before the “More” tag only. A link or button with “Read More” appears below. This link takes readers to the full post. Check that the break looks natural and inviting.
Credit: www.greengeeks.com
Using Plugins To Customize Read More
Using plugins to customize the Read More feature in WordPress makes the process easy and flexible. Plugins give you control over how the Read More link looks and works. They help you create a better user experience and keep visitors on your site longer.
Many plugins offer options to change the text, style, and placement of Read More links. Some include extra features like animations or button styles. These tools work well without needing to code.
Top Plugins To Consider
Several plugins stand out for customizing Read More links. Advanced Excerpt allows control over excerpt length and Read More text. Read More Excerpt Link provides easy customization of link style and text. WP Show More adds a button that expands content inline. These plugins are user-friendly and widely supported.
Configuring Plugin Settings
After installing a plugin, open its settings page. Set the Read More text to match your site’s tone. Adjust excerpt length to fit your design. Choose where the link appears—before or after the excerpt. Save changes and preview your posts to see the effect.
Styling Read More Links
Most plugins let you change colors, fonts, and sizes of Read More links. Use simple CSS if the plugin supports it. Make the link stand out but keep it consistent with your site’s style. A clear, clickable Read More link encourages readers to explore more content.
Best Practices For Read More Links
Read More links help keep your WordPress posts neat and easy to scan. Using them right can boost user experience and keep visitors on your site longer. Follow best practices to make these links clear and useful.
Crafting Compelling Link Text
Use simple and clear words for your Read More links. Instead of just “Read More,” try phrases like “Continue Reading” or “See Full Story.” This tells readers exactly what to expect. Avoid long or confusing link text. Make sure it stands out but fits with your page style.
Positioning The Read More Tag
Place the Read More tag where your preview ends naturally. Usually, this is after a few sentences or the first paragraph. Avoid cutting off in the middle of a sentence or idea. Proper placement keeps the text smooth and inviting. It helps readers decide to click without feeling lost.
Balancing Content Preview Length
Show enough content to interest readers but not too much. A short preview of 40-60 words works well. It gives a clear idea without revealing everything. Too long previews reduce clicks on Read More links. Too short previews might confuse or frustrate readers. Find a balance that fits your content style.
Credit: rankmath.com
Troubleshooting Common Issues
Troubleshooting common issues helps keep your WordPress site working well. Sometimes the “Read More” feature does not work as expected. This part guides you through fixing frequent problems. Clear instructions make it easier to solve these issues fast.
Read More Not Showing Correctly
The “Read More” link may not appear or show oddly. Check if you inserted the tag in the right place. It works only in the visual or text editor modes.
Sometimes, the content before the tag is too short. WordPress hides the link if the preview is almost the full post. Make sure you have enough text before the break.
Conflict With Themes Or Plugins
The theme or plugins can stop the “Read More” from working. Some themes override default WordPress behavior. Try switching to a default theme like Twenty Twenty-One to test.
Disable all plugins, then check the “Read More” again. Turn plugins on one by one to find the problem. Update your theme and plugins to avoid conflicts.
Fixing Formatting Problems
Sometimes the “Read More” tag changes text format. This happens if extra spaces or line breaks are around the tag. Edit your post and remove any blank lines near the tag.
Use the text editor to check for hidden HTML tags. Fixing these keeps the post layout clean and consistent. Clear your cache to see changes on the live site.
Frequently Asked Questions
How Do I Add A “read More” Tag In WordPress?
To add a “Read More” tag, place the cursor where you want to break the text. Then, click the “Insert Read More tag” button in the editor. This creates a summary snippet and hides the rest until clicked.
Why Use The “read More” Feature On WordPress Posts?
Using “Read More” improves site navigation and user experience. It keeps pages clean, loads faster, and encourages visitors to explore full content. It also helps with SEO by structuring content effectively.
Can I Customize The “read More” Text In WordPress?
Yes, you can customize the “Read More” text. Edit your theme’s functions. php file or use plugins to change the default label to anything you prefer, improving engagement and branding.
Does The “read More” Tag Affect WordPress Seo?
The “Read More” tag positively impacts SEO by reducing content clutter on blog pages. It helps search engines index summaries while keeping readers interested to click and read full posts.
Conclusion
Adding a “Read More” tag helps keep your posts neat and clear. It makes your blog easier to scan and saves space on your homepage. Visitors can choose what they want to read without feeling overwhelmed. This simple step improves user experience and keeps readers interested.
You can add the tag quickly using WordPress tools. Try it on your next post and see how it changes your site’s look. Small changes like this make a big difference in keeping your blog organized and reader-friendly.