

Are you looking to share your ideas, stories, or updates on your WordPress site but don’t know where to start? Adding a post in WordPress is simpler than you might think.
Once you learn the steps, you’ll be able to create engaging content that grabs your readers’ attention and keeps them coming back for more. In this guide, you’ll discover exactly how to add a post quickly and easily, even if you’re new to WordPress.
Ready to take control of your website and start publishing like a pro? Let’s dive in!
Setting Up Your WordPress Account
Setting up your WordPress account is the first step to creating a website or blog. This process involves choosing the right hosting service, installing WordPress, and logging into your dashboard. Each step is important to get your site up and running smoothly.
Choosing A Hosting Service
Choose a hosting service that fits your needs and budget. Hosting stores your website files and makes them available online. Look for providers with good speed, uptime, and customer support. Shared hosting is affordable for beginners. Managed WordPress hosting offers more features but costs more.
Installing WordPress
Many hosting services offer one-click WordPress installation. This tool simplifies setup, saving time and effort. Follow the instructions provided by your host. You will need to create a database and fill in some basic details. After installation, WordPress files will be ready on your server.
Logging Into The Dashboard
Access your WordPress dashboard by visiting yoursite.com/wp-admin. Enter your username and password created during setup. The dashboard is where you manage your site. From here, you can add posts, pages, and customize settings. Spend time exploring the dashboard to understand its features.
Credit: www.ipage.com
Creating A New Post
Creating a new post in WordPress is a simple process. It allows you to share your ideas, news, or stories easily. You can add text, images, and links to make your post interesting.
This section guides you step-by-step on how to start a new post. Follow these instructions to begin writing your content quickly.
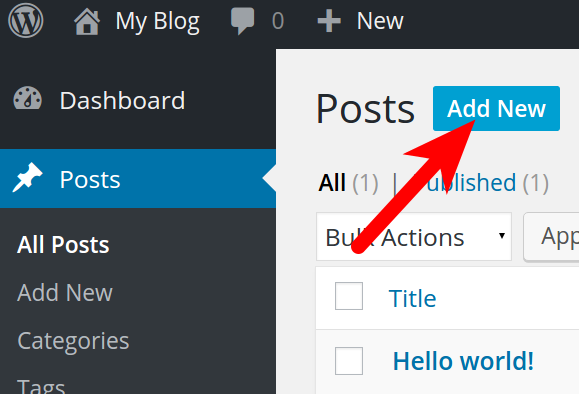
Navigating To The Posts Section
First, log in to your WordPress dashboard. Look at the menu on the left side of the screen. Find the option labeled “Posts.” Click on it to open the posts area. This section shows all your existing posts and options to manage them.
Clicking On Add New
Inside the Posts section, find the button labeled “Add New.” It is usually at the top or near the menu. Click this button to open a blank page for your new post. Here, you can start writing your title and content. This page also offers tools to format your text and add media.
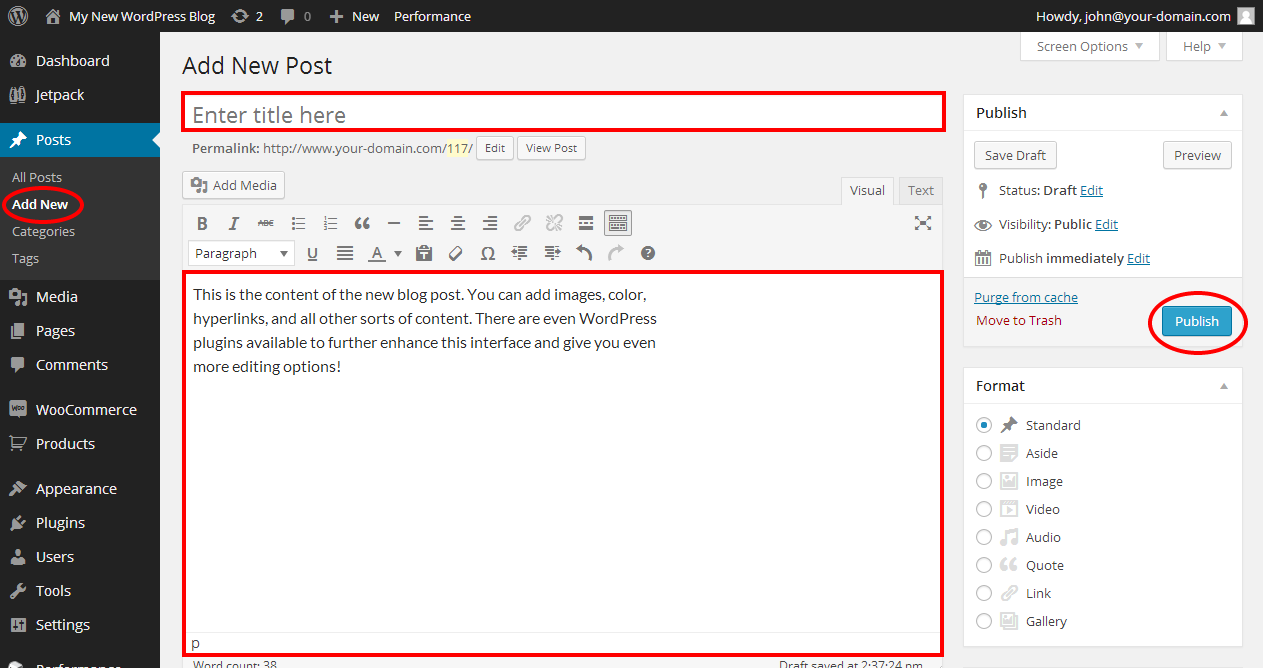
Writing Your Post
Writing your post in WordPress is a simple and clear process. It lets you share your ideas, stories, or information with the world. This section guides you through the main steps of creating content that is easy to read and looks good on your website.
Adding A Title
The title is the first thing readers see. It should be short and describe your post clearly. Click on the top field that says “Add title.” Type your main idea here. A good title helps people understand what your post is about quickly. Keep it direct and interesting.
Using The Block Editor
WordPress uses the Block Editor to build your post. Each paragraph, image, or video is a separate block. This system helps organize your content cleanly. Click the “+” icon to add new blocks. You can move blocks up or down to change the order. It makes editing easy and flexible.
Inserting Text And Media
Start typing your text in a paragraph block. Use simple sentences to keep readers engaged. To add images or videos, click the “+” and choose the media block. Upload files from your computer or select from your media library. Media adds visual interest and supports your message.
Formatting Your Content
Formatting your content helps readers understand your message clearly. It makes your post easier to read. Proper formatting breaks your text into sections. This keeps your audience interested and improves SEO. WordPress offers simple tools to format content effectively.
Applying Headings And Paragraphs
Headings organize your content into clear sections. Use headings to show main ideas and subtopics. WordPress lets you choose heading levels from H1 to H6. Use H2 for main sections and H3 for subsections. Paragraphs separate your ideas. Keep paragraphs short for better readability.
Adding Images And Videos
Images and videos make your posts more engaging. They help explain your points visually. To add media, click the “Add Media” button. Upload files from your computer or use URLs. Always add alt text to describe images. This improves accessibility and SEO.
Using Lists And Quotes
Lists organize information clearly. Use bullet points for unordered lists. Numbered lists show steps or ranking. Quotes highlight important statements or ideas. Use the blockquote feature to style quotes. This draws attention and adds credibility.
Optimizing For Seo
Optimizing your WordPress posts for SEO helps your content reach more readers. It improves your site’s visibility on search engines. Focus on key elements that boost your post’s ranking. Simple steps make a big difference.
Choosing Keywords
Pick keywords that match what people search for. Use specific phrases related to your post topic. Avoid broad or very competitive words. Place keywords naturally in your title and content. This helps search engines understand your post’s subject.
Adding Meta Descriptions
Write a clear and short meta description for each post. Summarize the main idea in 150 characters or less. Include your main keyword in the description. A good meta description encourages users to click your link.
Using Seo Plugins
Install SEO plugins like Yoast or All in One SEO. These tools guide you to improve your post’s SEO. They check keyword use, readability, and meta tags. Plugins also create sitemaps to help search engines find your posts faster.
Setting Categories And Tags
Setting categories and tags helps organize your WordPress posts. It makes your blog easier to navigate. Visitors find related content quickly. Search engines understand your site better. This can improve your SEO.
Creating Categories
Categories group your posts by broad topics. To create a category, go to the post editor. On the right side, find the Categories box. Click “Add New Category.” Type a name for the category. Press Enter or click “Add New Category” again. The new category appears in the list. You can select it for your post.
Assigning Tags
Tags describe specific details about your post. They are like keywords. In the post editor, find the Tags box. Type words or phrases related to your post. Separate each tag with a comma. Click “Add” or press Enter to add tags. Tags help visitors find posts with similar topics.
Previewing And Publishing
After writing your post in WordPress, the next step is to check how it looks. Previewing and publishing help ensure your content is ready for readers. You can see the post before it goes live and decide when to share it with the world.
This process helps avoid mistakes and lets you plan your content release. WordPress gives several options to control your post visibility and timing.
Using The Preview Feature
The preview feature shows how your post will appear once published. Click the “Preview” button in the editor. It opens a new tab with your post as readers will see it. Check images, links, and formatting here. Make sure everything looks right before publishing.
Scheduling Posts
Scheduling lets you set a future date and time for your post. This is useful for planning content ahead. In the “Publish” section, click “Immediately” and select your date and time. WordPress will publish the post automatically on that schedule. This keeps your site active even when you are busy.
Publishing Immediately
To publish your post right away, click the “Publish” button. Your post will become visible to everyone on your site. This option is great for timely news or updates. Make sure you have reviewed the post before clicking publish. Once live, readers can start engaging with your content.
Credit: www.inmotionhosting.com
Editing And Managing Posts
Editing and managing posts in WordPress is simple and important. It helps keep your content fresh and accurate. You can change your posts anytime after publishing. Also, you can remove posts you no longer need and bring back deleted ones.
Updating Published Posts
To update a published post, go to the WordPress dashboard. Click on “Posts” to see all your articles. Find the post you want to edit. Click “Edit” below the post title. Make the changes you want in the editor. You can update text, images, or links. After editing, click “Update” on the right side. Your changes will go live immediately.
Deleting And Restoring Posts
Deleting posts is easy and keeps your site clean. In the “Posts” list, hover over the post you want to delete. Click “Trash” to move it to the trash folder. The post is not gone forever. To restore it, click “Trash” at the top of the post list. Find the post and click “Restore.” Your post returns to the published or draft state.

Credit: www.youtube.com
Frequently Asked Questions
How Do I Add A New Post In WordPress?
To add a new post, log in to your WordPress dashboard. Click “Posts” then “Add New. ” Enter your title and content, then click “Publish” to make it live on your site.
Can I Schedule Posts In WordPress?
Yes, WordPress allows you to schedule posts. After creating your post, click “Publish” and select “Schedule. ” Choose the date and time for publishing, then confirm to automate posting.
How Do I Add Images To WordPress Posts?
To add images, click the “Add Media” button above the editor. Upload or select an image from your library, then insert it into your post for visual appeal.
What Is The Difference Between Posts And Pages In WordPress?
Posts are timely content listed by date, ideal for blogs. Pages are static, like About or Contact pages. Both serve different purposes for website structure.
Conclusion
Adding a post in WordPress is simple and quick. Just follow the steps carefully. You can create and publish content easily. Use the editor to add text, images, and links. Preview your post before publishing it live. Regular posting helps keep your website active.
Practice often to feel more confident. Start sharing your ideas with the world today.


