
Want to make your WordPress site more engaging? Adding photos is one of the easiest and most effective ways to grab your visitors’ attention.
But if you’re not sure how to upload images or want to do it the right way, you’re in the right place. You’ll learn simple, step-by-step methods to add photos on WordPress quickly and effortlessly. By the end, your website will look more professional and inviting—helping you connect better with your audience.
Ready to transform your site with stunning visuals? Let’s dive in!
Credit: wordpress.org
Choosing The Right Images
Choosing the right images for your WordPress site is very important. Good images catch attention and make your content clear. They help visitors understand your message faster. The right pictures also make your site look professional and trustworthy.
Picking images that match your topic is key. The images should support your words and add value. Poor images can confuse readers or make your site look messy. Take time to select photos that fit your style and content.
Types Of Images To Use
Use photos that relate to your blog topic. Real photos, like people or places, work well for stories and reviews. Illustrations or icons can explain ideas simply. Charts or graphs help show data clearly. Choose images that make your text easier to understand.
Optimizing Image Size
Large images slow down your website. Resize pictures to fit your page width before uploading. Use JPEG for photos and PNG for graphics with few colors. Compress images to reduce file size without losing quality. Fast loading keeps visitors happy and improves SEO.
Sources For Free Images
Many websites offer free pictures you can use legally. Check sites like Unsplash, Pexels, and Pixabay. Always read the license to know how you can use the image. These sites have high-quality photos for many topics. Using free images saves money and time.
Credit: solidwp.com
Uploading Photos To WordPress
Uploading photos to WordPress is simple and quick. You can add images to your site without extra tools. WordPress offers multiple ways to upload photos. Choose the one that fits your needs best.
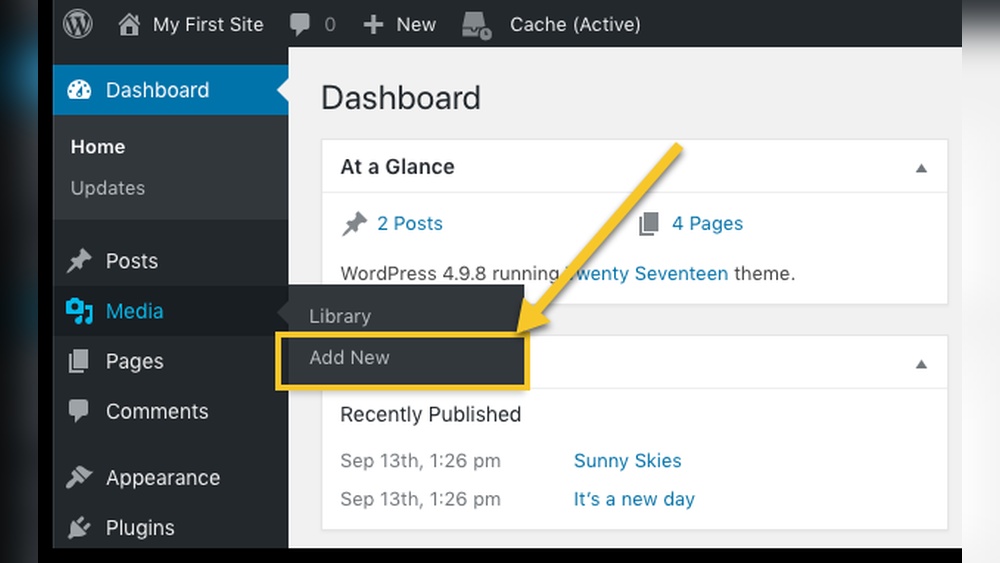
Using The Media Library
The Media Library is the main place to store all your photos. To upload, go to your WordPress dashboard. Click on “Media” and then “Add New.” You can select files from your computer. After upload, images are ready for use anywhere on your site.
Drag And Drop Upload
Drag and drop makes uploading faster. Open the Media Library or post editor. Drag your photo file from your computer. Drop it into the upload area. WordPress will upload and save the image automatically. No extra clicks needed.
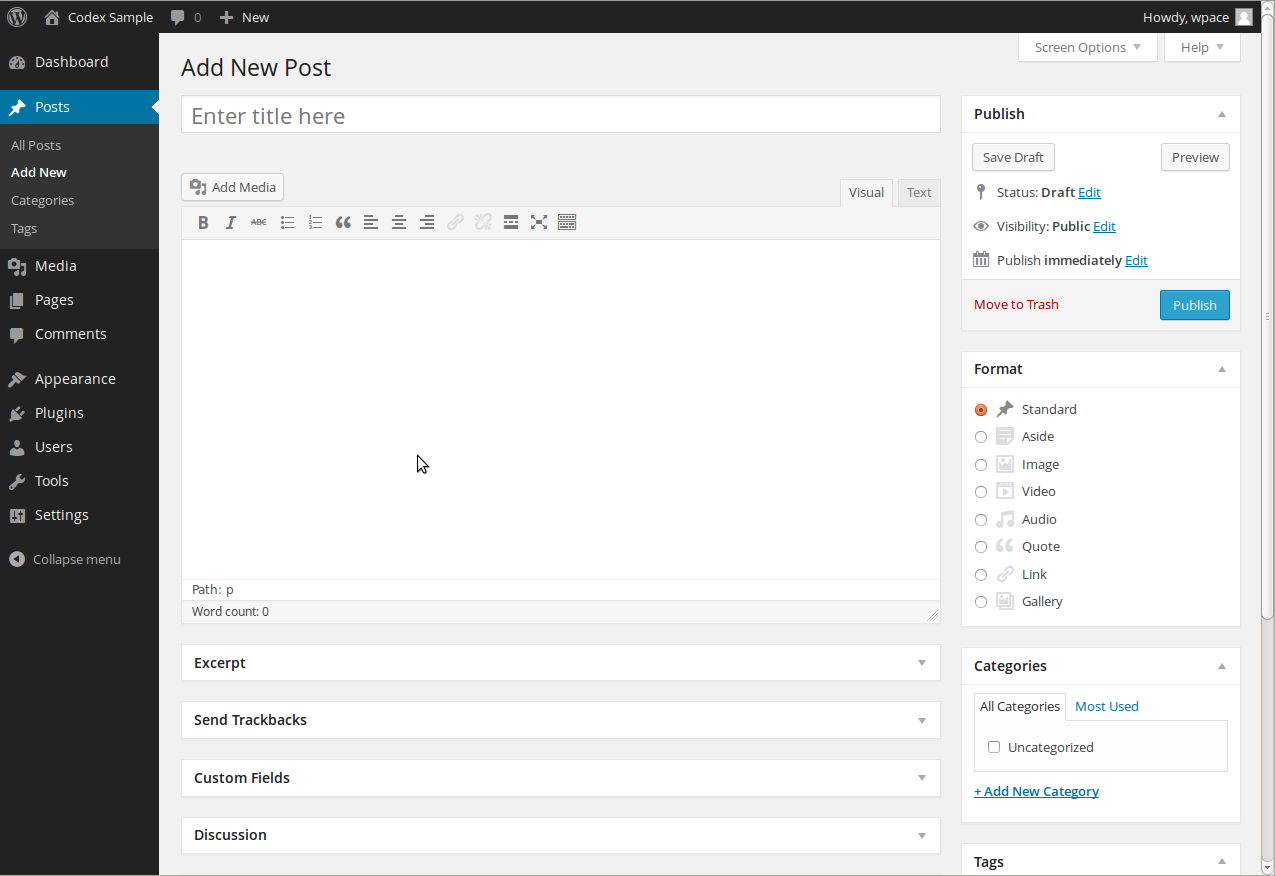
Uploading Via Post Editor
While writing a post, you can add images directly. Click the “Add Media” button above the editor. Choose a photo from the Media Library or upload a new one. Insert the image into your content. This method saves time and keeps your workflow smooth.
Adding Images To Posts And Pages
Adding images to your WordPress posts and pages makes your content more interesting. Pictures help explain ideas clearly. They also keep readers engaged longer. WordPress makes it easy to add images and customize them. Below are simple steps to insert and manage photos effectively.
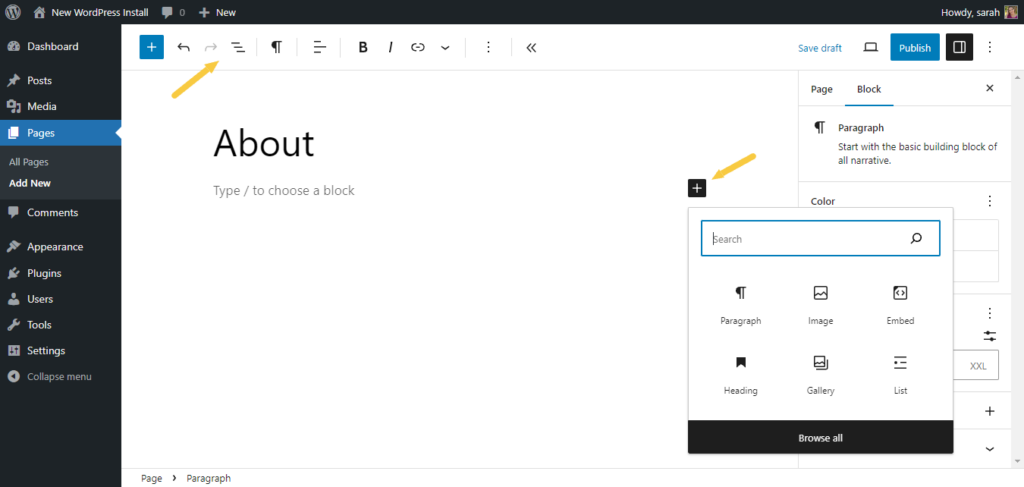
Inserting Images In The Block Editor
Open your post or page in the WordPress block editor. Click the plus (+) icon to add a new block. Choose the “Image” block from the list. You can upload a new photo or select one from the media library. After selecting, the image appears in your content. You can resize it by dragging the corners. This method places images exactly where you want them.
Adjusting Image Alignment
Select the image in the block editor. Look for the alignment options in the toolbar above. Choose left, center, or right alignment based on your layout. Left or right aligns the image with text wrapping around it. Center alignment places the image in the middle of the page. Proper alignment improves the look and flow of your content.
Adding Captions And Alt Text
Click on the image to access its settings. Below the image, find the caption box. Type a short description that explains the picture. Captions help readers understand images better. Also, add alt text in the image settings panel. Alt text describes the image for search engines and users with disabilities. Clear captions and alt text boost SEO and accessibility.
Creating Image Galleries
Creating image galleries on WordPress helps showcase multiple photos in one place. Galleries make your website look organized and visually appealing. Visitors enjoy browsing through grouped images easily. WordPress offers simple tools and plugins to build these galleries. Let’s explore how to create and customize them.
Setting Up A Gallery Block
Start by opening your WordPress editor. Click the plus (+) icon to add a new block. Search for the “Gallery” block and select it. Upload images from your computer or choose from the media library. Arrange photos by dragging them into the order you want. Click “Insert Gallery” to add it to your post or page.
Customizing Gallery Layouts
After adding the gallery block, adjust the layout settings. Choose the number of columns to display images side by side. Select whether to crop images or keep original sizes. Use the “Link To” option to decide if images open in a new page or lightbox. Preview the gallery to see how it looks on different devices.
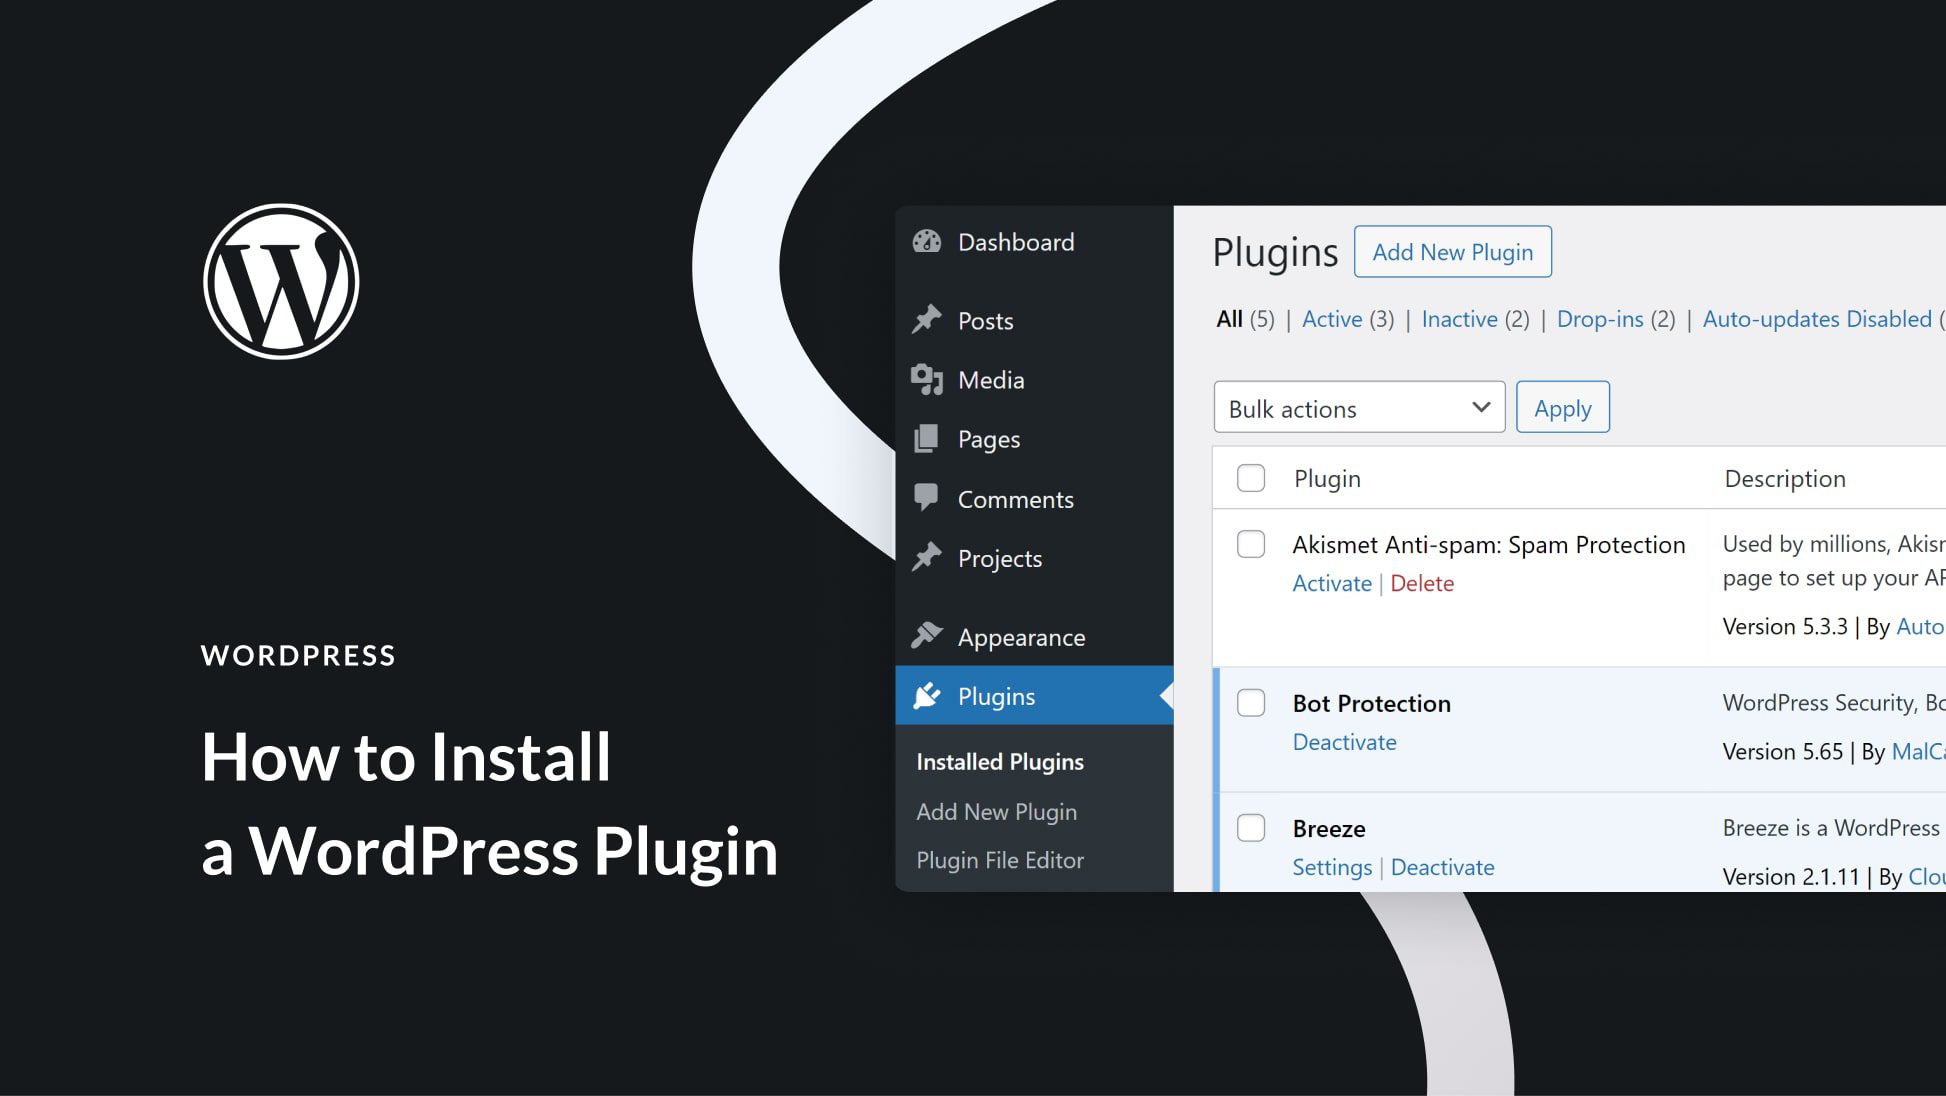
Using Plugins For Advanced Galleries
Plugins add extra features beyond the basic gallery block. Install popular plugins like Envira Gallery or NextGEN Gallery. These tools offer sliders, albums, and lightbox effects. Customize thumbnails, captions, and hover animations. Some plugins also improve loading speed and SEO for images.
Managing Image Seo
Managing image SEO is important for improving your website’s visibility on search engines. Properly optimized images help your site load faster and rank higher. They also make your content more accessible to users with disabilities. Follow these simple steps to boost your image SEO on WordPress.
Writing Effective Alt Text
Alt text describes the image for search engines and users. Write short, clear descriptions that match the image content. Avoid keyword stuffing. Focus on what the image shows or its purpose on the page. This helps search engines understand the image and improves accessibility.
Naming Images For Seo
Use descriptive file names for your images before uploading them. Replace spaces with hyphens. For example, use “blue-widgets.jpg” instead of “IMG1234.jpg”. A clear name helps search engines index your images correctly. It also improves your chances of appearing in image search results.
Using Image Sitemaps
Image sitemaps help search engines find and index your images faster. You can create an image sitemap manually or use plugins in WordPress. Submit your sitemap to Google Search Console. This improves your image visibility and drives more traffic to your site.
Troubleshooting Image Issues
Images make your WordPress site look great. Sometimes, issues occur with uploading or displaying pictures. These problems can frustrate users and slow down your site. Knowing how to fix common image troubles helps keep your site smooth and professional. This section explains easy ways to solve image problems.
Fixing Upload Errors
Upload errors often happen due to file size or type. Check if your image is too large. WordPress limits the file size you can upload. Resize or compress the image to reduce its size. Also, confirm the file format is supported. Use JPG, PNG, or GIF formats for best results.
Sometimes, server settings cause upload failures. Clear your browser cache and try again. Deactivate plugins that may block uploads. Updating WordPress and plugins can fix compatibility issues. If errors persist, contact your hosting provider.
Resolving Display Problems
Images might upload but not show correctly on your site. Broken images can appear due to wrong file paths. Verify that the image URL is correct in your post or page. Use the WordPress media library to insert images properly.
Theme conflicts can hide images. Switch to a default theme to test. If images show, update or change your theme. Also, clear your site cache to refresh image display. Check browser compatibility by viewing your site on different browsers.
Improving Site Speed With Images
Large images slow down your website. Slow sites drive visitors away. Optimize images before uploading. Use tools to compress images without losing quality. Choose the right image size for each page.
Enable lazy loading to delay loading images off-screen. This saves bandwidth and speeds up page load time. Use a caching plugin to improve overall site speed. Fast-loading images make your site user-friendly and SEO-friendly.
Credit: www.elegantthemes.com
Frequently Asked Questions
How Do I Upload Photos To WordPress Posts?
To upload photos, click “Add Media” above the editor. Select images from your device or media library, then insert them into your post easily.
Can I Optimize Photos For Faster WordPress Loading?
Yes, optimize photos by resizing and compressing before upload. Use plugins like Smush to improve site speed and performance.
What Image Formats Are Supported On WordPress?
WordPress supports JPEG, PNG, GIF, and WebP formats. Use JPEG for photos, PNG for transparency, and WebP for faster loading.
How To Add Captions And Alt Text To Photos?
After uploading, click the image to edit. Add captions and descriptive alt text to improve SEO and accessibility.
Conclusion
Adding photos to WordPress is simple and quick. Just follow the steps carefully. Use clear, good-quality images to attract visitors. Make sure to add descriptions and alt text for better SEO. Organize your photos well in galleries or posts. This helps your site look neat and professional.
Keep practicing to feel more comfortable with the process. Your WordPress site will look great with the right photos. Enjoy sharing your images easily and confidently.


