
Want to make your WordPress website easier to navigate? Adding pages to your WordPress menu is the key.
When your visitors find what they’re looking for quickly, they stay longer and come back more often. In this guide, you’ll learn simple, step-by-step ways to add pages to your menu—no tech skills needed. Ready to take control of your website’s navigation and improve user experience?
Let’s dive in and get your menu working perfectly for you.
Accessing The Menu Settings
Accessing the menu settings in WordPress is the first step to customizing your website navigation. This area lets you control which pages appear in your menu. It also allows you to organize menus easily.
Finding the menu settings is simple. You do not need special skills. Just follow a few clear steps to reach the menu editor.
Logging Into Your WordPress Dashboard
Start by logging into your WordPress dashboard. Use your username and password. The dashboard is the control center of your site.
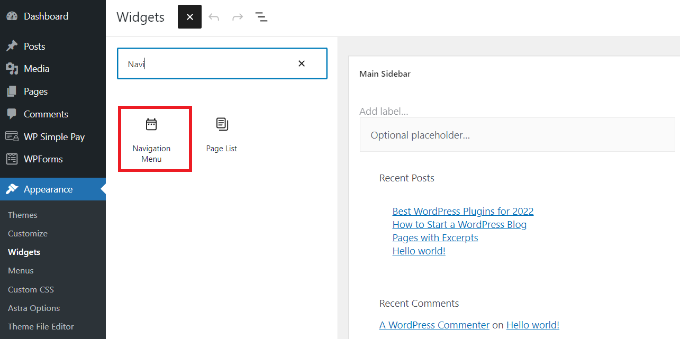
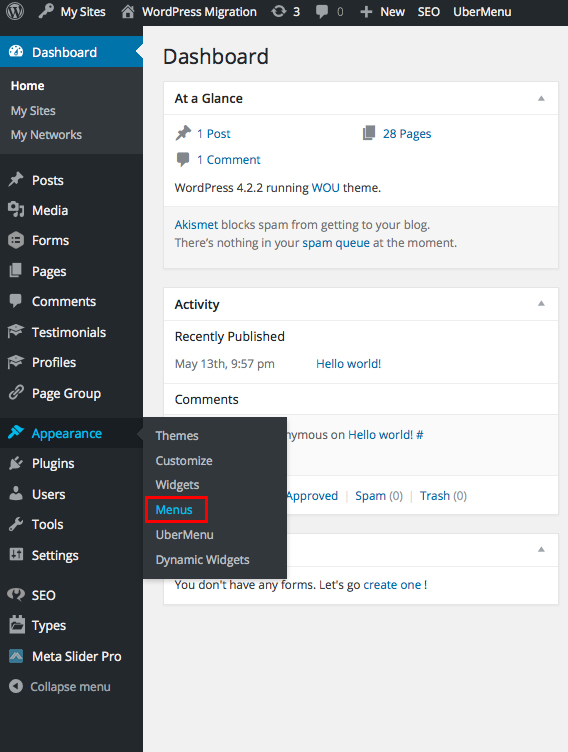
Locating The Appearance Section
On the left side, find the “Appearance” tab. Click it to open a list of options. This section controls the look of your site.
Opening The Menus Page
Under “Appearance,” select “Menus.” This opens the menu settings page. Here you can create and edit menus.

Credit: wou.edu
Creating A New Menu
Creating a new menu in WordPress lets you organize your website’s pages clearly. It helps visitors find important sections easily. The process is simple and fast. Anyone can do it without special skills.
Follow the steps carefully to set up a menu that fits your site’s needs. A well-made menu improves the user experience and keeps your site tidy.
Access The Menus Section
Start by logging into your WordPress dashboard. Look for the “Appearance” option on the left side. Click on “Menus” under it. This area controls all menu-related settings.
Create A New Menu
At the top of the Menus page, find the button labeled “create a new menu.” Click this button to begin. Give your menu a clear name. Names like “Main Menu” or “Footer Menu” work well.
Save Your Menu
After naming your menu, click the “Create Menu” button. This saves your new menu in WordPress. Now you can start adding pages and links to it.
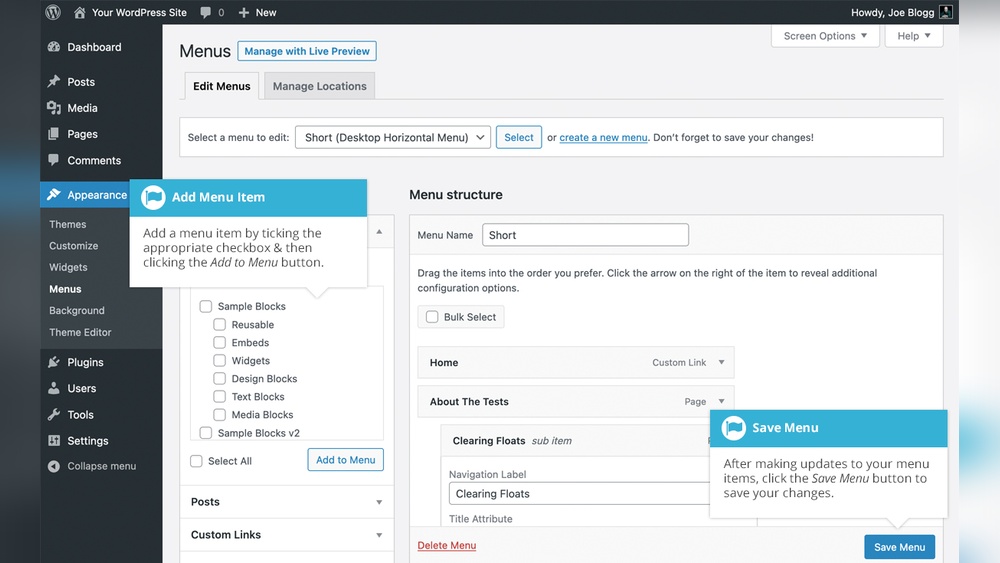
Adding Pages To Your Menu
Adding pages to your WordPress menu helps visitors find important content quickly. Menus organize your site and improve navigation. You can include pages, links, and categories in menus. This section explains how to add these elements easily.
Selecting Pages
Go to the WordPress dashboard and open the Appearance menu. Click on Menus to start editing. On the left, find the Pages box. Check the pages you want to add. Click the Add to Menu button. Drag the pages to arrange their order. Save the menu to apply changes.
Using Custom Links
Custom links let you add any URL to your menu. This option is useful for external sites or special pages. Enter the link URL in the Custom Links box. Type the link text for the menu item. Click Add to Menu. Move the item where you want it. Save your menu to finish.
Adding Categories
Categories group related posts on your site. Adding them to menus helps visitors explore topics. In the Menus screen, find the Categories box. Select the categories you want included. Click Add to Menu. Arrange and save the menu. Now visitors see category links in your menu.
Credit: www.wpbeginner.com
Organizing Menu Items
Organizing menu items in WordPress helps visitors navigate your site easily. A well-structured menu improves user experience and keeps your site tidy. You can arrange pages in the menu to highlight important content. Group related pages together for better clarity.
Reordering Items
Reordering menu items is simple. Drag and drop pages to change their order. Place the most important pages at the top. This helps visitors find key pages fast. You can move items up or down by dragging them. The menu updates immediately after you reorder items.
Creating Submenus
Submenus create a hierarchy in your menu. Drag a menu item slightly to the right under another item. This action makes it a submenu or child item. Submenus group related pages under one main heading. They keep your menu clean and organized. Visitors can explore topics without clutter.
Saving And Assigning Menus
After creating or editing your WordPress menu, saving and assigning it is essential. This step ensures your changes appear correctly on your website. Properly saving the menu prevents loss of your work. Assigning the menu tells WordPress where to show it.
Saving Changes
Once you finish adding pages or links, look for the “Save Menu” button. It is usually at the top or bottom of the menu editor. Click this button to store your changes. Without saving, your edits will be lost if you leave the page. Saving keeps your menu updated and ready for visitors.
Assigning Menu Locations
Menus need a location to appear on your site. WordPress themes offer different menu spots like header, footer, or sidebar. In the menu editor, find the “Menu Settings” area. Choose the location where you want your menu to show by checking the box. After selecting, save your menu again. This step makes the menu visible to your site visitors in the chosen place.
Credit: wou.edu
Troubleshooting Common Issues
Adding pages to a WordPress menu usually works smoothly. Sometimes, issues appear that stop the menu from showing correctly. These problems can cause confusion and affect your site’s navigation. Understanding common issues helps fix them fast. Here are solutions to two frequent problems.
Menu Not Displaying
Menus may not appear due to theme settings. Check if the menu location is set in the Appearance > Menus area. Some themes need you to assign a menu to a spot like “Primary Menu.”
Clear your site cache. Cached files may prevent new menu changes from showing. Use your caching plugin or hosting tool to clear cache.
Deactivate plugins one by one. A plugin conflict might block menus. After deactivating, refresh your page to check if the menu appears.
Items Not Showing Correctly
Menu items might not show because of incorrect settings. Check that pages are added to the menu under Appearance > Menus. Make sure you save the menu after adding items.
Look for custom links or categories that may not be supported by your theme. Replace or remove unsupported items.
Update WordPress, themes, and plugins. Outdated software can cause display problems with menus.
Frequently Asked Questions
How Do I Add A New Page To My WordPress Menu?
Go to Appearance > Menus in your WordPress dashboard. Select your menu, check the page you want, and click “Add to Menu. ” Finally, click “Save Menu” to update your navigation.
Can I Add Custom Links To WordPress Menus?
Yes, you can add custom URLs via the “Custom Links” tab in the Menus section. Enter the URL and link text, then add it to your menu and save.
How Do I Reorder Pages In A WordPress Menu?
In the Menus editor, drag and drop menu items to rearrange them. Position pages as desired, then click “Save Menu” to apply the new order.
What If My New Page Doesn’t Show In The Menu?
Ensure the page is added to the menu and saved. Clear your site cache or refresh the page to see updates.
Conclusion
Adding pages to your WordPress menu is quick and simple. You just select the pages and click “Add to Menu. ” Then, arrange them by dragging to the order you want. Remember to save your menu to make changes live.
This helps visitors find information easily on your site. Keep your menu organized and clear for a better user experience. Practice these steps, and managing your WordPress menu will become second nature.


