
Are you looking to make your WordPress website easier to navigate? Adding a menu item is one of the simplest ways to improve your site’s user experience and help visitors find what they need quickly.
Whether you want to add a new page, link, or category to your menu, this guide will walk you through every step. By the end, you’ll have the skills to customize your menu like a pro, keeping your visitors engaged and coming back for more.
Ready to take control of your website’s navigation? Let’s dive in!
Credit: stackoverflow.com
Accessing The WordPress Dashboard
Accessing the WordPress Dashboard is the first step to managing your website. This dashboard is the control center. It lets you change settings, create content, and add menu items easily.
Knowing how to reach the dashboard saves time. It also helps you feel confident using WordPress. Follow these simple steps to get there quickly.
Open Your Web Browser
Start by opening any web browser like Chrome, Firefox, or Safari. Use the one you prefer. This lets you access your WordPress site online.
Enter Your Website Url
Type your website address in the browser’s address bar. Add “/wp-admin” at the end of your URL. This directs you to the login page of WordPress.
Log In With Your Username And Password
On the login page, enter your username or email. Then, type your password. Click the “Log In” button to proceed to the dashboard.
Explore The Dashboard Interface
Once logged in, you see the WordPress Dashboard. The left menu shows tools and settings. The main area displays summaries and recent activity.
Navigating To The Menus Section
Navigating to the Menus section in WordPress is a simple first step in customizing your site’s navigation. This area allows you to control what visitors see in your menu bar. Accessing it is quick and requires just a few clicks.
Finding the Menus section sets the stage for adding or editing menu items. You manage links, pages, categories, and custom URLs here. Understanding this part of WordPress helps you build a clear and easy-to-use menu.
Start by logging into your WordPress admin panel. Use your username and password to enter the dashboard. This is the control center for your website.
Locating The Appearance Menu
Look at the left sidebar in the dashboard. Find the “Appearance” option. It groups all design and layout settings for your site.
Selecting The Menus Option
Click on “Appearance” to open its submenu. Choose “Menus” from the list. This opens the page where you can manage your site’s navigation menus.
Creating A New Menu
Start by opening the WordPress dashboard and navigating to the Menus section. Select your menu, then click “Add Items” to include new pages or links. Finally, save the menu to show the new items on your site.
Accessing The Menu Settings
Start by logging into your WordPress dashboard. On the left side, find the “Appearance” option. Hover over it and click on “Menus.” This page lets you create and manage site menus. It is the first step to adding a new menu.
Creating Your New Menu
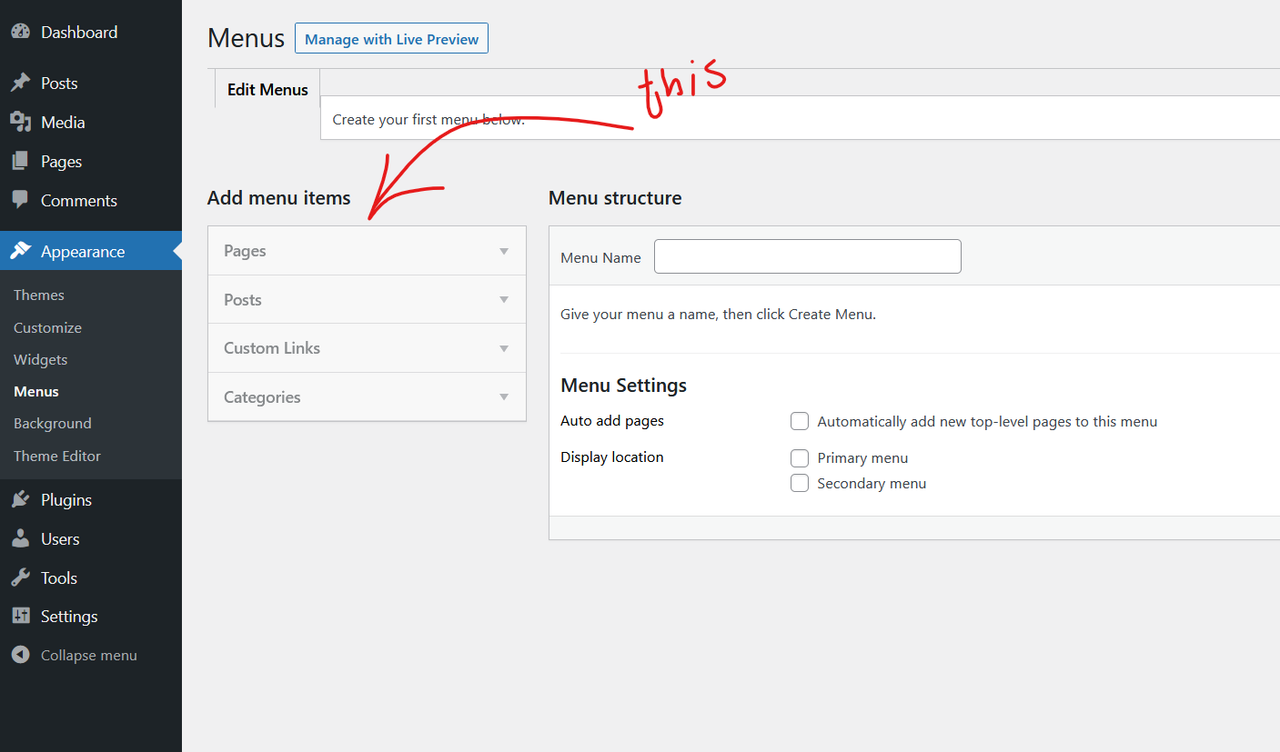
Click the “Create a new menu” link at the top of the page. Give your menu a simple, clear name. The name helps you recognize it later. After typing the name, press the “Create Menu” button. Your new menu is ready for items.
Selecting Menu Items
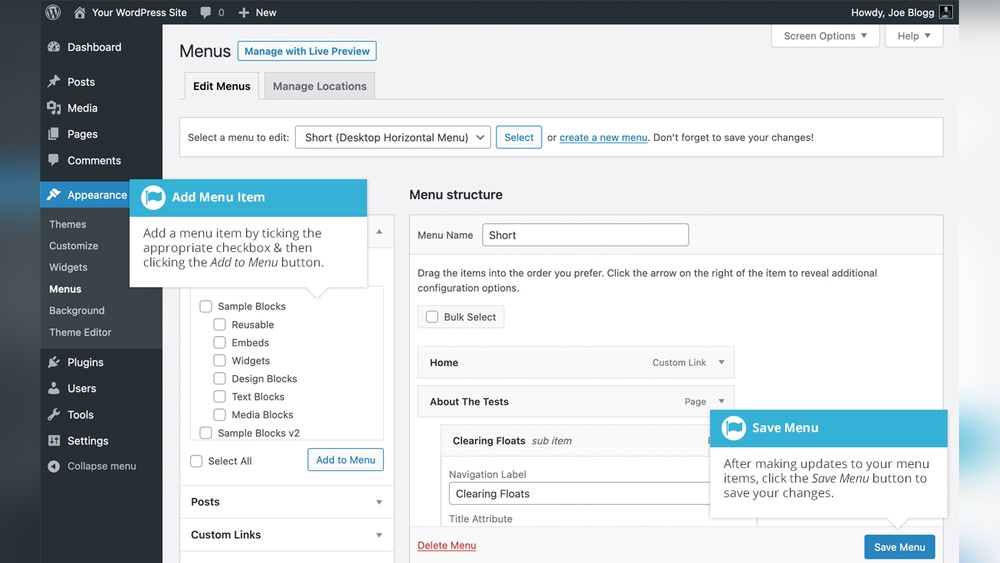
Look at the left side of the menu page. You will see boxes for pages, posts, and categories. Choose the items you want to add by ticking their checkboxes. Click “Add to Menu” to move them to your menu. You can add many items this way.
Drag and drop the menu items to arrange their order. Place important links at the top. You can also create sub-menus by dragging items slightly to the right. This helps make your menu clear and easy to use.
Saving And Assigning The Menu
After arranging the menu, click the “Save Menu” button. Then, choose where the menu will appear on your site. Most themes have locations like “Primary” or “Footer.” Select one and save your settings again. Your menu is now live on your website.

Credit: docs.themeisle.com
Adding Pages To Your Menu
Adding pages to your WordPress menu makes your website easy to navigate. Visitors find information faster. Menus organize your content clearly and simply. This section explains how to add pages step-by-step.
Menus usually appear at the top of your site. They show links to different pages. Adding pages to menus helps users explore your site.
Access The Menus Settings
Go to your WordPress dashboard first. Find the “Appearance” option on the left side. Click on it, then choose “Menus.” This opens the menu editor where you manage items.
Select The Menu To Edit
Pick the menu you want to change from the dropdown. Many sites have more than one menu. Choose the main menu or the one you want to add pages to. Click “Select” to open it.
Choose Pages To Add
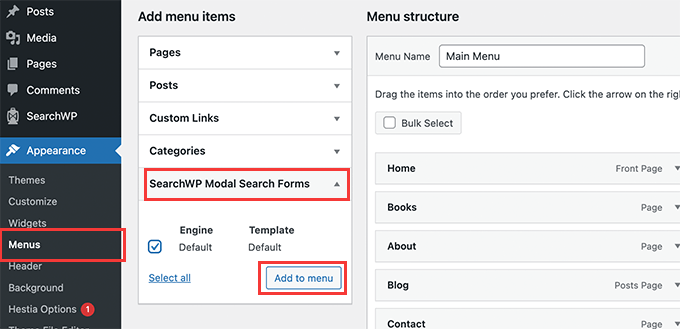
Look at the left side for the “Pages” box. It shows all your published pages. Check the box next to each page you want in your menu. You can add more than one page at once.
Add Pages To The Menu
After selecting pages, click the “Add to Menu” button. The pages appear in the menu structure on the right. You can now organize them in the order you like.
Save Your Menu
Once you finish adding pages, press the “Save Menu” button. Your changes go live immediately. Visitors see the new pages in the menu right away.
Including Custom Links
Including custom links in your WordPress menu lets you create unique navigation paths. These links can point to any URL, internal or external. This feature helps you guide visitors to important pages beyond your standard posts and pages.
Custom links offer flexibility. Use them to add social media profiles, partner sites, or special promotions. They also allow linking to files or external resources easily.
Creating A Custom Link In WordPress Menu
Go to your WordPress dashboard and open the Appearance menu. Click on Menus to access your menu settings. On the left side, find the Custom Links section. Enter the web address you want to link to in the URL field. Add the label for your link in the Link Text box. Press the Add to Menu button to include it in your menu structure.
Editing Custom Link Labels
After adding a custom link, you can change its label anytime. Open the menu structure and find your custom link. Click the down arrow next to the link to expand options. Edit the Navigation Label field with your new text. Save the menu to apply changes immediately.
Removing Or Rearranging Custom Links
To remove a custom link, expand it and click Remove. Rearranging links is simple. Drag and drop the custom link to a new position. This changes the order visitors see on your site. Always save your menu to keep the updates.
Organizing Menu Items
Organizing menu items in WordPress helps visitors find pages easily. A clear menu improves user experience and site navigation. You can reorder items and create submenus to keep your menu tidy and simple.
Reordering Items
To reorder menu items, drag and drop them in the menu editor. Click and hold the item, then move it up or down. This changes the order visitors see on your site. Reordering helps highlight important pages first.
Creating Submenus
Submenus group related pages under one main item. Drag a menu item slightly to the right under another item. It becomes a child or submenu item. Submenus make your menu neat and easy to explore.
Assigning Menu Locations
Assigning menu locations is a key step in creating a WordPress menu. This step tells WordPress where to display your menu on your website. Each WordPress theme has specific menu locations. These locations could be in the header, footer, or sidebar.
Placing your menu in the right location helps visitors find important links easily. It also improves the website’s navigation and user experience. Let’s explore how to assign menu locations correctly.
Finding Menu Locations In WordPress
Go to the WordPress dashboard. Click on Appearance, then Menus. Look for the “Menu Settings” or “Manage Locations” tab. Here, you will see available menu spots defined by your theme. Each location has a name like “Primary Menu” or “Footer Menu.”
Choosing The Right Menu Location
Think about where your visitors expect to find your menu. The primary menu usually appears at the top. Footer menus are good for less important links. Choose a location that fits your website’s structure and design. Select the checkbox for your desired menu location.
Saving Your Menu Location
After selecting the menu location, click the “Save Menu” button. This action applies your menu to the chosen spot on your website. Refresh your site to see the changes. Your menu should now appear where you assigned it.
Saving And Previewing Your Menu
Saving and previewing your menu in WordPress is a key step after adding new items. It ensures your changes are stored and look good on your site. Without saving, your work might be lost. Previewing shows how the menu appears to visitors. This helps catch errors before going live.
WordPress makes saving and previewing simple. You can do both tasks right inside the menu editor. This saves time and avoids guesswork. Let’s explore how to save and preview your menu properly.
Saving Your Menu In WordPress
After adding or changing menu items, locate the “Save Menu” button. It is usually on the right side of the screen. Click this button to store your changes. WordPress updates the menu immediately after saving.
Always save before leaving the page. This prevents losing your work. WordPress may not warn you if you leave without saving. Make saving a habit during menu editing.
Previewing Your Menu On The Site
To see your menu live, use the “Manage Locations” tab. Here, assign your saved menu to a specific spot on your site, like the header or footer. Then visit your website’s front end.
Refresh the page to view the menu with your new items. Check the layout and links. Previewing helps find mistakes in menu order or links. Adjustments can be made in the editor and saved again.
Troubleshooting Common Issues
Adding a menu item in WordPress usually works smoothly. Sometimes, small problems can stop your menu from showing correctly. This section helps fix common problems fast. Simple steps bring back your menu’s full function.
Incorrect Menu Location
Menus must be set to the right location. Go to Appearance > Menus. Check the box for the correct display area. Save changes after selecting the spot. This step ensures your menu appears where you want.
Cache Issues
Old cache can block new menu items. Clear your browser cache first. If you use a caching plugin, clear that cache too. This action refreshes your site and shows updates immediately.
Plugin Conflicts
Some plugins may interfere with menus. Deactivate plugins one by one. Check if the menu problem disappears. Once found, consider replacing the conflicting plugin. This method isolates the issue quickly.
Theme Limitations
Some themes limit menu features. Try switching to a default theme like Twenty Twenty-Three. Add a menu item again. If it works, your theme might restrict menus. Contact your theme’s support for help.
Incorrect Menu Item Url
Menu items need valid URLs. Check each link carefully. Use full URLs for external links. For internal pages, select from the Pages list. Correct URLs keep your menu functional and user-friendly.
Credit: www.wpbeginner.com
Frequently Asked Questions
How Do I Add A New Menu Item In WordPress?
To add a new menu item, go to Appearance > Menus in your dashboard. Select or create a menu, then choose pages, posts, or custom links. Click “Add to Menu” and arrange items by dragging. Finally, save the menu to apply changes.
Can I Add Custom Links As Menu Items?
Yes, you can add custom links. In the Menus section, select “Custom Links. ” Enter the URL and link text, then click “Add to Menu. ” This allows you to link to external websites or specific pages within your site.
How To Organize Menu Items In WordPress Menus?
You can organize menu items by dragging them up or down. Indent items to create submenus or dropdowns. This helps structure your navigation for better user experience. Remember to save changes after rearranging the menu.
Is It Possible To Add Categories As Menu Items?
Yes, categories can be added as menu items. In the Menus section, click on the Categories tab, select desired categories, and click “Add to Menu. ” This helps visitors browse posts by specific topics easily.
Conclusion
Adding a menu item in WordPress is simple and quick. You can organize your site and help visitors find pages easily. Just follow the steps carefully, and your menu will look great. Keep your menus clear and updated for the best user experience.
Practice a few times to get comfortable with the process. Soon, managing your WordPress site will feel natural. This small task improves your website’s navigation and helps visitors stay longer. Try it today and see the difference it makes!


