
If you want to track your website’s performance and understand your visitors better, adding a Google Tag to your WordPress site is a must. But maybe you’re wondering how to do it without messing up your site or spending hours on complicated tutorials.
Don’t worry—this guide will walk you through each step in a simple way, so you can start collecting valuable data fast. By the end, you’ll have the power to make smarter decisions that grow your site and boost your success.
Ready to get started? Let’s dive in.
Why Add Google Tag To WordPress
Adding a Google Tag to your WordPress site helps track visitor behavior. It collects data about how users interact with your pages. This information supports better decisions for website growth. Google Tag connects various Google tools in one place for easy management.
Using Google Tag simplifies tracking without editing code repeatedly. It saves time and reduces errors. This makes it easier to improve your site’s performance and marketing efforts.
Benefits Of Google Tag
Google Tag lets you manage all tags in one platform. It supports Google Analytics, Google Ads, and other services. This central control improves accuracy and saves time.
You can add new tags without changing site code. It helps test and update tags quickly. The tag also improves page loading speed by loading scripts efficiently.
Impact On Site Analytics
Google Tag provides detailed visitor data for analysis. You see which pages get more traffic and user actions. This insight helps optimize content and design.
Tracking conversions and campaigns becomes easier. You understand which marketing efforts work best. This leads to better budget use and higher returns.
Credit: www.hostinger.com
Preparing Your WordPress Site
Preparing your WordPress site is the first step before adding the Google Tag. This step helps avoid problems during the setup. It also ensures your site stays safe and works well. Taking time here makes the process smooth and stress-free.
Backup Your Site
Start by backing up your WordPress site. A backup saves all your files and data. This way, you can restore your site if something goes wrong. Use a reliable plugin or your hosting provider’s backup tool. Save the backup to your computer or cloud storage. Backups protect your work and give peace of mind.
Check Theme Compatibility
Next, check if your WordPress theme supports Google Tag integration. Some themes may block scripts or cause conflicts. Visit your theme’s documentation or support page. Look for notes on adding code snippets or tags. Testing on a staging site is a safe way to check. This step prevents errors and keeps your site stable.
Creating A Google Tag
Creating a Google Tag is the first step to track your website traffic and user behavior. This tag helps you collect data for analysis and marketing. The process involves setting up an account and generating a tag code to place on your WordPress site.
Set Up Google Tag Manager Account
Start by visiting the Google Tag Manager website. Click on “Create Account” and enter your account name. Choose your country and add a container name, usually your website name. Select “Web” as the target platform. Agree to the terms and conditions, then click “Create.” Your account is now ready to manage tags.
Generate Tag Code
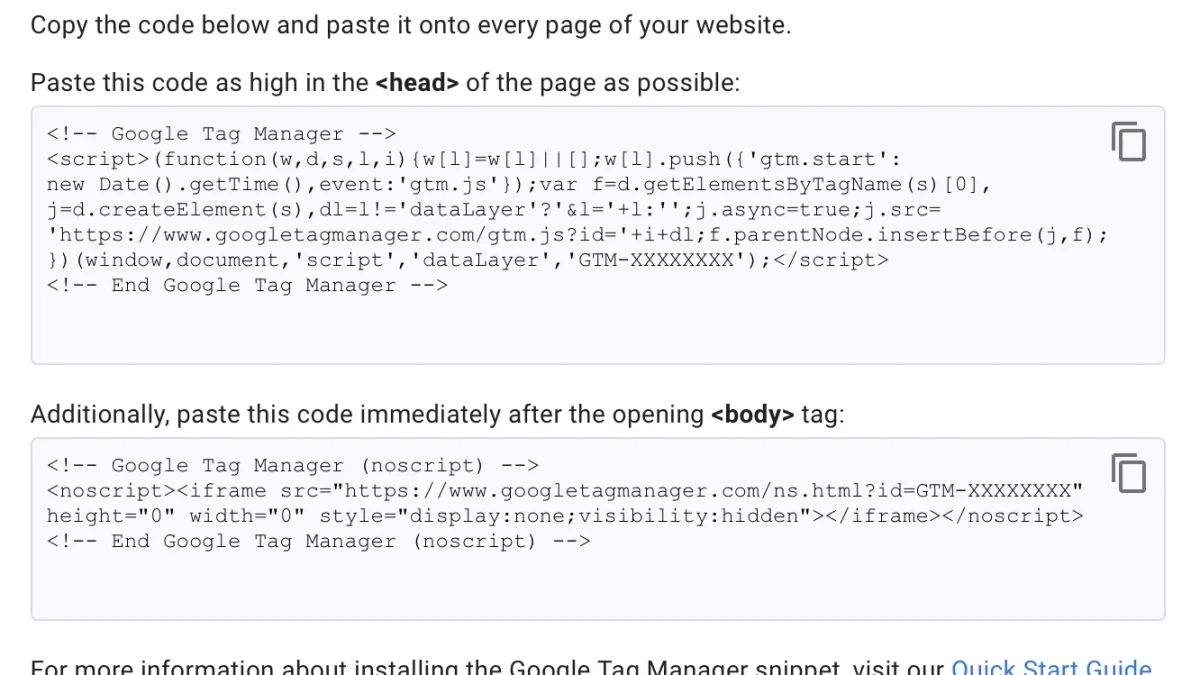
After creating the account, Google Tag Manager shows you two code snippets. These snippets are your tag codes. Copy both codes carefully. The first code goes into the section of your WordPress site. The second code goes just after the opening tag. These codes help Google collect data from your website visitors.
Adding Tag Via Plugin
Adding the Google Tag to your WordPress site using a plugin is a simple and effective method. It helps you manage your tags without touching the code. This method suits beginners and those who prefer an easy setup. Plugins handle the technical part, so you can focus on your site.
Choose The Right Plugin
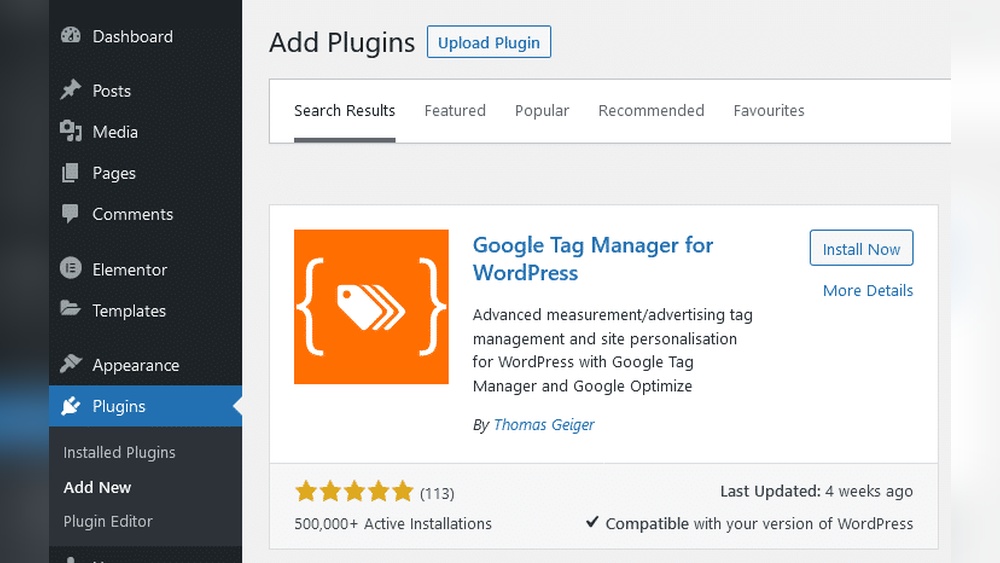
Pick a plugin that supports Google Tag Manager or Google Analytics. Check the plugin’s ratings and reviews. A popular and updated plugin ensures better security and performance. Examples include “Insert Headers and Footers” and “Google Tag Manager for WordPress.”
Install And Activate Plugin
Go to your WordPress dashboard. Find the “Plugins” menu and click “Add New.” Search for your chosen plugin by name. Click “Install Now,” then “Activate” once the installation finishes. The plugin is now ready to use.
Insert Tag Code
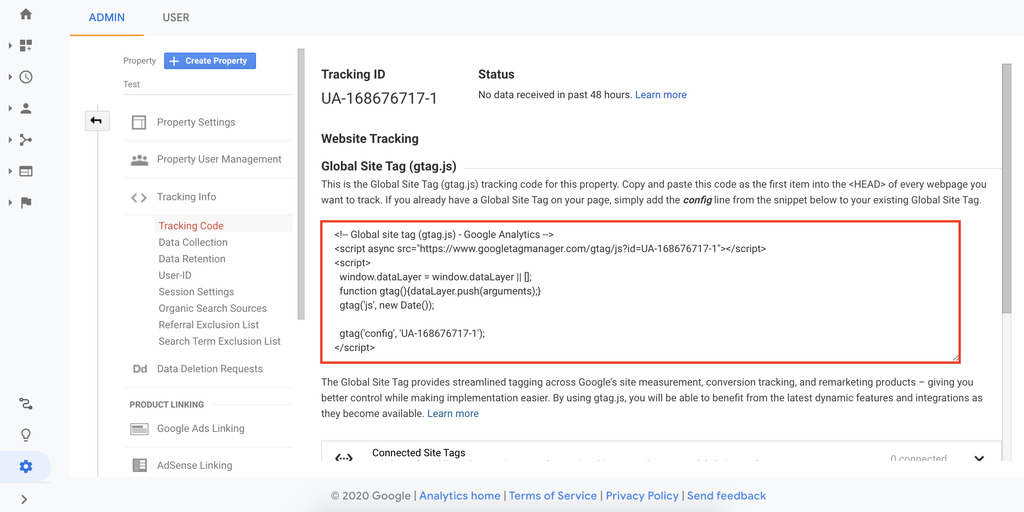
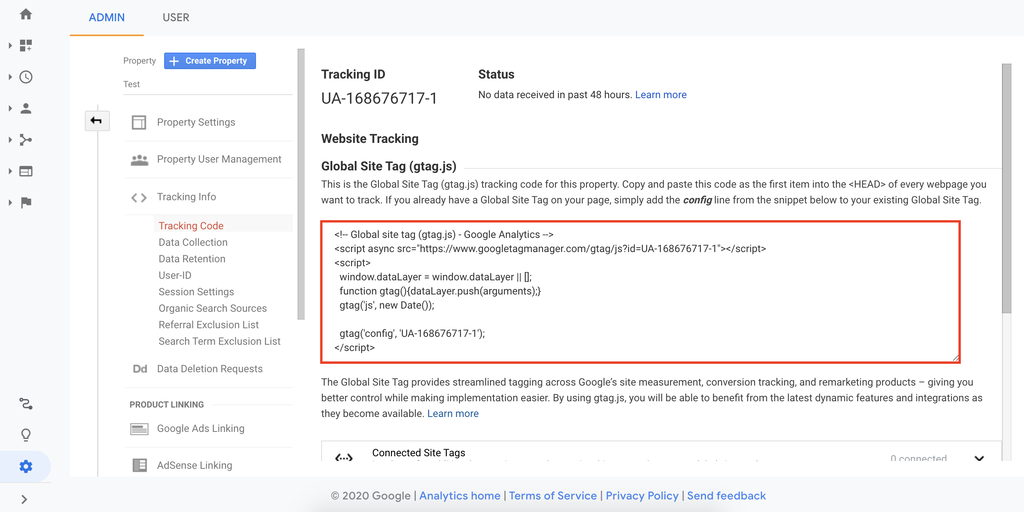
Open the plugin settings from your dashboard. Look for the area to add header or tracking codes. Paste your Google Tag code exactly as provided by Google. Save your changes. The tag will start tracking your site traffic immediately.
Manual Tag Integration
Manual tag integration lets you place the Google Tag directly into your WordPress site’s code. This method gives you full control over where the tag goes. It works well if you want to avoid plugins or need precise placement.
Follow these simple steps to add the Google Tag manually. Be careful and back up your site before editing files. Small mistakes can break your site.
Access Theme Files
Log in to your WordPress dashboard. Go to Appearance > Theme Editor. Find the header.php file in the list on the right. This file controls the top part of your site, where the tag goes.
Add Tag To Header
Open the header.php file. Paste your Google Tag code right before the closing tag. This ensures the tag loads on every page. Double-check the code to avoid errors.
Save And Test Changes
Click the Update File button to save your changes. Clear your site cache if you use caching plugins. Visit your site and check if the tag works using Google Tag Assistant or your browser’s developer tools.
Verifying Tag Installation
Verifying the Google Tag installation on your WordPress site is essential. This step confirms the tag is working correctly. Proper verification helps you collect accurate data. It ensures you can track visitor actions without issues.
There are simple ways to check if your tag works. These methods are easy to follow and do not require advanced skills. Let’s explore two effective ways to verify your Google Tag installation.
Use Google Tag Assistant
Google Tag Assistant is a free Chrome extension. It helps you check if your tag is installed properly. After adding the tag to your WordPress site, open your site in Chrome. Click on the Tag Assistant icon in your browser.
The tool will show all detected tags on your page. It highlights any errors or warnings. Green means your tag is working well. If you see red or yellow, fix the issues before continuing.
Check Real-time Analytics
Google Analytics offers a real-time report feature. This report shows live visitor activity on your site. Open Google Analytics and go to the Real-Time section. Visit your WordPress site in another tab or device.
If your tag is working, you will see your visit in real-time. This confirms the tag sends data correctly. No visitors showing means the tag might not be installed properly. Repeat the installation or troubleshooting steps if needed.
Troubleshooting Common Issues
Troubleshooting is key to a smooth Google Tag setup on WordPress. Sometimes tags do not work as expected. Small problems can stop your tag from firing or cause conflicts. Identifying these issues quickly saves time and effort. This section covers common problems and how to fix them.
Tag Not Firing
When the tag does not fire, check the installation first. Verify the tag code is placed in the correct section of your site, usually the header. Use the Google Tag Assistant or Tag Manager preview mode to test if the tag fires. Clear your browser cache to avoid loading old files. Disable any ad blockers that might block the tag. Ensure your site is not set to private or under maintenance mode.
Conflicts With Other Plugins
Plugins can interfere with Google Tag scripts. Look for plugins that affect scripts or headers, such as caching or security plugins. Temporarily disable other plugins one by one to find conflicts. Update all plugins and WordPress to their latest versions. Use a plugin designed for Google Tag integration to reduce errors. Check plugin support forums for known issues with tags.
Credit: www.hostinger.com
Best Practices For Google Tag
Using Google Tag on your WordPress site helps track visitor actions and improve your marketing. Following best practices keeps your tags effective and your site running smoothly. Proper tag management avoids errors and data loss.
Regularly Update Tags
Keep your Google Tags up to date to match current tracking needs. Outdated tags may cause wrong data or stop working. Check tag versions often and update them if needed. This helps you collect accurate information about your visitors.
Also, remove tags that you no longer use. Extra tags can slow down your site and confuse reports. Clean tags mean faster loading and better data quality.
Monitor Tag Performance
Track how well your Google Tags work on your WordPress site. Use tools like Google Tag Assistant to find problems. Fix broken tags quickly to keep data flow steady.
Watch tag firing rates and errors in your analytics dashboard. If tags do not fire correctly, your data will be incomplete. Regular checks ensure reliable tracking and better decisions.
Credit: wplook.com
Frequently Asked Questions
How Do I Install Google Tag On WordPress?
To install Google Tag on WordPress, copy your tag code from Google Tag Manager. Paste it into your WordPress header, using a plugin or theme editor. This allows you to track user behavior effectively on your site.
Can I Add Google Tag Without Coding Skills?
Yes, you can add Google Tag without coding. Use WordPress plugins like “Insert Headers and Footers” to paste the tag code easily. This method is beginner-friendly and ensures your tag is correctly implemented.
Why Is Google Tag Important For WordPress Sites?
Google Tag helps track website traffic and user actions. It improves marketing insights and conversion tracking. Adding it to WordPress enhances data collection for better decision-making and campaign optimization.
How Do I Verify Google Tag Is Working?
Use Google Tag Assistant or Google Analytics real-time reports. These tools confirm if your tag is firing correctly. Proper verification ensures accurate data collection from your WordPress site.
Conclusion
Adding Google Tag to your WordPress site is simple and helpful. It lets you track visitors and see how they use your site. Use the steps above to place the tag correctly. Check that the tag works after installation. Good tracking helps improve your website over time.
Keep your site updated and track data regularly. This small task can make a big difference in your online success.


