
Are you looking to track your website’s performance without touching complicated code? Adding Google Tag Manager to your WordPress site can make this simple.
With just a few easy steps, you’ll gain full control over your marketing tags, helping you understand your visitors better and boost your business. Keep reading, and you’ll learn exactly how to set it up quickly—no tech skills needed. Your website’s data game is about to get a serious upgrade!
Google Tag Manager Basics
Google Tag Manager is a tool that helps manage website tags easily. Tags are small pieces of code that collect data about visitors. This data helps understand user behavior and improve the website. For WordPress sites, Google Tag Manager makes adding and updating tags simple. It removes the need to change code every time.
What Is Google Tag Manager
Google Tag Manager is a free tool by Google. It lets you add and manage tags without touching site code. Tags can track clicks, form submissions, and more. You control all tags from one place. It works with many marketing and analytics tools.
Benefits For WordPress Sites
Google Tag Manager saves time by managing tags in one dashboard. No need to edit WordPress theme files often. It reduces errors caused by manual coding. You can add new tags quickly to track events. It helps improve site speed by loading tags asynchronously. Easy to test and debug tags before publishing. Works with popular plugins and themes without conflict.

Credit: www.youtube.com
Preparing Your WordPress Site
Preparing your WordPress site is an important first step before adding Google Tag Manager. It helps ensure the process goes smoothly without risks. Taking simple precautions can save your site from potential issues. This preparation is easy and only takes a few minutes.
Backup Your Website
Backing up your website protects your data and settings. It creates a copy of your entire site. This copy can restore your site if something goes wrong. Use a trusted backup plugin or your web host’s backup feature. Save the backup to a safe location outside your website. Regular backups keep your site safe during updates or changes.
Choose The Right User Role
Assign the correct user role to manage Google Tag Manager. The Administrator role has full access to your site. It allows you to add and edit code safely. Avoid using Editor or Author roles for this task. Limiting access helps protect your site from mistakes. Make sure only trusted users have Administrator rights.
Creating A Google Tag Manager Account
Creating a Google Tag Manager account is the first step to managing tags on your WordPress site. This account helps you organize and control all your tracking codes in one place. It makes website tracking easier without changing your site’s code repeatedly. Follow the steps below to create your account and set up a container for your WordPress website.
Setting Up A New Account
Go to the Google Tag Manager website and sign in using your Google account. Click on the “Create Account” button to start. Enter your account name, usually your business or website name. Select your country from the dropdown menu. Make sure to agree to the terms of service to continue. This step sets up your main account for managing tags.
Configuring Your Container
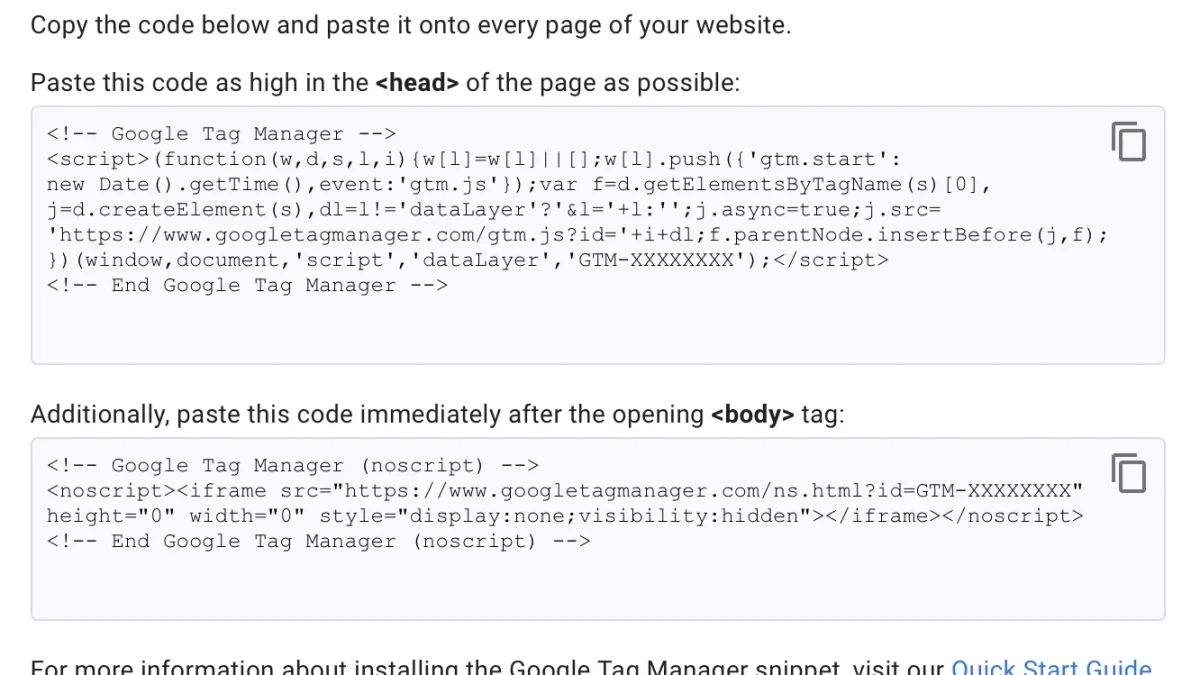
Next, create a container that will hold your tags. Name your container after your website or project. Choose “Web” as the target platform. This tells Google Tag Manager where you plan to use the tags. Click “Create” to finish. You will see the container code snippets to add to your WordPress site.
Credit: wplook.com
Installing Google Tag Manager On WordPress
Installing Google Tag Manager on your WordPress website helps track user activity easily. It allows you to add and manage marketing tags without changing code every time. You can set it up using a plugin or by adding the code manually. Both methods are simple and effective. Choose the one that fits your skills and needs.
Using A Plugin
Using a plugin is the easiest way to install Google Tag Manager. Many plugins are available that help you add the Tag Manager code quickly. Start by searching for “Google Tag Manager” in your WordPress plugins section. Install and activate the plugin that suits you best.
After activation, enter your Google Tag Manager ID in the plugin settings. This ID looks like “GTM-XXXXXX”. The plugin will insert the necessary code into your website automatically. No need to touch any files or write code. It saves time and reduces errors.
Manual Code Integration
Manual code integration gives more control over where the Tag Manager code goes. First, copy the two snippets of code from your Google Tag Manager account. One goes into the header section, and the other near the top of the body section in your site.
Access your WordPress theme files by going to Appearance > Theme Editor. Open the header.php file and paste the first code snippet just after the
tag. Next, open the footer.php or index.php file to add the second snippet after the opening tag.Save the changes and clear any caches on your site. This method requires careful editing but works well without extra plugins. Always back up your site before making changes to theme files.
Verifying Tag Manager Installation
After adding Google Tag Manager to your WordPress site, it is important to check that it works correctly. Verifying the installation helps ensure your tags fire as planned. This step avoids tracking errors and data loss.
There are simple tools to test your Tag Manager setup. These tools show if your tags activate on your website pages. Testing also helps fix any mistakes early.
Preview Mode Testing
Google Tag Manager offers a Preview Mode for quick checks. Activate Preview Mode in your Tag Manager account. Then open your website in a new browser tab.
You will see a debug panel at the bottom of the page. This panel shows which tags fire on each page. It also displays triggers and variables in real-time.
Use Preview Mode to click around your website. Confirm that the correct tags activate on the right pages. This method gives you instant feedback on your setup.
Using Tag Assistant
Tag Assistant is a free Chrome extension for tag verification. Install Tag Assistant from the Chrome Web Store. Then enable it while visiting your website.
The extension scans your site for Google tags. It reports any errors or warnings it finds. Tag Assistant highlights problems and suggests fixes.
This tool works well with Google Tag Manager, Analytics, and other tags. Use it to ensure your tags run smoothly and collect data properly.
Adding Tags And Triggers
Adding tags and triggers in Google Tag Manager helps track user actions on your WordPress site. Tags collect data like clicks or form submissions. Triggers tell tags when to fire or activate. Correct setup ensures accurate tracking and better website insights.
Common Tags To Add
Google Analytics tags are the most popular. They track page views and user behavior. Facebook Pixel tags help measure ad performance. Conversion tags track goals like purchases or sign-ups. Remarketing tags target visitors with ads later. Each tag serves a specific tracking purpose.
Setting Up Triggers
Triggers decide when tags should run. Page View triggers fire tags on page load. Click triggers activate tags when users click buttons or links. Form Submission triggers track when users send forms. Scroll Depth triggers measure how far users scroll down pages. Choose triggers that match your tracking goals.
Troubleshooting Common Issues
Adding Google Tag Manager to your WordPress site can sometimes cause issues. These issues may stop your tags from working correctly. Troubleshooting common problems helps keep your tracking accurate. It also ensures your website runs smoothly.
Tags Not Firing
Tags may not fire for several reasons. Check if your GTM container code is correctly placed in your theme. It must be in the header or body as Google recommends. Clear your website cache to remove old scripts that may block tags. Disable browser extensions that block scripts, like ad blockers. Use the GTM preview mode to test if tags trigger as expected. Verify that triggers inside GTM match the actions on your site. Incorrect trigger settings often cause tags to not fire.
Conflicts With Other Plugins
Some WordPress plugins can conflict with Google Tag Manager. These conflicts may stop tags from working. Disable other tracking or analytics plugins temporarily to check for conflicts. Plugins that modify site headers may block GTM code. Update all plugins to their latest versions to avoid compatibility issues. Use a staging site to test plugin conflicts safely. If conflicts persist, consider using a plugin designed for GTM integration only. This helps avoid code clashes and keeps your site stable.
Optimizing Tag Manager Usage
Optimizing your Google Tag Manager setup on WordPress improves site tracking and speed. Proper management of tags and triggers prevents errors and confusion. Good practices help maintain a clear and efficient system that supports your marketing goals.
Organizing Tags And Triggers
Keep your tags and triggers simple and clear. Name each tag to describe its purpose. Group similar tags to find them fast. Avoid creating duplicate tags to reduce mistakes. Use folders or naming conventions for better structure. Regularly review and remove tags that are no longer needed.
Performance Best Practices
Limit the number of tags firing on each page. Too many tags slow down your website. Use tag sequencing to control when tags load. Test your tags on different devices to ensure speed. Enable built-in tag templates for faster setup. Monitor your site speed regularly to spot issues early.

Credit: www.analyticsmania.com
Frequently Asked Questions
What Is Google Tag Manager For WordPress?
Google Tag Manager is a free tool that helps manage website tags. It simplifies adding and updating tracking codes without editing site code directly. Using it on WordPress improves marketing and analytics efficiency by centralizing tag management in one place.
How Do I Install Google Tag Manager On WordPress?
To install, create a GTM account and get your container ID. Then, add the GTM code snippet to your WordPress header or use a plugin. This integrates Google Tag Manager with your website for easy tag management.
Can I Use Google Tag Manager Without Coding Skills?
Yes, Google Tag Manager is user-friendly and requires no coding. Plugins simplify installation, and its interface helps manage tags visually. This makes it accessible for marketers and beginners to implement tracking easily.
How To Verify Google Tag Manager Works On WordPress?
Use the GTM Preview mode to test tag deployment before publishing. Additionally, check tags firing in Google Tag Assistant or browser developer tools. Confirming proper setup ensures accurate data collection and tag functionality.
Conclusion
Adding Google Tag Manager to your WordPress site is simple and useful. It helps you manage tags without changing code every time. You can track user actions and improve your website easily. Follow the steps carefully, and you will set it up in minutes.
Keep your site organized and ready for marketing tools. Start using Google Tag Manager today and see the benefits grow over time.


