

Are you looking to add a form to your WordPress site but don’t know where to start? Using Elementor, you can create beautiful, functional forms quickly—no coding needed.
Imagine capturing leads, getting feedback, or allowing easy contact—all with a few clicks. In this guide, you’ll discover simple steps to build and customize your forms so they fit your site perfectly. Ready to turn visitors into customers? Let’s dive in and make your website work harder for you.
Credit: www.greengeeks.com
Choose The Right Elementor Version
Choosing the right Elementor version is key to adding a form in WordPress easily. Elementor offers free and paid versions. Each has different features that affect form creation. Picking the right one saves time and effort.
The free Elementor version includes basic widgets and tools. It allows simple page building but has limited form options. For basic contact forms, it might be enough. For advanced forms, a premium version is better.
Free Elementor Version Features
The free version of Elementor lets you design pages with drag and drop. It includes basic widgets like text, images, and buttons. However, it does not have a built-in form widget. You need to use third-party plugins for forms.
This version suits users with simple needs. It is good for small websites or blogs. You can still create forms, but with extra plugins.
Elementor Pro Form Widget
Elementor Pro includes a powerful form widget. It allows you to build forms directly inside Elementor. You can add fields like text, email, checkboxes, and more. It supports form actions like sending emails or connecting to marketing tools.
This version works well for business sites needing custom forms. It saves time by keeping everything inside one plugin.
Choosing Based On Your Needs
Think about the kind of forms you want. Simple contact forms may work with the free version plus a plugin. Complex forms with conditional logic or payments need Elementor Pro.
Also, consider your budget. The free version costs nothing but may need extra plugins. Pro requires payment but offers all tools in one place.
Install And Activate Elementor Plugin
To create a form in WordPress using Elementor, the first step is to install and activate the Elementor plugin. Elementor is a popular page builder that makes designing websites easy and fast. It lets you add forms and other elements without coding.
Installing Elementor is simple and takes just a few minutes. Once activated, you can start building custom forms right away. Follow the steps below to get Elementor ready on your WordPress site.
Access The WordPress Dashboard
Log in to your WordPress admin area. The dashboard is where you manage plugins, themes, and settings. You need to be on this page to install new plugins.
Navigate To The Plugins Section
On the left menu, click “Plugins.” This opens the plugin management page. Here, you can add, activate, or delete plugins easily.
Search For The Elementor Plugin
Click on “Add New” at the top of the plugins page. Use the search bar to type “Elementor.” The plugin will appear in the results.
Install The Elementor Plugin
Find the Elementor plugin by Elementor.com. Click the “Install Now” button. Wait a few seconds for the installation to complete.
Activate The Elementor Plugin
Once installed, click “Activate.” This enables Elementor on your website. You can now use it to build pages and add forms.
Select A Page For Your Form
Choosing the right page for your form is an important step. It helps visitors find and use the form easily. A well-placed form can increase user interaction and improve website goals.
Think about the page purpose before adding the form. It could be a contact page, a landing page, or a product page. Each page type serves a different goal for your form.
Select An Existing Page
Open your WordPress dashboard and go to Pages. Find the page that fits your form’s purpose. Click Edit with Elementor to open the page builder.
This method keeps your site organized. It also avoids creating unnecessary pages. Choose a page already getting visitors for better results.
Create A New Page For Your Form
Sometimes, a new page is better. It gives your form a dedicated space. Go to Pages and click Add New.
Name your page clearly, like “Contact Us” or “Sign Up.” Open it with Elementor to design and add the form.
A new page keeps the form focused. Visitors won’t get distracted by other content.
Consider User Experience
Place the form where visitors expect to find it. Make it easy to access without extra clicks.
Think about mobile users too. The form should load well on small screens.
Test your page after adding the form. Check if the form is visible and simple to use.

Credit: www.youtube.com
Open Elementor Editor
Adding a form to your WordPress site is simple with Elementor. The Form widget lets you create contact forms, surveys, and more. This tool helps you collect user information easily.
Using the Form widget does not require coding skills. You can drag and drop it anywhere on your page. Let’s explore how to add the Form widget step by step.
Add The Form Widget To Your Page
Open the Elementor editor on the page where you want the form. Look for the Form widget in the left panel. Drag the widget and drop it into the section you choose.
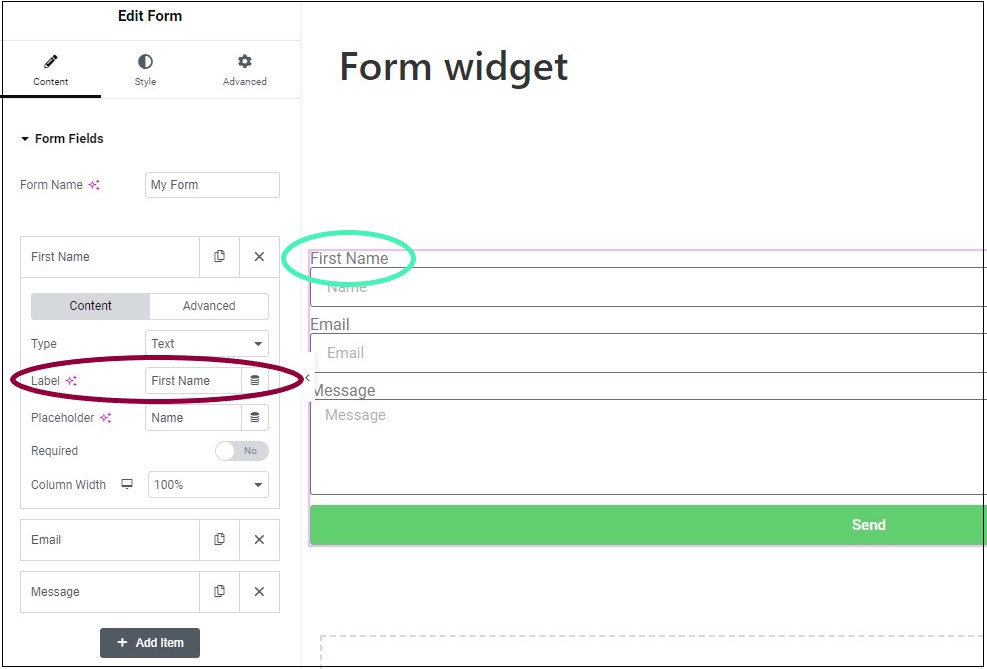
Customize The Form Fields
After placing the widget, you will see default form fields. Edit these fields by clicking on each one. You can change labels, field types, and add new fields.
Set Up Form Actions
Scroll down to the Actions After Submit section. Choose what happens after users submit the form. Options include sending an email or redirecting to another page.
Add The Form Widget
Customizing form fields helps create a form that fits your website’s needs. It lets you control what information visitors share. You can tailor each field to collect the right data. This section explains how to customize form fields using Elementor.
Add And Remove Fields
Start by adding new fields to your form. Elementor lets you drag and drop fields easily. You can also remove any field you do not need. This keeps your form simple and focused. Removing fields reduces confusion for visitors.
Set Field Types
Select the right type for each field. Elementor offers many options like text, email, and dropdown. Choose a field type that matches the data you want. Correct field types improve user experience. They also help collect accurate information.
Configure Field Labels
Labels tell visitors what to enter in each field. Use clear and short labels. Place labels above or inside the field for visibility. Good labels guide users and reduce errors. Always check that labels match the field purpose.
Customize Form Fields
Configuring form settings is a key step after adding a form in Elementor. It controls how the form behaves and what happens after users submit it. Proper settings help you get notifications, show messages, and avoid spam. Let’s explore the main settings to adjust for a smooth form experience.
Set Up Email Notifications
Email notifications alert you when someone submits the form. In Elementor, open the form widget and find the “Actions After Submit” section. Choose “Email” to enable notifications. Next, go to the “Email” tab to set the recipient address. Use your email or the team’s email to get alerts. You can customize the subject and message to include form data. This way, you receive all details without logging into WordPress.
Create Confirmation Messages
Confirmation messages show after form submission. They tell users their form was sent successfully. In Elementor, find the “Actions After Submit” section and select “Message.” Write a short, clear message like “Thank you for contacting us.” You can also redirect users to a thank-you page. This step improves user experience and confirms their action.
Enable Spam Protection
Spam can fill your inbox with fake messages. Use spam protection to stop unwanted submissions. Elementor supports Google reCAPTCHA integration. Go to the form’s “Spam Protection” tab and enable reCAPTCHA. You need to add your site and secret keys from Google. This tool blocks most spam bots and keeps your form clean. It saves time and keeps your site safe.
Configure Form Settings
Styling your form in Elementor helps it match your website’s look. A well-styled form makes visitors more likely to fill it out. You can change colors, fonts, buttons, and layout easily.
Customizing these details improves user experience and keeps your site professional. Let’s explore how to style your form design step by step.
Adjust Colors And Fonts
Pick colors that fit your website’s theme. Use light backgrounds with dark text for easy reading. Change font styles to match your brand. Keep fonts simple and clear. Avoid too many colors to keep it neat.
Modify Button Appearance
Make the submit button stand out. Choose a bright color that contrasts with the form. Use bold text on the button. Add a little padding for better clicking. Rounded corners can make the button look friendly.
Set Form Layout
Choose a layout that looks clean and organized. Use single-column for mobile-friendly forms. Multi-column works well on wider screens. Add space between fields to avoid clutter. Align labels and inputs for easy reading.
Credit: elementor.com
Style The Form Design
Publishing your form on your WordPress website using Elementor is simple. After designing your form, the next step is to make it live. This lets visitors interact with your form and submit their information.
Elementor provides tools to place your form anywhere on your site. You can add it to pages, posts, or even widgets. This flexibility helps you collect data exactly where you want.
Insert The Form Widget Into Your Page
Open the page where you want the form. Click “Edit with Elementor” to launch the editor. Find the “Form” widget in the left panel. Drag and drop it onto your page area.
The form you created will appear instantly. You can move it and adjust its size easily.
Customize Form Settings Before Publishing
Check your form settings to ensure they are correct. Set the action after submission, like sending an email or showing a message. Adjust fields if needed to match your goal.
Save your settings. This step makes sure your form works as expected.
Click The Publish Or Update Button
Once your form looks good, click the green “Publish” or “Update” button at the bottom. This action makes your form live on the website. Visitors can now see and use it.
Refresh the page to see the form live in action.
Preview And Test The Form
Creating forms with Elementor is easy, but sometimes issues may arise. Troubleshooting common form problems helps keep your site user-friendly. This section covers simple fixes for submission errors, styling problems, and email delivery.
Fix Form Submission Errors
Form submission errors often happen due to plugin conflicts or server limits. Clear your cache and try again. Check if JavaScript is enabled in your browser. Update Elementor and related plugins to the latest versions. Disable other plugins one by one to find conflicts. Make sure your hosting supports PHP and has enough resources.
Resolve Styling Problems
Styling issues can make your form look broken or out of place. Confirm you use the latest Elementor version. Check for custom CSS that may override form styles. Use Elementor’s built-in style settings to adjust colors and fonts. Clear your browser cache to see recent changes. Test the form on different devices to ensure responsiveness.
Ensure Email Delivery
Not receiving form emails is a common problem. Verify your email address in the form settings. Use SMTP plugins to improve email delivery reliability. Check spam or junk folders for missing emails. Confirm your hosting provider allows sending emails from your site. Test the form with different email addresses to ensure success.
Frequently Asked Questions
How Do I Create A Form In Elementor?
To create a form in Elementor, open your page editor, drag the Form widget to your layout, and customize fields. Adjust settings like email notifications and style to fit your needs. Finally, save and publish your form for visitors to use.
Can I Add Custom Fields To Elementor Forms?
Yes, Elementor allows adding custom fields like text, email, dropdowns, and checkboxes. You can fully customize each field’s label, placeholder, and validation rules to match your form requirements easily.
How Do I Connect Elementor Forms To Email?
In Elementor’s form settings, navigate to the Actions After Submit tab. Select Email and enter the recipient’s email address. Customize the email content and subject to receive submissions directly to your inbox.
Is It Possible To Integrate Elementor Forms With Third-party Services?
Yes, Elementor supports integration with services like Mailchimp, HubSpot, and Zapier. Use the built-in connectors or webhooks to automate workflows and manage form submissions efficiently.
Conclusion
Adding a form in WordPress using Elementor is simple and quick. You can create contact forms, surveys, or sign-up forms without coding. Just drag and drop the form widget and customize it. This helps you collect information from visitors easily.
Regular updates keep your forms working well. Try different fields to match your needs. This method saves time and makes your website more interactive. Start building forms today and improve your site’s user experience.


