
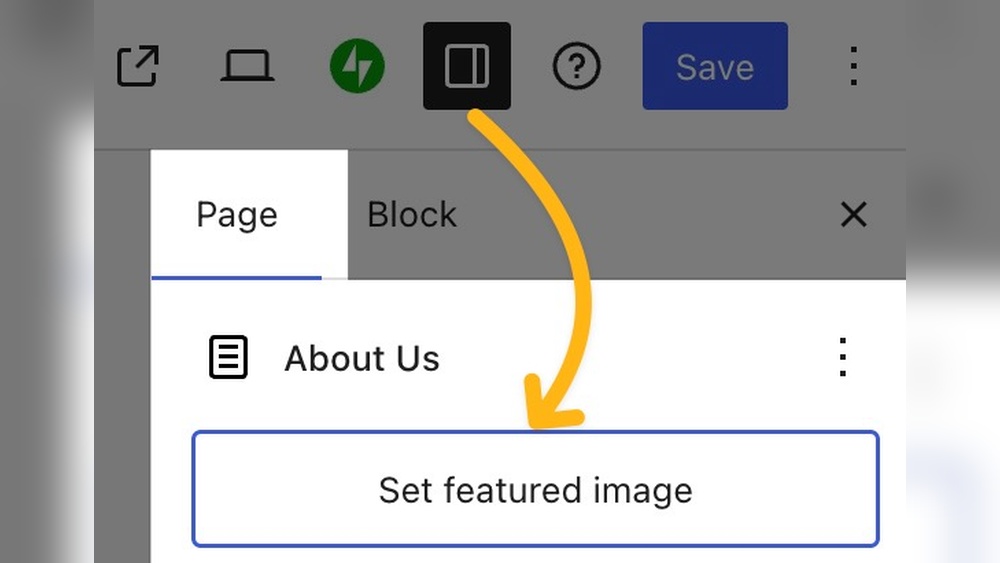
Are you struggling to make your WordPress posts stand out? Adding a featured image can instantly grab your visitors’ attention and make your content more engaging.
But if you’re not sure how to add a featured image in WordPress, don’t worry—you’re about to learn a simple step-by-step method that anyone can follow. Keep reading, and you’ll discover how a small change can boost your site’s appeal and keep your readers coming back for more.
What Is A Featured Image
A featured image is the main picture that represents a WordPress post or page. It appears at the top or alongside the content. This image draws attention and gives readers an idea about the post’s topic.
Featured images also show up in blog archives, social media shares, and search results. They make your content more attractive and easier to understand.
Purpose Of A Featured Image
The featured image helps readers quickly see what the post is about. It creates a visual connection with the content. This image can increase clicks and engagement on your site.
Where Featured Images Appear
Featured images show on the post page, homepage, and category pages. They also appear in social media previews when sharing links. This makes your posts stand out in many places.
How Featured Images Improve Seo
Search engines use images to understand page content better. A well-chosen featured image can improve your SEO. It also helps your post rank higher in image search results.
Why Use Featured Images
Featured images play a key role in making your WordPress posts stand out. They grab attention and give readers a quick idea about the content. A strong visual can make your blog more inviting and easier to understand.
Using featured images improves your site’s look and feel. It creates a consistent style that helps visitors recognize your brand. Visitors remember your site better when images are clear and relevant.
Enhances Visual Appeal
Images catch the eye faster than text. A good featured image makes your post look interesting. It invites people to click and read more.
Improves User Experience
Featured images help readers grasp the topic quickly. They break up long text and make posts easier to read. This keeps visitors on your site longer.
Boosts Social Media Sharing
Social networks show featured images with your links. Posts with images get more clicks and shares. This can increase your blog’s reach and audience.
Supports Seo Efforts
Search engines notice images with proper tags. Featured images can improve your post’s ranking. Use clear file names and alt text for best results.
Preparing Your Image
Preparing your image is a key step before uploading it as a featured image in WordPress. The image should look good and load fast. This helps your website appear professional and keeps visitors interested.
Choosing the right size and optimizing the image for the web are important parts of this process. These steps make sure your image fits well on your site and does not slow it down.
Choosing The Right Size
Select an image size that matches your website’s layout. Too large images slow down your site. Too small images look blurry or pixelated.
Common sizes for featured images are 1200×628 pixels or 800×600 pixels. Check your WordPress theme’s recommended image size for best results. Resize your image using free tools or image editors before uploading.
Optimizing For Web
Compress your image to reduce file size without losing quality. Smaller files load faster on all devices. Use formats like JPEG for photos and PNG for graphics with fewer colors.
Use online compressors or apps to optimize images easily. Keep the file size under 200 KB to improve page speed. Always preview your image after optimization to ensure it still looks good.
Credit: www.hostinger.com
Adding Featured Image In Classic Editor
Adding a featured image in the Classic Editor of WordPress is a simple process. It helps your posts look more attractive and catch readers’ attention. This section explains how to add a featured image step-by-step.
Locating The Featured Image Box
Open the Classic Editor for your post. Scroll down the page. Look at the right side panel. Find the box labeled “Featured Image.” If you do not see it, click “Screen Options” at the top. Check the box for “Featured Image.” The box will now appear on the right side.
Uploading Or Selecting An Image
Click the “Set featured image” link inside the box. This opens the media library. You can choose an image you already uploaded. Or click “Upload Files” to add a new image from your computer. Select the image you want. Make sure the image is clear and fits your post topic.
Setting The Featured Image
After selecting an image, click the “Set featured image” button. The image will appear in the Featured Image box. This confirms your choice. Save or update your post. The featured image now shows on your blog and helps readers see what your post is about.
Adding Featured Image In Block Editor
Adding a featured image in the WordPress Block Editor is simple and quick. The featured image shows as the main picture for your post. It helps attract readers and makes your content look professional. This guide explains how to find the panel, upload or choose an image, and confirm your selection.
Finding The Featured Image Panel
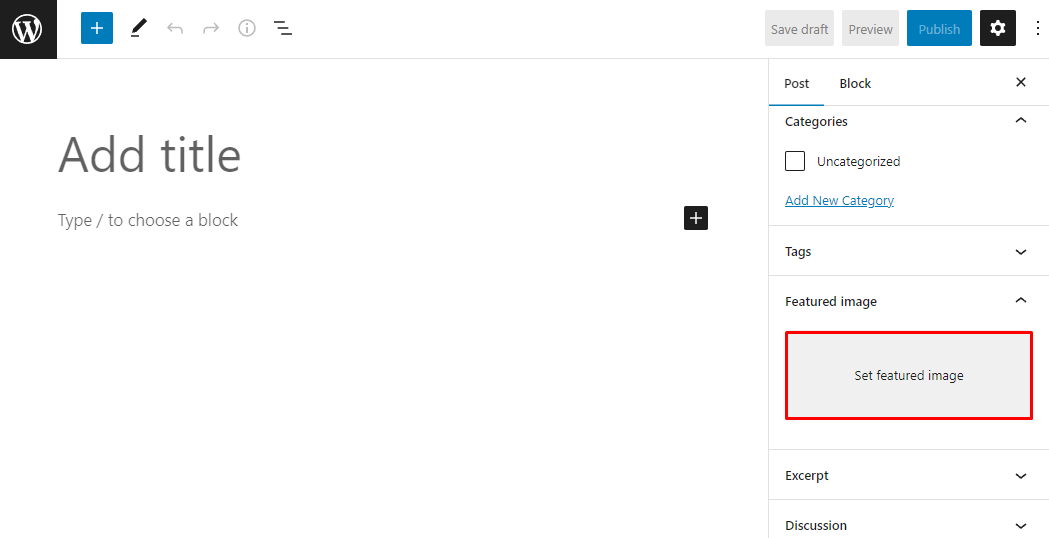
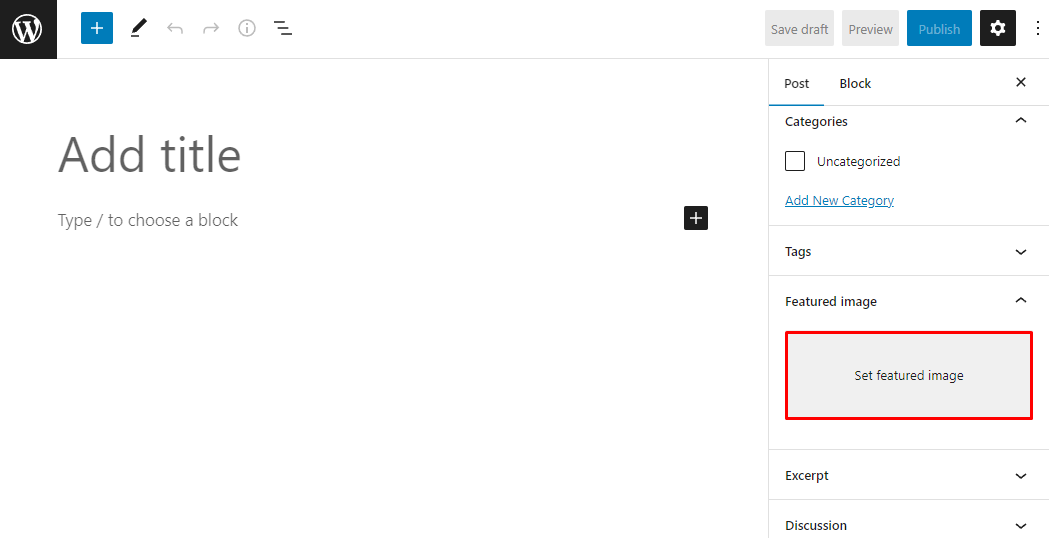
Open your post or page in the Block Editor. Look on the right side of the screen. You will see a settings sidebar. Scroll down to find the “Featured Image” panel. If you don’t see it, click the gear icon at the top right to open the settings. The panel is where you can add or change your featured image.
Uploading Or Choosing An Image
Click the “Set featured image” button in the panel. This opens the media library. You can pick an image already uploaded or upload a new one. To upload, drag your image file or click “Upload Files” and select it from your computer. Choose an image that fits your post topic well.
Confirming The Selection
After selecting or uploading, click the “Set featured image” button at the bottom right. The panel will then show a small preview of the image. This confirms your image is set. You can change it later by repeating the steps. Remember to save or update your post to keep the featured image.
Troubleshooting Common Issues
Sometimes, adding a featured image in WordPress can cause problems. These issues can stop the image from showing or make it look wrong. Knowing how to fix these common troubles helps keep your site looking good and working well.
Featured Image Not Showing
Check if the theme supports featured images. Some themes do not show them by default. Look in the theme settings or documentation. Also, ensure you have set a featured image for the post. Sometimes, the image is uploaded but not assigned as featured.
Clear your browser cache and reload the page. Caching can hide recent changes. Disable plugins one by one to find conflicts. Certain plugins may block images from displaying. Finally, update WordPress and the theme. Outdated software often causes display issues.
Image Size Problems
Featured images may appear blurry or cropped incorrectly. This happens when the image size does not fit the theme’s requirements. Use images with the recommended dimensions. Find size details in your theme’s guide or support page.
Resize images before uploading. Use tools like Photoshop or free online editors. Avoid very large files to improve load speed. Also, check WordPress media settings. Sometimes, automatic resizing can cause problems.
Regenerate thumbnails if images look wrong after changing the theme. Plugins like “Regenerate Thumbnails” fix this issue. This step recreates all image sizes for the new theme.
Using Plugins To Manage Featured Images
Managing featured images in WordPress can be easier with plugins. These tools help you control how images appear on your site. They save time and add extra options to customize images.
Plugins offer features that WordPress does not have by default. They help upload, edit, and display featured images more smoothly. Using plugins can improve your website’s look and user experience.
Popular Plugins
Several plugins stand out for managing featured images. “Regenerate Thumbnails” helps fix image sizes fast. “Featured Image from URL” lets you use images from other sites. “Quick Featured Images” allows bulk editing of images. These plugins are easy to install and use.
Each plugin suits different needs. Some focus on resizing, others on image sources. Choose the plugin that fits your website style and goals.
How Plugins Enhance Featured Images
Plugins add control over image display and size. They can automatically crop or resize images. This keeps your site looking neat and uniform. Some plugins enable lazy loading, which speeds up page loading.
Plugins also allow bulk image management. You can set or change featured images for many posts at once. This saves a lot of time for busy site owners. Many plugins support image SEO by adding alt text automatically.

Credit: ostraining.com
Credit: www.hostinger.com
Frequently Asked Questions
How Do I Add A Featured Image In WordPress?
To add a featured image, open your post editor. Locate the “Featured Image” box on the right. Click “Set featured image,” upload or select an image, and click “Set featured image. ” Finally, update or publish your post to save changes.
Why Can’t I Find The Featured Image Option In WordPress?
The featured image option may be disabled in screen settings. Check the “Screen Options” tab at the top right of the editor. Ensure “Featured Image” is checked. If missing, your theme might not support featured images, requiring theme support or plugin assistance.
What Image Size Is Best For WordPress Featured Images?
Recommended featured image size varies by theme, but 1200×628 pixels is a common standard. This size ensures good quality on most devices and social media. Always check your theme’s documentation for specific image size guidelines.
Can I Change A Featured Image After Publishing?
Yes, you can change the featured image anytime. Simply edit the post, click on the current featured image, select a new image, and update the post. The new image will replace the old one instantly.
Conclusion
Adding a featured image in WordPress is simple and quick. It helps make your posts look better and catch readers’ eyes. You just need to follow a few easy steps. Remember to choose a clear and relevant image. This small action can improve your website’s appearance and user experience.
Keep practicing, and adding images will become second nature. Your posts will stand out and attract more visitors over time.


