
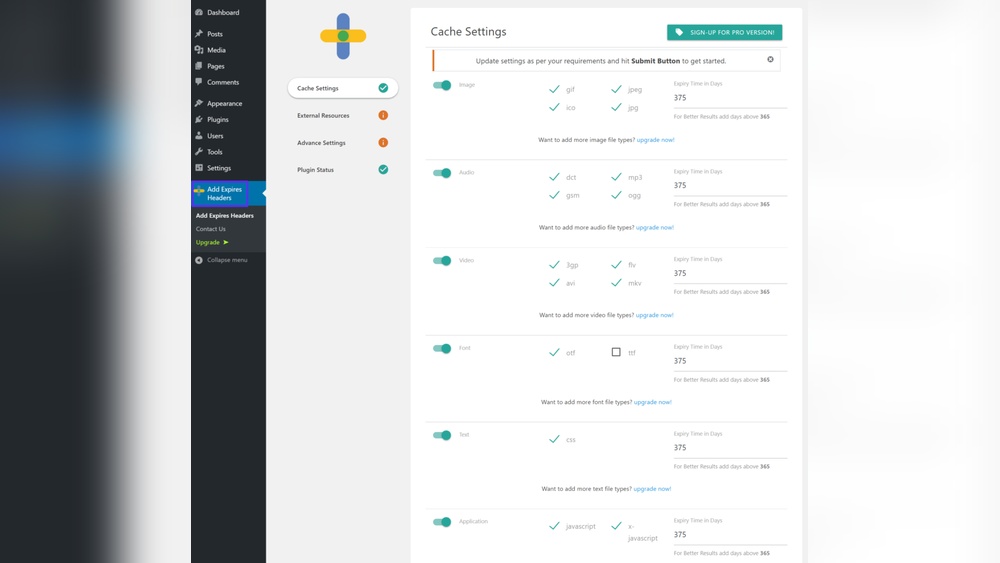
Are you tired of your WordPress site loading slowly and losing visitors because of it? Adding expires headers is a simple trick that can speed up your website and keep your visitors happy.
By telling browsers when to store files, you reduce loading times and improve performance. You’ll learn exactly how to add expires headers to your WordPress site—step by step. Keep reading, and you’ll have a faster, smoother website in no time.

Credit: kinsta.com
Why Expires Headers Matter
Expires headers tell browsers how long to keep files like images and scripts. This helps browsers avoid downloading the same files repeatedly. Setting these headers correctly makes your WordPress site faster and smoother. It also benefits your visitors and improves your site’s ranking on search engines.
Impact On Site Speed
Expires headers reduce the number of requests to your server. Browsers load files from the cache instead of downloading them again. This cuts down loading time significantly. Faster sites use less bandwidth and server resources. A quick-loading site keeps visitors on your pages longer.
Benefits For User Experience
Visitors expect pages to load fast. When files load quickly, users stay happy and engaged. Slow sites frustrate visitors and increase bounce rates. Expires headers help pages open smoothly and instantly. This creates a better browsing experience on your WordPress site.
Seo Advantages
Search engines prefer fast websites. Site speed is a ranking factor in search results. Using expires headers improves your site’s performance score. Better speed can lead to higher rankings and more traffic. Optimizing headers helps search engines crawl your site efficiently.
Credit: blog.hubspot.com
Types Of Cache-control Headers
Cache-control headers tell browsers how to store and use website files. They help speed up your site and reduce server load. Different types of headers work in different ways. Knowing these types helps you manage your WordPress site better.
Expires Header Explained
The Expires header tells the browser when a file will expire. It uses a fixed date and time. After this time, the browser will get a new copy from the server. This header is simple and easy to use for static files like images and scripts.
Cache-control Header Basics
The Cache-Control header is more flexible. It sets rules like max-age, which tells how long to keep a file in cache. It can also control whether the file is public or private. These rules give more control over caching behavior than the Expires header.
Differences Between Headers
The Expires header uses a fixed expiration date. Cache-Control uses relative time with max-age. Cache-Control can control more options like must-revalidate or no-store. Many sites use both headers together for better caching control. Understanding these differences helps you set the right caching for your WordPress site.
Methods To Add Expires Headers In WordPress
Adding expires headers helps browsers store files longer. This reduces server load and speeds up your website. WordPress offers several ways to set these headers. Choose the method that fits your skills and hosting setup. Each method ensures better caching and faster page loads.
Using .htaccess File
The .htaccess file controls server settings for Apache servers. You can add expires headers by editing this file. Access it via FTP or your hosting control panel. Insert code to specify how long browsers keep files. This method works well for most shared hosting plans.
Editing Nginx Configuration
Nginx servers use a different setup than Apache. You need to edit the Nginx configuration file directly. Add expires headers inside the server block for your site. This method requires access to the server and some technical knowledge. It offers powerful control over caching rules.
Adding Code Via Functions.php
WordPress themes have a functions.php file for custom code. You can add PHP code to set expires headers here. This method works without server access. It is ideal for simple caching needs and beginners. Be careful not to break your site when editing this file.
Leveraging Caching Plugins
Caching plugins offer user-friendly ways to add expires headers. Install popular plugins like W3 Total Cache or WP Super Cache. These tools include options to set expiry times for files. No coding required. Plugins also improve overall site speed and performance.
Step-by-step Guide With .htaccess
Adding Expires headers to your WordPress site helps improve loading speed. It tells browsers how long to keep files before fetching new ones. Using the .htaccess file is a common way to set these rules. This step-by-step guide shows how to do it safely and correctly.
Backing Up Your Site
Start by creating a full backup of your WordPress site. This includes all files and your database. A backup protects your site if anything goes wrong. Use a plugin or your hosting control panel to save a copy. Never edit .htaccess without a backup.
Accessing The .htaccess File
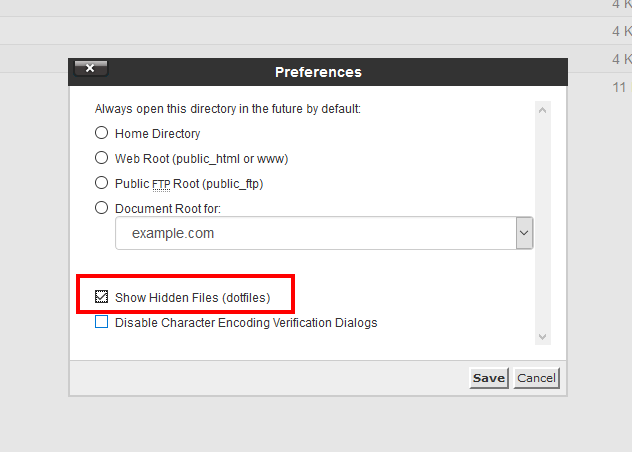
Find the .htaccess file in your WordPress root folder. Use an FTP client or your hosting file manager to open it. The file is hidden by default, so enable “show hidden files”. Download a copy to your computer before making changes.
Adding Expires Header Rules
Open the .htaccess file in a text editor. Add the following code at the end of the file:
ExpiresActive On ExpiresByType image/jpg "access plus 1 year" ExpiresByType image/jpeg "access plus 1 year" ExpiresByType image/gif "access plus 1 year" ExpiresByType image/png "access plus 1 year" ExpiresByType text/css "access plus 1 month" ExpiresByType application/pdf "access plus 1 month" ExpiresByType text/javascript "access plus 1 month" ExpiresByType application/javascript "access plus 1 month" ExpiresByType application/x-javascript "access plus 1 month" ExpiresByType application/x-shockwave-flash "access plus 1 month" ExpiresByType image/x-icon "access plus 1 year" Save the file and upload it back to your server. This code sets expiration times for common file types.
Testing The Changes
Clear your browser cache before testing. Use online tools like GTmetrix or WebPageTest. Check the response headers for Expires or Cache-Control values. Confirm the expiry times match your rules. Fix any errors by reviewing your .htaccess code.
Popular Plugins For Cache Control
Popular cache control plugins help you set expires headers easily. These headers tell browsers how long to keep files. It reduces load time and saves bandwidth. Many WordPress users rely on plugins for this task. Plugins offer a simple way to improve site speed and user experience.
Wp Rocket
WP Rocket is a well-known plugin for caching. It has a user-friendly interface to enable expires headers. The plugin also optimizes other speed factors automatically. WP Rocket works well for beginners and experts alike. It reduces server load and improves page loading times.
W3 Total Cache
W3 Total Cache offers advanced caching features. It allows you to set expires headers with custom durations. The plugin supports browser caching, page caching, and more. W3 Total Cache is highly configurable for different needs. It helps reduce download times and boost site performance.
Litespeed Cache
LiteSpeed Cache works best with LiteSpeed servers. It provides an easy way to add expires headers. The plugin also includes image optimization and database cleanup. LiteSpeed Cache improves loading speed and SEO rankings. It is a good option for users seeking all-in-one caching.

Credit: www.bluehost.com
Troubleshooting Common Issues
Adding expires headers to WordPress helps speed up your website. Sometimes, issues can stop them from working right. This section explains common problems and how to fix them. It helps you keep your site fast and smooth.
Conflicting Plugins
Some plugins may change headers you set. They can overwrite expires headers or block them. Disable all caching or performance plugins first. Check if expires headers work after that. Turn plugins on one by one to find the conflict. Replace or update the plugin causing the issue.
Incorrect Header Syntax
Expires headers need correct code format to work. A small mistake in syntax can break it. Use a tool to check your .htaccess or nginx config. Look for missing semicolons, wrong spelling, or bad date formats. Fix syntax errors and test your site again.
Browser Cache Not Updating
Browsers may keep old cache even after headers change. Clear your browser cache or try a different browser. Use a private window to avoid stored cache issues. Check your site with online tools to confirm headers update. Patience helps; some caches take time to refresh.
Measuring Speed Improvements
Measuring speed improvements helps you see the real impact of adding expires headers. It shows how much faster your WordPress site loads. Testing before and after changes gives clear results. This proves if your efforts work and guides future tweaks.
Using Google Pagespeed Insights
Google PageSpeed Insights tests your site’s load time on desktop and mobile. It gives a score based on performance. The tool highlights issues related to caching and expires headers. You get suggestions to improve speed and user experience. Check the score before and after adding expires headers to compare.
Gtmetrix Analysis
GTmetrix provides detailed speed reports with clear visuals. It shows load time, page size, and requests. GTmetrix also points out caching issues. The Waterfall chart helps identify slow-loading elements. Use this tool to see how expires headers affect loading speed. Track changes by running tests before and after implementation.
Pingdom Tools
Pingdom Tools offers quick and easy website speed tests. It measures load time from different locations worldwide. The report includes performance grade and detailed recommendations. Pingdom highlights caching problems and improvements. Use Pingdom to monitor how expires headers reduce load time. Compare results to confirm your site is faster.
Best Practices For Cache Expiry Times
Best practices for cache expiry times help improve website speed and user experience. Setting proper expiry headers ensures browsers store files just long enough. This reduces server load and speeds up page loading. Choosing the right expiry time is key to balancing performance and content freshness.
Setting Optimal Expiry Durations
Set expiry times based on the type of file. Static files like images and CSS can have longer expiry times. Usually, one month to one year works well for these files. Dynamic files, like HTML or scripts, need shorter expiry times. Avoid setting very short times for static files to prevent repeated downloads.
Balancing Freshness And Performance
Keep content fresh without slowing the site. Update expiry times to reflect how often the content changes. Use longer expiry for files that rarely change. Use shorter expiry for frequently updated content. This balance helps users get the latest data while enjoying fast load times.
Handling Dynamic Content
Dynamic content changes often and needs special care. Set short expiry times or no caching for such files. Use cache control headers to tell browsers when to check for updates. Consider using versioning for scripts and styles. This forces browsers to load new versions when they change.
Frequently Asked Questions
What Are Expires Headers In WordPress?
Expires headers tell browsers how long to cache files. They improve loading speed by reducing server requests. Adding them to WordPress helps visitors load your site faster on repeat visits.
Why Add Expires Headers To WordPress?
Adding expires headers boosts website speed and SEO rankings. It reduces bandwidth usage and server load. This leads to a better user experience and higher Google search visibility.
How Do I Add Expires Headers Using .htaccess?
To add expires headers, edit your WordPress. htaccess file. Insert specific code snippets that set caching times for file types. Always back up before making changes to avoid site issues.
Can Caching Plugins Add Expires Headers Automatically?
Yes, many WordPress caching plugins add expires headers for you. Plugins like W3 Total Cache and WP Rocket simplify the process. They manage caching rules without manual coding.
Conclusion
Adding expires headers to your WordPress site helps speed up loading times. Fast websites keep visitors happy and improve search rankings. You can add these headers using plugins or by editing code. Choose the method that feels easiest for you.
Keep your site running smoothly and visitors will stay longer. Small changes like this make a big difference over time. Start today to give your site a boost. Simple steps, better results.


