

Are you looking to make your WordPress website easier to navigate? Adding drop down pages can help you organize your content and give your visitors a smoother experience.
But if you’re not sure how to set this up, don’t worry—you’re in the right place. You’ll learn simple steps to create drop down menus that look professional and work perfectly. By the end, your site will feel more organized and user-friendly, keeping visitors engaged longer.
Ready to transform your menu and boost your site’s usability? Let’s get started!
Create Parent And Child Pages
Creating parent and child pages helps organize your WordPress site. It groups related content under main topics. Visitors find information easier this way. Drop down menus show child pages under parent pages. This structure makes your site neat and simple.
Set Up Parent Pages
Log in to your WordPress dashboard. Go to Pages and click Add New. Enter the title for your parent page. For example, “Services” or “Products.” Add content if needed. Click Publish to save the page. This page acts as the main category for related child pages.
Add Child Pages
Go to Pages and click Add New again. Enter the title for the child page. For example, under “Services,” add “Web Design.” On the right side, find the Page Attributes box. Select the parent page from the dropdown menu. This links the child page to the parent. Add content and click Publish. Repeat for all child pages you want to create.
Credit: cyberchimps.com
Build Custom Menus
Creating custom menus in WordPress helps organize your website. Drop down pages make navigation clear and simple. Custom menus let you control which pages appear and how they nest. This section shows how to build these menus step-by-step.
Access Menu Settings
Start by logging into your WordPress dashboard. Find the “Appearance” section on the left sidebar. Click on “Menus” to open the menu editor. Here, you can create and manage your menus easily. Choose an existing menu or create a new one for your drop down pages.
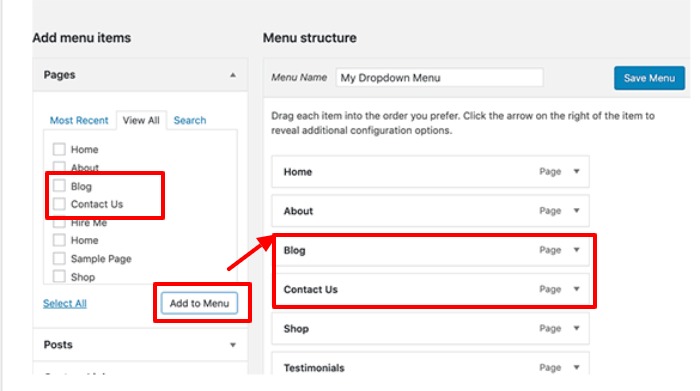
Add Pages To Menu
On the left side, see the list of your pages. Select the pages you want to add by checking their boxes. Click the “Add to Menu” button to include them. Drag and drop pages to arrange their order. Move a page slightly to the right to make it a drop down item under another page.
Arrange Drop Down Items
Arranging drop down items in WordPress menus makes your site easy to navigate. Proper order helps visitors find pages faster. Organize pages clearly to improve user experience and site structure.
Drag And Drop Pages
Go to the WordPress menu editor to arrange pages. Click and hold a page item. Drag it up or down to change its position. Drop it where you want it to appear.
This method is simple and quick. You can reorder main menu items in seconds. Keep the most important pages near the top for visibility.
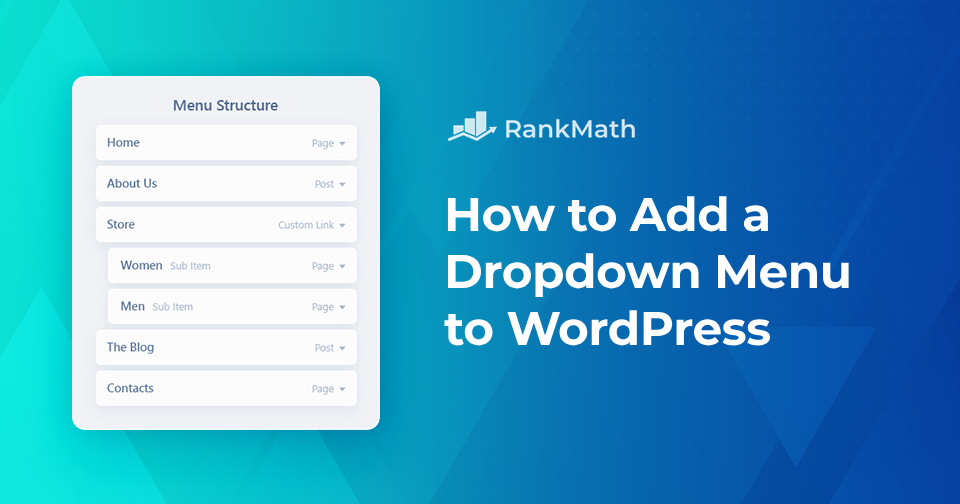
Nest Child Pages
To create drop down menus, nest child pages under parent pages. Drag a page slightly to the right under another page. This action makes it a child page.
Child pages appear as drop down items in the menu. Nesting organizes content into groups. Visitors see related pages together in the menu.
Credit: rankmath.com
Configure Menu Locations
Configuring menu locations is a key step in setting up drop down pages in WordPress. It determines where your menu appears on your site. Most themes have specific spots for menus, like the header or footer. Assigning your menu to the correct location ensures visitors see the navigation clearly. This step helps organize your pages and improves site usability.
Assign Menu To Theme
Go to your WordPress dashboard and open Appearance > Menus. After creating your menu, look for the Menu Settings section. Here, you will find options to assign the menu to theme locations. These locations depend on your theme, such as Primary Menu or Footer Menu. Select the location where you want the drop down menu to show. Click Save Menu to apply the changes.
Preview Menu Changes
After assigning the menu, preview your site to check the changes. Visit the front end of your site and look at the menu area. The drop down pages should appear under the main menu items. Test the menu by hovering over items to ensure the drop down works smoothly. This preview helps catch any errors before your visitors see the menu.
Use Plugins For Advanced Menus
Plugins can improve your WordPress menus beyond the default options. They let you create advanced drop down pages with ease. These tools offer more style choices and better control. Plugins help make your site easier to navigate and look professional.
Choose A Menu Plugin
Select a plugin that fits your needs and skill level. Popular options include Max Mega Menu, WP Mega Menu, and Responsive Menu. Check user reviews and update frequency to ensure reliability. Pick one that supports drag-and-drop for simple setup. Confirm it works well with your WordPress theme.
Enhance Drop Down Features
Plugins add features like icons, animations, and multiple columns. You can create menus that stand out visually and function smoothly. Some plugins allow custom colors and fonts for your drop down items. They also support mobile-friendly menus that adapt to different screens. Test your menu on desktops and phones to ensure usability.

Credit: www.hostinger.com
Troubleshoot Drop Down Issues
Drop down menus make your site easier to use. Sometimes, these menus do not work right. Troubleshooting helps fix these issues fast. This section guides you through common problems and solutions.
Fix Menu Display Problems
Check if the drop down menu shows on all devices. Sometimes, menus work on desktop but fail on mobile. Clear your browser cache to see recent changes. Disable plugins one by one to find conflicts. Update WordPress, themes, and plugins to the latest versions. Use a default theme like Twenty Twenty-Three to test menu display. This helps find if your theme causes the problem.
Check Theme Compatibility
Not all themes support drop down menus well. Some themes need extra settings or custom CSS. Read your theme’s documentation about menus. Look for options related to drop down menus. Switch to a basic theme to check if menus work there. If yes, your theme might block drop downs. Contact the theme developer for support or updates. Use themes known for good menu support to avoid issues.
Frequently Asked Questions
How Do I Create A Drop Down Menu In WordPress?
To create a drop down menu, go to Appearance > Menus in your WordPress dashboard. Add parent and child pages, then drag child pages slightly right under the parent page. Save the menu to activate the drop down on your site’s navigation bar.
Can I Add Multiple Drop Down Pages In WordPress?
Yes, WordPress allows multiple drop down pages. You just need to organize child pages under different parent pages in the menu editor. This helps create a clear, hierarchical navigation structure for your visitors.
Are Drop Down Menus Mobile-friendly In WordPress?
Most modern WordPress themes have responsive drop down menus. They automatically adjust to mobile screens, turning into touch-friendly menus. Always test your menu on various devices to ensure smooth user experience.
Do I Need A Plugin For Drop Down Pages In WordPress?
No, WordPress has built-in menu management that supports drop down pages. Plugins are optional and useful if you want advanced styling or animation features beyond default capabilities.
Conclusion
Adding drop-down pages in WordPress helps organize your website better. It makes navigation easier for visitors. You only need a few steps to set it up. This feature improves user experience and keeps your site neat. Try creating drop-down menus to show your content clearly.
Keep your pages simple and structured. This small change can make a big difference in how people use your site. Start today and see how it helps your website grow.


