
Are you looking to give your WordPress site a fresh, personalized look? Adding a CSS class is one of the simplest ways to do just that.
By using CSS classes, you can control the style of specific elements on your site without touching the core code. This means you get full creative control while keeping your site safe and easy to update. You’ll discover clear, step-by-step instructions on how to add CSS classes in WordPress—no coding experience needed.
Keep reading, and you’ll be styling your site like a pro in no time!
Why Add Css Classes In WordPress
Adding CSS classes in WordPress helps customize the look of your website. It lets you change styles without touching the core theme files. This keeps your design neat and easy to update. CSS classes also make your site unique and more user-friendly.
By using CSS classes, you can target specific parts of your site. This makes styling precise and efficient. It saves time and effort compared to editing many elements separately. Plus, CSS classes help keep your code clean and organized.
What Are Css Classes?
CSS classes are names you give to HTML elements. They group elements to apply the same style. This method avoids repeating style rules for each element. Instead, you write one rule for the class, and it affects all tagged elements.
How Css Classes Improve Website Design
CSS classes allow detailed control over your site’s appearance. You can change colors, fonts, spacing, and more. This control helps create a consistent look across pages. It also improves the user experience by making the site easier to read and navigate.
Why Css Classes Matter For WordPress Users
WordPress users benefit from CSS classes because they simplify customization. You can tweak parts of your theme without coding everything from scratch. Many page builders support CSS classes, making design changes accessible to beginners.
Credit: themesharbor.com
Locating The Right Elements
Adding a CSS class to WordPress elements starts with knowing which parts need styling. Locating the right elements helps apply styles correctly. This process varies depending on the editor you use. Understanding each method makes editing easier and faster.
Using The WordPress Block Editor
The WordPress Block Editor shows content in blocks. Each block represents a part of your page, like a paragraph or image. Click a block to select it. On the right side, find the “Advanced” panel. Here, you can add a CSS class. This method targets specific blocks for styling.
Blocks make it clear which element you edit. You see the changes right away. No code needed. This method works well for simple styling tasks.
Identifying Elements In Classic Editor
The Classic Editor looks like a text box with formatting options. It does not separate content into blocks. To add a CSS class, switch to the “Text” tab. This view shows HTML code behind the content.
Find the element you want to style by reading the code. Add the class attribute inside the HTML tag. This method needs basic HTML knowledge. It gives more control over your content’s design.
Inspecting With Browser Developer Tools
Every modern browser has developer tools. Open these by right-clicking the page and choosing “Inspect.” This tool shows the HTML structure of your page. You can see each element’s classes and IDs.
Use this tool to find the exact element to style. It helps confirm which CSS class to add. This method is useful for complex pages with many elements. It gives a clear view of the page’s code.
Adding Css Classes Via Block Editor
Adding CSS classes via the Block Editor is a simple way to customize your WordPress site. It lets you change the style of individual blocks without editing theme files. This method is quick and works well for users who want to tweak their site’s look.
The Block Editor allows you to select any block and assign a CSS class. Then, you can write custom CSS to style that block. This approach keeps your site organized and easy to update.
Selecting Blocks
First, open your WordPress post or page in the Block Editor. Click on the block you want to style. You will see a toolbar and settings on the right side of the screen. This confirms which block is active.
You can select text blocks, images, buttons, or any other block type. Each block can have its own CSS class. Make sure you choose the correct block before adding a class.
Adding Classes In Advanced Settings
After selecting the block, look for the “Advanced” section in the block settings panel. It is usually at the bottom of the sidebar. Here, you find a field labeled “Additional CSS Class.”
Type the name of your CSS class in this field. Do not add a dot (.) before the class name. For example, just write “custom-style” instead of “.custom-style”.
Save or update your post after adding the class. You can then add CSS rules for this class in your theme’s customizer or style.css file. This method helps you style blocks uniquely without affecting others.
Adding Css Classes In Classic Editor
Adding CSS classes in the Classic Editor of WordPress helps customize your content’s look. These classes let you style specific parts of your post or page easily. You can change colors, fonts, spacing, and more by adding CSS classes.
This guide explains how to add CSS classes inside the Classic Editor. The process is simple and does not require advanced skills. Follow the steps below to start styling your content with ease.
Switching To Text Mode
Open your post or page in the Classic Editor. By default, you see the Visual mode. This mode shows a live preview of your content. To add CSS classes, switch to Text mode. Click the “Text” tab at the top right of the editor. This mode displays your content’s HTML code. You can now add class attributes directly to the HTML tags.
Manually Adding Class Attributes
In Text mode, find the HTML element you want to style. It could be a paragraph, heading, or image tag. Add the class attribute inside the tag. For example,
This is a paragraph.
saves your class name as “my-class.”Use simple and clear class names. Avoid spaces or special characters in class names. Save or update your post after editing. Check the front end to see your new styles in action. This method gives full control over your content’s style.
Using Theme Customizer For Css
The Theme Customizer in WordPress lets you add CSS classes easily. It gives a simple way to change your site’s look. You do not need to edit theme files or use extra plugins. Just add custom CSS in one place.
This method works well for small style changes. You can see live previews before saving. It is safe and keeps your styles even after theme updates.
Accessing Additional Css Section
Go to your WordPress dashboard. Find the menu labeled “Appearance.” Click on “Customize” to open the Theme Customizer.
In the Customizer, look for the “Additional CSS” section. Click it to open a text area. This area is where you write your custom CSS code.
You can type or paste CSS code here. Changes show in real time on the right side. When ready, click “Publish” to save.
Applying Styles To Custom Classes
First, add a CSS class to an element in your page or post. Use the block editor or HTML view to do this.
Next, write CSS rules targeting that class in the “Additional CSS” box. For example, use a dot (.) before the class name.
Define styles like color, font size, margin, or padding. These styles apply only to elements with your custom class.
Check the live preview to see how styles look. Adjust the code until it fits your design. Save your changes by clicking “Publish.”
Credit: wordpress.com
Adding Classes With Page Builders
Page builders make it easy to customize your WordPress site. They let you add CSS classes without writing code. Adding classes helps style elements uniquely. This section shows how to add classes in popular page builders.
Elementor
In Elementor, select the widget or section you want to style. Go to the Advanced tab. Find the field labeled CSS Classes. Type your class name here without the dot (.). Save your changes. The class applies instantly to that element.
Beaver Builder
Open Beaver Builder and choose the module or row. Click the Advanced tab in the settings panel. Enter your class name in the Class box. No dots needed. This class lets you add custom styles easily. Save and preview your page.
Divi
In Divi Builder, pick the module, row, or section. Click the gear icon to open settings. Go to the Advanced tab. Find the CSS Class input field. Type the class name there without dots. Save your settings to apply styles.
Best Practices For Naming Classes
Naming CSS classes clearly helps keep your WordPress site organized. Clear names make it easy to understand what each class does. This saves time when you edit or update your site later. Good naming also avoids conflicts with other styles or plugins.
Follow simple rules for naming classes. Use meaningful words that describe the element’s purpose or style. Avoid vague or generic names that confuse you or others working on the site.
Use Lowercase Letters And Hyphens
Write all class names in lowercase letters. Separate words with hyphens, not underscores or spaces. For example, use main-header instead of Main_Header. This format is easier to read and works well across browsers.
Keep Class Names Short But Descriptive
Choose names that are short yet clear. Avoid very long names that are hard to remember. For example, button-primary is better than main-site-call-to-action-button. Short names speed up writing and editing code.
Avoid Using Numbers Or Special Characters
Numbers and special characters can cause confusion. They may also conflict with CSS syntax. Stick to letters and hyphens only. This keeps your classes simple and compatible.
Follow A Consistent Naming Style
Use the same naming style throughout your site. For example, always use hyphen-separated lowercase words. Consistency helps you and others understand the code quickly. It also reduces mistakes during styling changes.
Use Meaningful Names, Not Style Descriptions
Name classes based on the element’s role, not how it looks. For example, use nav-menu instead of blue-text. Styles can change, but the element’s purpose stays the same. This approach makes your CSS more flexible.
Credit: diviextended.com
Troubleshooting Common Issues
Adding a CSS class in WordPress should be simple. But sometimes, things do not work as expected. Common issues can stop your styles from showing on your site. Understanding these problems helps you fix them quickly. This section covers the most frequent troubles and how to solve them.
Classes Not Applying
Sometimes, your CSS class does not show any effect. Check if you added the class to the right HTML element. Make sure the class name matches exactly in your CSS and HTML. Even one wrong letter can break it.
Clear your browser cache and reload the page. Old files may block new styles from loading. Check if your CSS file is properly linked in your theme or plugin. Without this, the styles will not work.
Conflicts With Theme Or Plugins
The WordPress theme or plugins might use the same CSS class names. This causes conflicts and stops your styles from showing. Try changing your class names to something unique. Use a prefix related to your site or project.
Deactivate plugins one by one to find if any cause the issue. Some plugins override your styles or add extra CSS rules. Also, check the theme’s style files for rules that may override yours.
Frequently Asked Questions
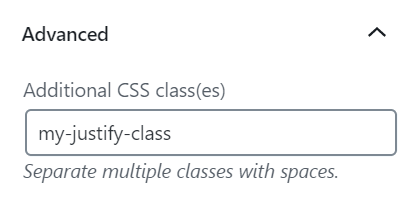
How Do I Add A Css Class To A WordPress Block?
To add a CSS class to a WordPress block, select the block and open its settings panel. Locate the “Advanced” section and enter your CSS class name in the “Additional CSS Class(es)” field. This applies custom styling to that specific block easily.
Can I Add Css Classes To WordPress Widgets?
Yes, you can add CSS classes to WordPress widgets. Go to Appearance > Widgets, open a widget, and find the “CSS Classes” field. Add your desired class name there to customize the widget’s appearance using your CSS styles.
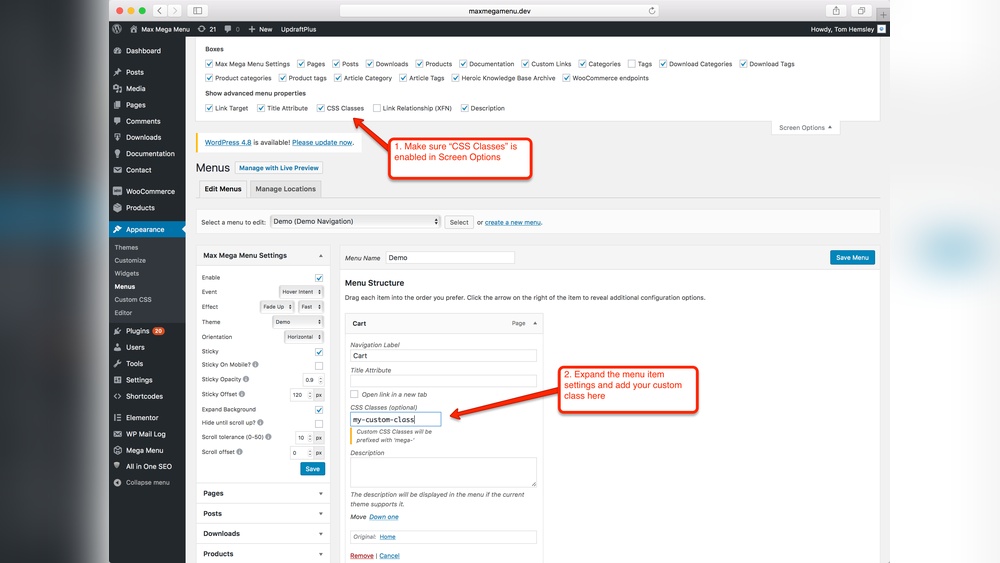
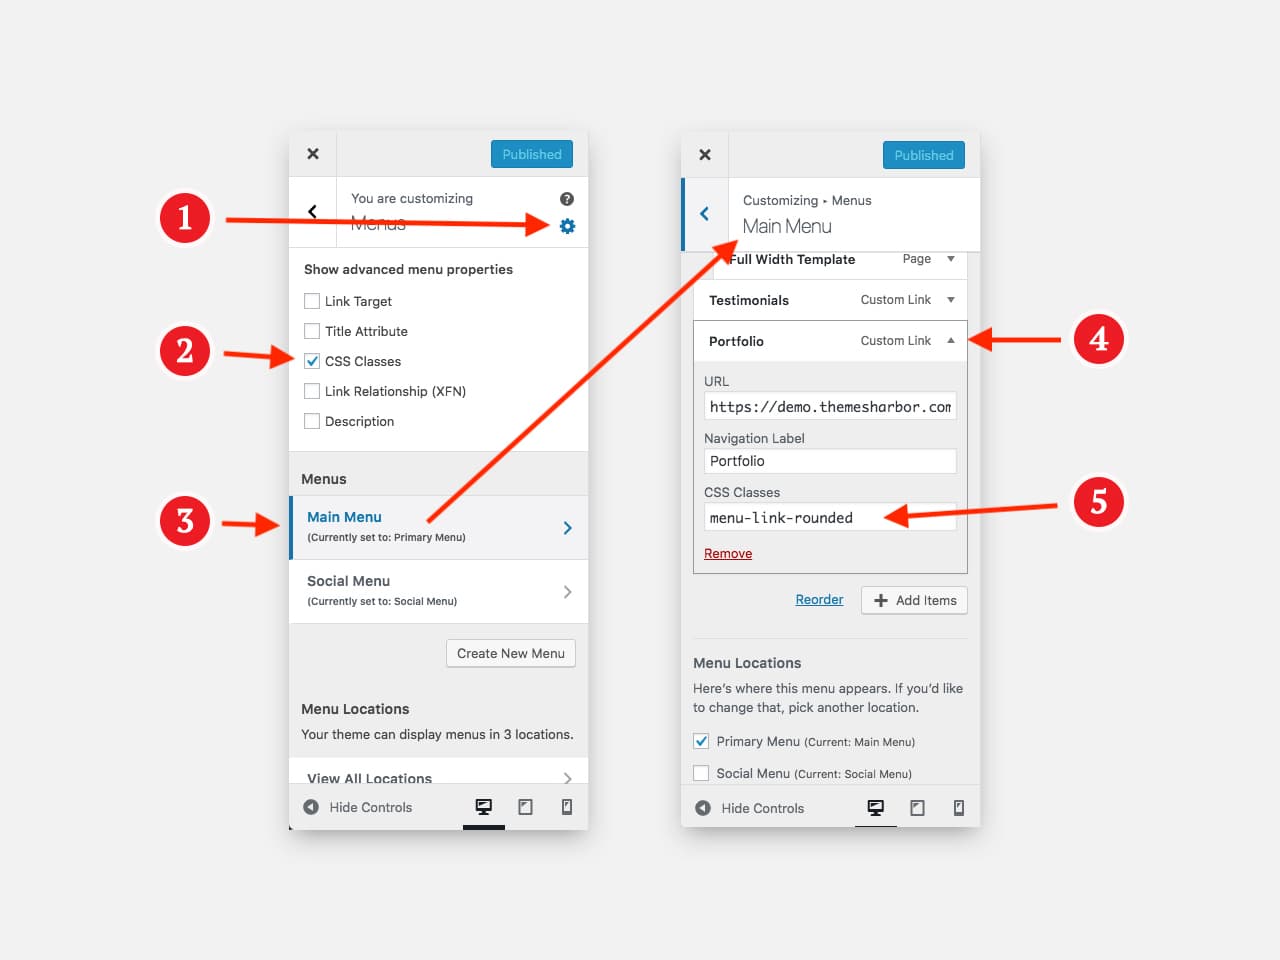
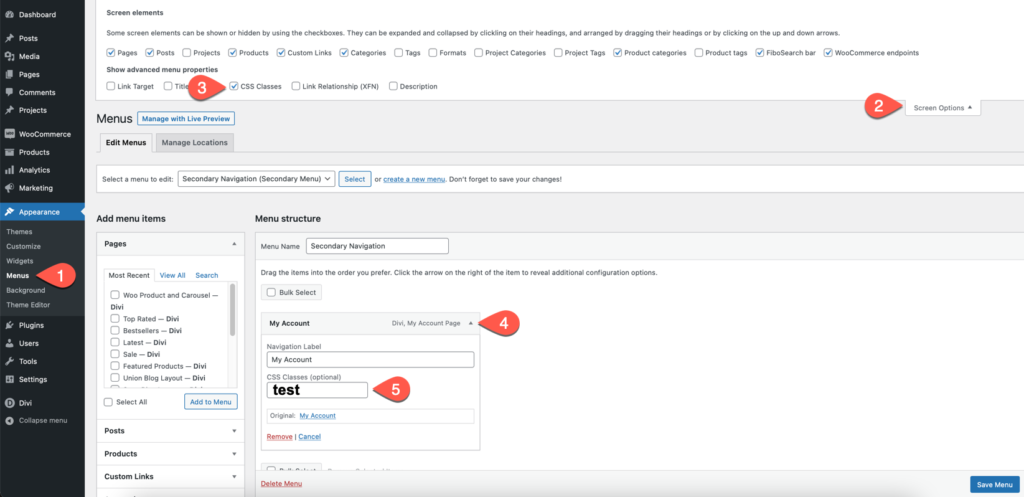
How To Add Css Classes To WordPress Menu Items?
To add CSS classes to menu items, go to Appearance > Menus. Enable “CSS Classes” in Screen Options, then edit a menu item and add your class name. This allows you to style individual menu links uniquely with CSS.
Is It Possible To Add Custom Css Classes In WordPress Posts?
Yes, WordPress lets you add custom CSS classes to posts via the block editor. Select a block in your post, navigate to the “Advanced” settings, and enter your CSS class. This helps target specific content blocks with custom styles.
Conclusion
Adding a CSS class in WordPress is simple and useful. It helps you change the look of your site easily. You can style text, images, and blocks just how you want. This small step can improve your site’s design a lot.
Keep practicing to feel more confident with CSS classes. Your website will look better with your own style. Try different classes and see what works best for you.


