
Are you looking to make it easy for visitors to reach you on your WordPress site? Adding a contact form with Elementor is the perfect way to do that—without needing any coding skills.
Imagine turning casual visitors into real connections by simply placing a simple form on your page. You’ll discover step-by-step how to create and customize a contact form using Elementor, so you can start capturing messages and growing your audience right away.
Keep reading, and you’ll have your contact form up and running in no time!
Choosing A Contact Form Plugin
Choosing the right contact form plugin is key for your WordPress site with Elementor. The right plugin makes it easy to build forms that visitors can use to reach you. It should fit your needs without slowing down your site.
Think about ease of use, features, and compatibility with Elementor. Some plugins work better with Elementor’s drag-and-drop builder. Others offer extra options like spam protection or custom layouts.
Popular Plugins Compatible With Elementor
Several contact form plugins work well with Elementor. WPForms is user-friendly and fits small to medium sites. Contact Form 7 is simple and free but needs extra plugins for styling. Gravity Forms offers many features but requires a premium license. Ninja Forms provides flexibility and is good for beginners. Each plugin lets you create forms with drag-and-drop tools or shortcodes.
Free Vs Premium Options
Free contact form plugins cover basic needs. They allow simple form creation and submission. Premium versions add features like payment integration and advanced styling. They include better spam filters and priority support. Paid plugins suit business sites needing extra tools. Free plugins work well for personal blogs or small sites. Choose based on your budget and required features.
Installing And Activating The Plugin
Installing and activating a plugin is the first step to adding a contact form in Elementor. This process allows you to extend your website’s features easily. You do not need coding skills. Just follow a few simple steps to get started.
Finding The Plugin In WordPress Repository
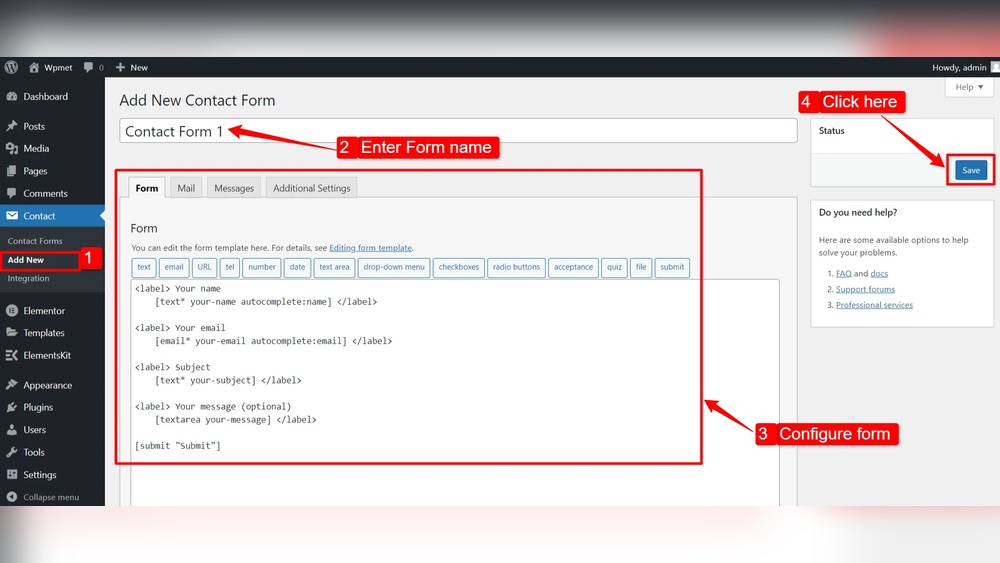
Log in to your WordPress dashboard. Navigate to the “Plugins” section on the left menu. Click on “Add New.” Here, you will see a search bar on the top right. Type the name of the contact form plugin you want. Common choices include “Contact Form 7” or “WPForms.” The search results will show plugins from the official WordPress repository. Choose the one with good ratings and recent updates. This ensures the plugin is reliable and secure.
Step-by-step Installation Process
After finding the plugin, click the “Install Now” button. Wait a few seconds for the installation to complete. Once installed, the “Install Now” button changes to “Activate.” Click “Activate” to enable the plugin on your website. After activation, you will usually see a new menu item for the plugin in your dashboard. This lets you create and manage your contact forms easily. The plugin is now ready to use with Elementor.
Creating A New Contact Form
Creating a new contact form in WordPress Elementor is simple and fast. You can build a form that fits your needs without coding skills. This section explains the steps to create a form from scratch.
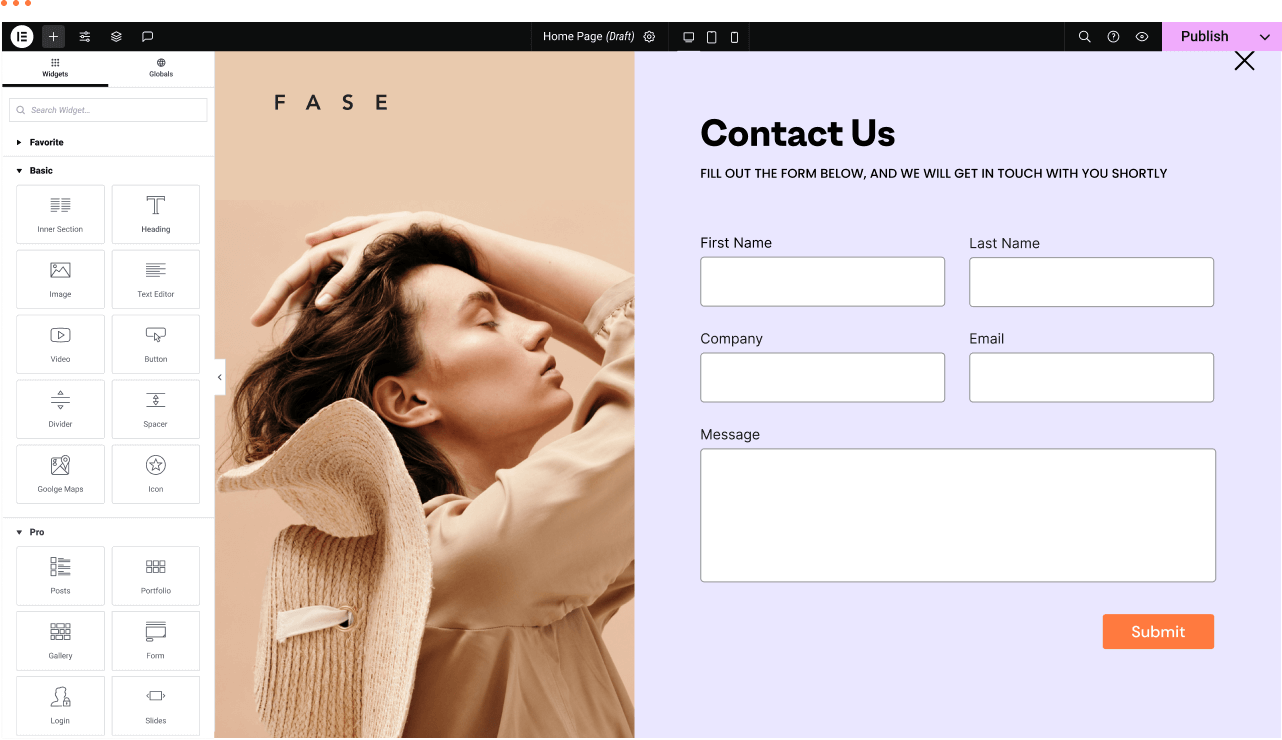
Start by opening the Elementor editor on your page. Locate the form widget and drag it to your desired section. The form will appear with default fields, ready to customize.
Setting Up Basic Form Fields
Begin by adding essential fields like Name, Email, and Message. Click each field to edit its label and placeholder text. Keep field names clear and simple for users.
Adjust the field type based on the information you want. For example, choose “Email” for email addresses to validate input. Add or remove fields as needed to match your contact goals.
Customizing Form Settings
Next, configure form actions after submission. Select options like email notifications or redirect to a thank-you page. Enter the email address where you want to receive messages.
Set the button text to something inviting, like “Send” or “Submit.” Check the form’s style settings to match your website’s look. Make sure the form is easy to read and use on all devices.
Adding The Contact Form To Elementor
Adding a contact form to your Elementor page lets visitors reach you easily. It improves user experience and helps grow your business. Elementor makes this task simple and quick. You can design and place forms without coding. Follow these steps to add a contact form in Elementor effectively.
Using Elementor’s Drag-and-drop Editor
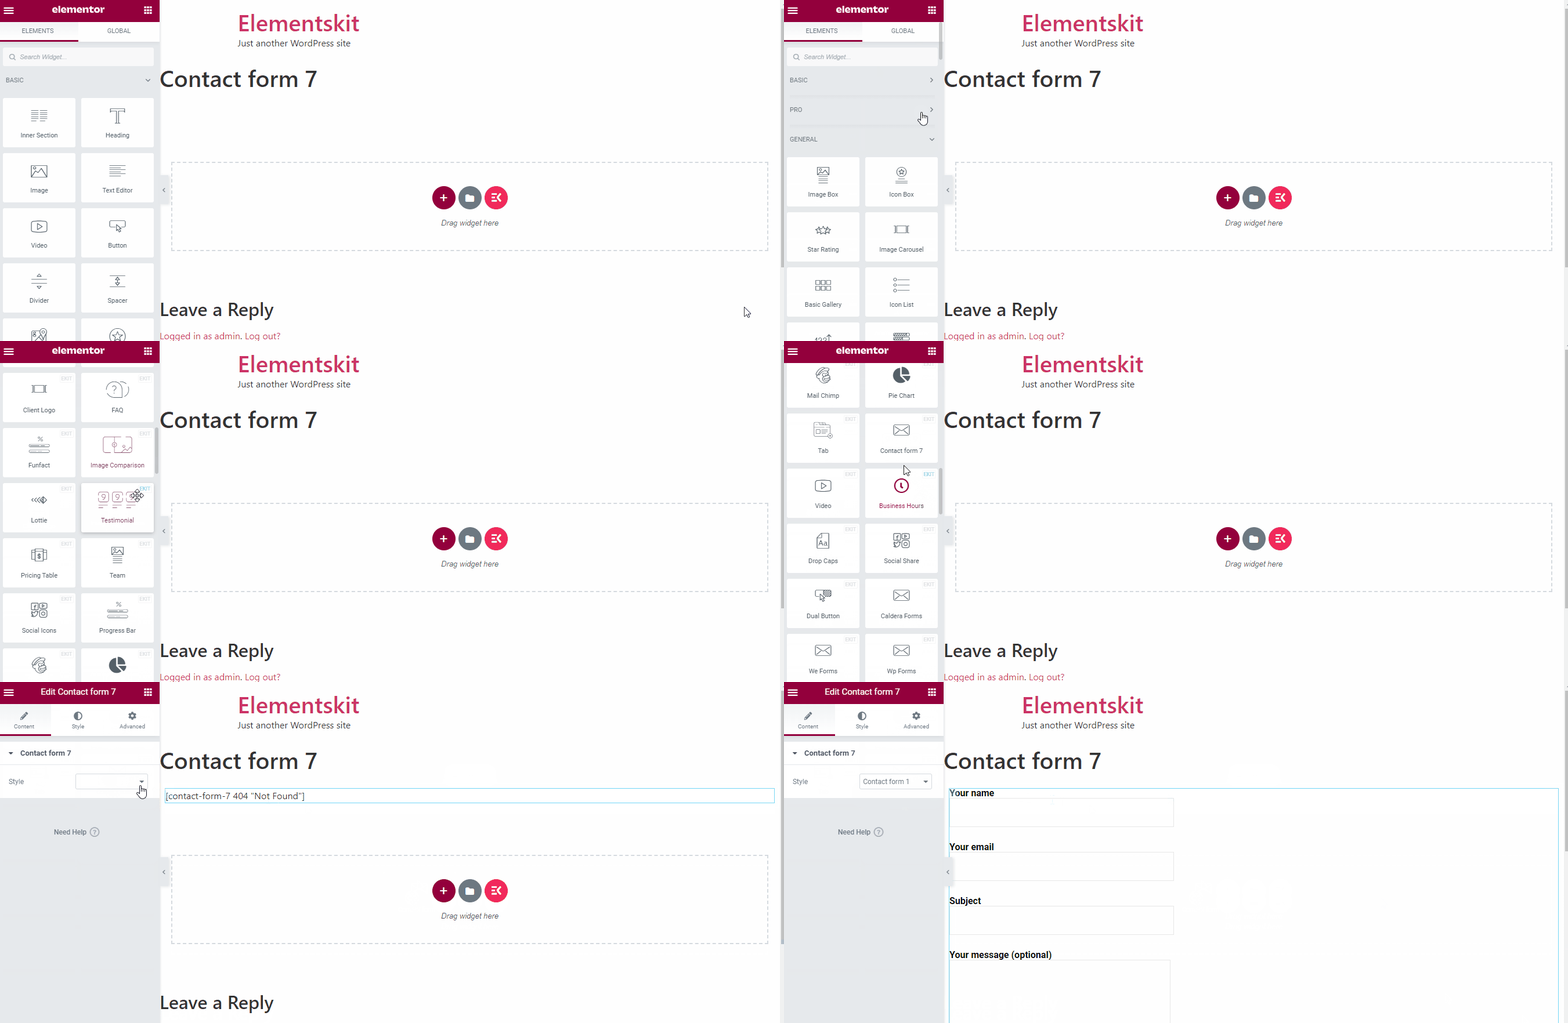
Elementor uses a drag-and-drop editor to build pages visually. You do not need to write any code. Open the page where you want the form. Click “Edit with Elementor” to launch the editor. On the left panel, find the form widget. Drag it from the panel and drop it on your page. You can see the form appear instantly.
Adjust the form fields as needed. Add text boxes, email fields, or text areas. Customize labels and placeholders. Each change shows live on your page. This makes it easy to create a form that fits your style.
Placing The Form Widget On Your Page
Position the form widget where visitors will easily find it. Common spots are the contact page or footer area. Use Elementor’s layout tools to move and resize the form. Align it with other page elements. Make sure it looks neat and balanced.
Check the form on different devices. Elementor lets you preview on desktop, tablet, and mobile. Ensure the form stays clear and easy to use everywhere. Save your changes once you are happy with the placement.
Customizing The Form Design
Customizing the form design in Elementor helps your contact form look perfect on your website. A well-designed form matches your site’s style and makes visitors feel comfortable filling it out. Simple changes to colors, fonts, layout, and spacing can improve the form’s appearance and usability.
Elementor gives easy tools to change these settings without coding. You can make the form look unique and professional in just a few clicks.
Adjusting Colors And Fonts
Start by choosing colors that fit your website theme. Use the color picker in Elementor to change the background, text, and button colors. Make sure the text color contrasts with the background for easy reading.
Fonts also affect how your form looks. Select fonts that match your site’s style. Adjust font sizes for labels, input fields, and buttons to keep everything clear and balanced.
Keep the design simple. Avoid too many colors or fonts. This keeps the form clean and user-friendly.
Modifying Layout And Spacing
Layout controls where the form elements appear. Elementor lets you change the alignment of labels and fields. You can place labels above or next to the input boxes.
Spacing is important for a neat look. Add padding and margins to separate form parts. This stops the form from looking crowded or messy.
Use consistent spacing. This helps users focus on each part of the form easily.

Credit: www.youtube.com
Configuring Email Notifications
Configuring email notifications is an important step after creating a contact form in Elementor. It helps you receive messages directly to your inbox. Without proper setup, you might miss important emails from your visitors.
This section explains how to set the recipient email address and test if notifications work. Follow these steps to ensure your form sends emails correctly every time.
Setting Recipient Email Address
Open your Elementor editor and select the contact form widget. Go to the “Actions After Submit” section and choose “Email.”
In the email settings, find the “To” field. Enter the email address where you want to receive messages. Use a valid and active email address to avoid delivery issues.
You can also set the “From Name” and “From Email” fields. These help identify the sender in your inbox. Use your website name and a reliable email address here.
Testing Notification Functionality
After setting the recipient email, test the form. Fill in the fields and submit the form on your site.
Check your inbox for the notification email. Look for the subject line and message content to confirm everything works.
If you do not receive the email, check your spam folder. Also, verify the email settings and try again. Testing ensures you never miss a message from your visitors.
Adding Spam Protection
Adding spam protection to your contact form is important. It stops fake messages and unwanted bots. Without protection, your inbox can fill with junk. This makes managing real messages hard.
WordPress Elementor offers simple ways to keep spam away. You can use tools like CAPTCHA or reCAPTCHA. Another way is to enable honeypot techniques. Both help your form stay clean and safe.
Using Captcha Or Recaptcha
CAPTCHA asks users to prove they are human. It shows simple tests like picking pictures or typing letters. reCAPTCHA is a popular choice by Google. It is easy to add in Elementor forms. It stops most bots from submitting spam.
To use reCAPTCHA, get a site key from Google. Then enter it in Elementor’s form settings. This adds a challenge for users but keeps real visitors happy. It helps block unwanted automated messages.
Enabling Honeypot Techniques
Honeypot is a hidden field in your form. Real users do not see or fill it out. Bots fill every field, including the hidden one. If the hidden field has content, the form blocks it.
Elementor lets you enable honeypot easily. This method works silently without disturbing users. It is a smart way to reduce spam without extra steps for visitors. Combining honeypot with CAPTCHA improves form security.
Credit: wpmet.com
Testing And Publishing The Form
Testing and publishing your contact form is a crucial step. It ensures your visitors can reach you without issues. This part guides you through checking and making your form live. You will learn how to preview your form on different devices and verify the live version.
Previewing The Form On Different Devices
Elementor lets you preview your form on various screen sizes. Click the responsive mode icon in the editor. Choose desktop, tablet, or mobile view. Check if the form looks good and works well. Make sure all fields are visible and easy to use. Adjust spacing or font size if needed. This step helps your form work smoothly for all users.
Publishing And Verifying Live Form
After previewing, save your changes and click “Publish.” Visit the live page with the form. Test filling out the form and submit it. Confirm you receive the submission email or notification. Check for any errors or missing fields. Test the form on different browsers too. Fix any issues found before sharing your page widely. This ensures your visitors can contact you without trouble.
Credit: elementor.com
Frequently Asked Questions
How Do I Add A Contact Form In Elementor?
To add a contact form in Elementor, drag the “Form” widget to your page. Customize fields, labels, and settings as needed. Finally, save and publish your page to make the form live.
Can I Customize The Contact Form Fields In Elementor?
Yes, Elementor lets you easily customize form fields. You can add, remove, or edit fields like name, email, message, and more. This ensures the form fits your specific needs.
Is Adding A Contact Form In Elementor Free?
Elementor offers a free form widget with basic features. For advanced options like integrations and conditional logic, Elementor Pro is required. Choose based on your form needs.
How To Connect Elementor Contact Form To Email?
In the form widget’s “Actions After Submit,” select “Email. ” Enter your email address in the settings to receive form submissions directly to your inbox.
Conclusion
Adding a contact form in WordPress Elementor is simple and useful. It helps visitors reach you easily. Just follow the steps carefully to set it up. Test the form to ensure it works correctly. A good contact form improves your website’s communication.
Keep it clear and easy to use. This small addition can make a big difference for your site. Try it today and see the benefits for yourself.


