

Are you looking to make scheduling easier for your visitors and save yourself hours of back-and-forth emails? Adding a booking calendar to your WordPress site can do just that.
Imagine your customers booking appointments, reservations, or services with just a few clicks—no confusion, no hassle. In this guide, you’ll discover simple steps to set up a booking calendar that fits your needs perfectly. Keep reading, and you’ll soon have a powerful tool that boosts your business and keeps your calendar organized effortlessly.
Choose The Right Booking Plugin
Choosing the right booking plugin is a key step for your WordPress site. It shapes how visitors book appointments or services. The right plugin makes the process smooth and easy. It fits your needs and budget. This section helps you pick a plugin that works best for you.
Popular Booking Plugins
Several booking plugins are popular among WordPress users. Amelia offers a user-friendly interface with many features. Bookly is flexible and supports many payment options. WP Simple Booking Calendar is great for simple date bookings. Each plugin suits different needs and business types.
Key Features To Look For
Look for features that simplify booking management. An easy booking form is essential. Automatic email notifications help keep clients informed. Payment integration allows secure online payments. Mobile-friendly design ensures a good experience on phones. Also, check if the plugin supports multiple services or staff members.
Free Vs Premium Options
Free plugins are good for basic booking needs. They offer limited features but work well for small sites. Premium plugins cost more but provide advanced features. These include customization, payment gateways, and support. Choose premium if your business needs more control or growth options. Free options are enough for simple bookings.
Install And Activate The Plugin
Installing and activating a booking calendar plugin is the first step to manage appointments on your WordPress site. This process is simple and takes only a few minutes. Follow the steps below to get started quickly and easily.
Accessing The WordPress Dashboard
Log in to your WordPress website using your username and password. The dashboard is the main control panel. It shows options to manage your site’s content and settings.
Find the left-hand menu after logging in. This menu holds all the tools you need to add new features like plugins.
Searching For The Plugin
In the dashboard menu, click on “Plugins.” Then select “Add New.” A search box appears on the top right. Type “booking calendar” into the search box.
WordPress shows a list of booking calendar plugins. Choose one that fits your needs by reading the short descriptions and ratings.
Installation Process
After selecting a plugin, click the “Install Now” button next to it. WordPress downloads and installs the plugin automatically. Wait a few moments for the process to finish.
Do not close the browser or navigate away while installation is in progress. This ensures the plugin installs correctly without errors.
Activating The Plugin
Once installed, click the “Activate” button. Activation makes the plugin ready to use on your website. You can now access its settings and start adding booking features.
Confirm activation by checking the plugin list. The active plugin will have a highlighted background or an “Active” label.
Configure Booking Settings
Configuring booking settings is a key step in setting up a booking calendar in WordPress. This step controls how your calendar works and what options your customers see. Proper configuration makes booking smooth and helps avoid scheduling errors.
Focus on availability, form fields, payments, and notifications. These settings shape the booking experience and affect your business operations.
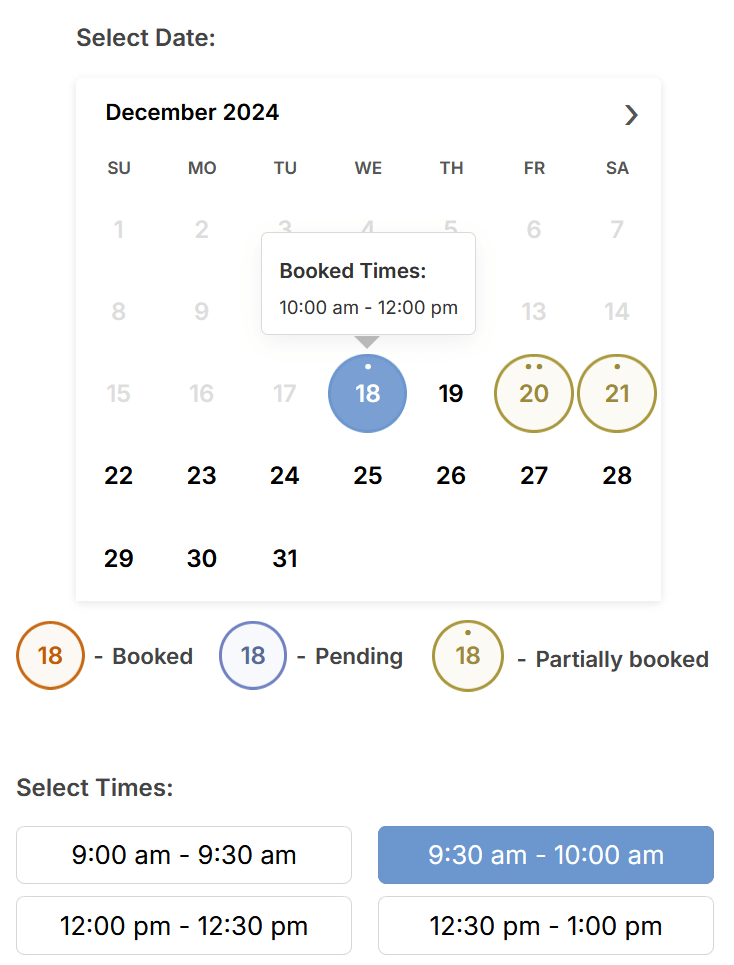
Setting Availability And Time Slots
Set your available days and hours clearly. Define time slots to match your service length. Avoid overlapping bookings by limiting slots per day. Use blackout dates for holidays or breaks. This keeps your schedule organized and reliable.
Customizing Booking Form Fields
Choose which details to collect from clients. Add fields like name, email, phone number, or special requests. Keep the form simple to avoid confusion. Required fields ensure important info is not missed. Custom forms improve client communication and service quality.
Payment Integration Options
Enable payment methods suitable for your business. Connect popular gateways like PayPal or Stripe. Allow full or partial payments during booking. Secure payment options build trust with customers. Clear payment settings reduce no-shows and late cancellations.
Notification And Confirmation Setup
Set up automatic emails or SMS alerts. Confirm bookings instantly to reassure clients. Send reminders before appointments to reduce missed bookings. Customize messages with client and booking details. Notifications keep everyone informed and improve customer service.
Add Booking Calendar To Your Site
Adding a booking calendar to your WordPress site helps visitors book appointments easily. It improves user experience and saves time managing schedules. There are simple ways to insert the calendar so it fits your site’s style and layout. Choose the method that best suits your needs and skills.
Using Shortcodes
Most booking calendar plugins provide shortcodes. Shortcodes are small codes you place anywhere on your site. Copy the shortcode from the plugin settings. Paste it into any page, post, or widget area. The calendar appears exactly where you put the shortcode. This method is fast and flexible for many users.
Embedding With Widgets
Widgets let you add content to sidebars or footers. Go to your WordPress dashboard and open the Widgets section. Find the booking calendar widget from the list. Drag and drop it into the sidebar or footer area. Adjust the settings if needed. The calendar will show up in the chosen widget area immediately.
Inserting Into Pages Or Posts
Open the page or post where you want the calendar. Click the plus (+) button to add a new block. Search for the booking calendar block or use a shortcode block. Paste the shortcode or select the calendar block. Save or update the page. Your booking calendar is now live on that page or post.
Test Your Booking System
Testing your booking system is a key step before going live. It ensures your calendar works correctly and your customers have a smooth experience. Check every feature carefully to avoid issues later.
Performing A Trial Booking
Start by making a test booking yourself. Choose dates and fill out the form as a customer would. Confirm the booking goes through without errors. Check if the booking appears in your admin panel.
Checking Email Notifications
Booking systems usually send confirmation emails. Check if you receive these emails after the test booking. Look for clear details about the booking. Verify that both the customer and admin get notifications.
Troubleshooting Common Issues
If the booking fails, find the cause quickly. Check plugin settings and payment options. Clear your site’s cache and try again. Review error messages and search plugin support for answers.
Credit: wpbookingcalendar.com
Optimize Booking Experience
Optimizing the booking experience on your WordPress site helps visitors book smoothly. A good booking process reduces confusion and saves time. It encourages users to complete their reservations without frustration. Focus on making the booking calendar easy to use on any device. Speed and clear design play a key role in user satisfaction.
Mobile Responsiveness
Many users book appointments using phones or tablets. The booking calendar must fit all screen sizes well. Choose a calendar plugin that adjusts to small screens automatically. Test the booking form on different devices to ensure it looks good. Buttons and fields should be easy to tap on smaller screens. A mobile-friendly booking system improves user trust and booking rates.
Speed And Performance Tips
Slow booking pages drive users away fast. Use a lightweight booking plugin to keep load times low. Optimize images and scripts related to the calendar for faster loading. Avoid too many extra features that can slow down your site. Use caching plugins to improve overall site speed. A fast booking calendar keeps users engaged and reduces drop-offs.
Enhancing User Interface
Clear and simple design helps users complete bookings easily. Use readable fonts and clear labels on the booking form. Highlight important steps like selecting a date or confirming details. Use colors wisely to guide user attention without causing distraction. Keep the layout uncluttered with enough spacing between fields. A clean user interface builds confidence and smooths the booking process.
Manage Bookings Efficiently
Managing bookings on your WordPress site helps keep your business organized. It saves time and avoids mistakes. A good booking calendar tool lets you handle appointments smoothly. You can check, change, and track bookings all in one place. This makes running your site easier and improves customer service.
Viewing And Editing Bookings
Access your bookings quickly from the WordPress dashboard. See details like date, time, and customer information. Edit bookings if changes are needed. Update times, add notes, or change client data. This keeps all information accurate and up to date. You stay informed and avoid double bookings or errors.
Exporting Booking Data
Export booking information as CSV or Excel files. This helps with offline review or sharing. Use the exported data for reports or backups. It supports your business records and planning. Exporting also makes it easy to analyze booking trends. Understand your busiest times and customer preferences better.
Handling Cancellations And Rescheduling
Allow customers to cancel or reschedule bookings easily. Update your calendar right away to free up spots. Send automatic notifications to inform clients about changes. This reduces confusion and missed appointments. Clear cancellation policies protect your business. Manage changes with a simple, user-friendly system.

Credit: formidableforms.com
Credit: wpbookingcalendar.com
Frequently Asked Questions
How Do I Install A Booking Calendar Plugin In WordPress?
To install, go to your WordPress dashboard, click Plugins > Add New. Search for a booking calendar plugin, then click Install and Activate. Once activated, configure settings as needed to start using it on your site.
Can I Customize Booking Calendar Appearance In WordPress?
Yes, most booking calendar plugins offer customization options. You can change colors, fonts, and layout to match your website’s style. Check your plugin’s settings or documentation for specific customization features available.
How To Sync Booking Calendar With Google Calendar?
Many booking plugins support Google Calendar sync. You need to connect your Google account via plugin settings. This keeps your appointments updated automatically across both platforms for better scheduling management.
Is A Booking Calendar Plugin Free Or Paid?
There are both free and premium booking calendar plugins. Free versions offer basic features, while paid versions provide advanced options like payment integration and notifications. Choose based on your website needs and budget.
Conclusion
Adding a booking calendar to your WordPress site makes scheduling simple. Visitors can book appointments quickly without confusion. Choose a plugin that fits your needs and customize it easily. Test the calendar to ensure it works smoothly for users. Regular updates keep your booking system safe and reliable.
A clear calendar improves user experience and saves time. Start today to make managing bookings easier for everyone.


