
Are you looking to make your WordPress site more visually engaging? Adding a banner to your WordPress theme can be a game-changer, grabbing your visitors’ attention and conveying your message right from the start.
Imagine transforming your website’s look, enhancing its appeal, and guiding your audience effortlessly to where you want them to go. In this guide, you’ll discover the simple steps to seamlessly integrate a banner into your WordPress theme, elevating your site’s aesthetic and functionality.
By the end, you’ll not only know how to add a banner but also understand how to use it effectively to boost your site’s performance. Ready to captivate your audience and stand out from the crowd? Let’s dive in!
Choosing The Right Banner
Selecting the perfect banner enhances your WordPress site. Easily add one through the theme’s customization settings. Customize size, image, and text for a professional look.
Identify Purpose
A banner can grab attention. It can also share important messages. Ask why you need a banner. Is it for a sale? Maybe a new product? Purpose helps in making the right choice.
Select Design Style
Choose a design style that matches your theme. Bright colors can make a banner pop. Simple designs can look neat. Ensure the banner’s look fits your site’s feel. The right style attracts the right audience.
Determine Size And Placement
Size matters in banners. A large banner can be bold. A small one might be subtle. Pick a size that suits your content. Placement is crucial too. Top of the page banners get noticed first. Side banners can be less intrusive. Decide where your banner will shine best.
Preparing Your Banner
Easily add a banner to your WordPress theme by accessing the theme’s customizer. Choose the header section, upload your banner image, and adjust the size to fit perfectly. Save changes to see your new banner live on your site.
Design Tools And Resources
Choose tools that are easy to use. Canva is great for beginners. Adobe Spark is also user-friendly. These tools offer templates. Templates save time and effort. Use online resources for inspiration. Websites like Unsplash provide free images. Make sure to check licenses. Always use high-quality images for your banner.
Image Formats And Resolutions
Images need to be clear. PNG and JPEG are common formats. PNG is better for graphics. JPEG works well for photos. Resolution is important. High resolution looks sharp. Low resolution appears blurry. Aim for at least 72 DPI for web use. Always keep file size manageable.
Testing For Responsiveness
Check your banner on different devices. It should look good on phones and computers. Use tools to test responsiveness. Google Mobile-Friendly Test is helpful. Ensure text is readable. Images must not be cut off. Adjust sizes if needed. Responsive design improves user experience.
Uploading Your Banner
First, log in to your WordPress account. Look for the Dashboard on the left side. Click on it to start. This is where you control your website.
Find Appearance in the Dashboard. Click on it. Then select Theme Settings. Here, you will see options for your theme. Explore them to find where banners go.
Click on Media from the Dashboard. Select Add New. Choose your banner image to upload. Wait for it to finish. Once done, go back to Theme Settings. Select your banner from the library. Save your changes to apply.
Integrating Banner With Customizer
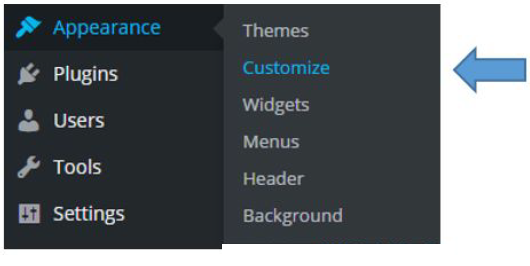
First, open your WordPress dashboard. Find the Appearance menu. Click on Customizer. This section helps you to add a banner. Look for Header or Banner section. It might have different names based on your theme. Once found, click it. Now, you can upload your banner image. Make sure the image is the right size. Save it to see the changes.
Check the display settings for your banner. You may want it on all pages. Or just the homepage. Some themes offer placement options. Choose what fits your needs. Ensure the banner looks good on mobiles. Preview changes often. This helps in getting the best look.
Always use the preview option. It shows how your banner looks live. If happy, hit Save. This keeps your work. Changes will now show on your site. If not happy, change settings again. Preview until satisfied. This ensures your banner looks perfect.
Adding Banner Via Theme Editor
Accessing the theme editor is easy. First, log into your WordPress admin panel. Navigate to Appearance and click on Theme Editor. This area lets you see and change theme files. Be careful when editing files here. Mistakes can break your site.
Find the header.php file in the theme editor. This file controls the header part of your site. Click on it to open. Look for the HTML structure of your header. You will add your banner code here. Make sure not to delete existing code.
Paste your banner code into the header.php file. Choose the right spot where your banner should show. Usually, banners go near the top. Save your changes after adding the code. Check your website to see the banner.

Credit: wpastra.com
Utilizing Plugins For Banner Addition
Adding banners to WordPress themes becomes simple using plugins. These tools offer easy customization options, allowing users to enhance website aesthetics effortlessly. Choose a plugin, upload your banner, and enjoy a visually appealing site.
Selecting Suitable Plugins
Choosing the right plugin is important for your banner. Look for plugins with good reviews. Check if they have regular updates. Choose plugins that fit your theme style. Make sure they are easy to use.
Installing And Activating Plugins
First, go to your WordPress dashboard. Find the plugins section. Search for the plugin you want. Click on ‘Install Now’ button. Once installed, press ‘Activate’. Your plugin is ready to use.
Configuring Plugin Settings
Open the plugin settings. Set your banner size and position. Add images or text to your banner. Adjust colors and fonts. Preview changes before saving. Make sure everything looks good. Save your settings.
Testing And Troubleshooting
Adding a banner in WordPress themes involves selecting the right widget area. Then upload your desired image through the media library. Adjust the display settings to fit your theme’s layout.
Ensuring Compatibility Across Devices
Test banners on different devices like phones, tablets, and computers. Check for any display issues. Make sure banners look good and load fast. Use tools to test on popular browsers. Confirm that the banner works well on Chrome, Firefox, and Safari. Don’t forget about older versions too. A compatible banner improves user experience.
Addressing Common Issues
Sometimes banners might not appear correctly. Check your theme’s settings first. Update your theme to fix bugs. Verify your banner plugin is updated. Clear your browser cache if banners don’t show. Look into CSS conflicts. Adjust styles to fix display problems. Regular checks can prevent banner errors.
Seeking Support And Resources
Find help in online forums. WordPress communities offer guidance. Consider checking developer documentation for detailed instructions. Tutorials provide step-by-step help. If issues persist, contact theme support. Developers can assist with technical problems. Use resources wisely for effective troubleshooting.
Credit: www.library.illinois.edu
Credit: thimpress.com
Frequently Asked Questions
How Do I Add A Banner In WordPress?
To add a banner, go to your WordPress dashboard. Click on ‘Appearance’, then ‘Customize’. Navigate to ‘Header’ or ‘Banner Settings’. Upload your image and adjust size and position. Save changes. Some themes may have additional options for customizing banners.
Can I Use Plugins For Banners In WordPress?
Yes, plugins like ‘Simple Banner’ or ‘Header Footer Code Manager’ can help. Install and activate the plugin from the WordPress repository. Follow the plugin’s instructions to add and customize your banner. These plugins offer more flexibility and options for advanced banner settings.
What Size Should A WordPress Banner Be?
Banner size varies depending on the theme. Typically, it should be around 1200×600 pixels for optimal display. Check your theme’s documentation for recommended sizes. Adjust the image dimensions accordingly to ensure it fits well and looks professional on your site.
Are Custom Banners Possible In WordPress Themes?
Yes, custom banners are possible. Use the theme’s customization settings or a plugin. Upload your custom-designed banner image. Adjust the size, position, and other settings as needed. Ensure your banner aligns with your site’s branding and theme aesthetics for a cohesive look.
Conclusion
Adding a banner in WordPress enhances your site’s appeal. It draws attention and conveys important messages. Follow the steps to insert banners with ease. Customizing your banner makes your website unique. Remember to keep it simple and relevant. Regular updates can keep your content fresh.
Banners are a powerful tool for engagement. Test different designs to see what works best. Always consider your audience’s needs. A well-placed banner can make a big difference. Happy designing and enjoy your improved website!


