
Are you looking to make your WordPress website smarter and more interactive? Adding an API can open up a world of possibilities, from displaying live data to connecting with other apps seamlessly.
But if you’re wondering how to add an API to your WordPress site without getting lost in technical jargon, you’re in the right place. This guide will walk you through simple, clear steps to help you integrate APIs quickly and confidently.
Stick with me, and you’ll have your site working smarter in no time.
Credit: realtyna.com
Why Add An Api To WordPress
Adding an API to your WordPress website improves its power and flexibility. APIs help websites communicate with other software smoothly. This connection lets your site do more and offer better experiences to visitors.
APIs allow your WordPress site to access new features without heavy coding. They save time and effort while opening doors to fresh possibilities. Understanding why APIs matter helps you decide how to use them best.
Benefits Of Api Integration
API integration makes your site faster and smarter. It connects your site with external tools easily. This adds new functions like payment gateways or social media feeds.
It also improves user experience by providing real-time updates and personalized content. APIs reduce manual work by automating tasks. This helps you manage your site more efficiently.
Common Use Cases
Many WordPress sites use APIs for different purposes. For example, e-commerce sites connect to payment processors through APIs. Blogs use APIs to show social media posts automatically.
Other sites use APIs to fetch data from external sources. Booking systems, weather widgets, and email marketing tools often rely on APIs. These uses make your website more interactive and useful.

Credit: rudrastyh.com
Choosing The Right Api
Choosing the right API for your WordPress website is important. The right API improves your site’s features and user experience. It helps your website connect with other services easily. A good API saves time and avoids future problems. Understanding the types of APIs and key factors helps you pick the best one.
Types Of Apis For WordPress
WordPress supports many APIs to add functions and data. REST API is popular for connecting with external apps and services. It uses simple web calls and returns data in JSON format. SOAP API works with more complex systems and uses XML. Some plugins offer their own APIs for extra features. Payment APIs help accept online payments securely. Social media APIs allow sharing and login options. Choose an API that fits your site’s needs and technical level.
Factors To Consider
Check API compatibility with your WordPress version. Easy-to-use APIs save time and reduce errors. Look for clear documentation and support from the API provider. Speed matters; slow APIs can hurt your site’s performance. Security is key; avoid APIs with weak protection. Consider the API’s cost and usage limits. Test the API in a safe environment before live use. Choose an API that grows with your website’s needs.
Preparing Your WordPress Site
Preparing your WordPress site before adding an API is important. This step helps keep your site safe and ensures smooth integration. Taking time to prepare avoids common problems later. Follow these simple steps to get ready.
Backup And Security Measures
Start with a full backup of your site. Save all files and the database. This protects your content if something goes wrong. Use trusted backup plugins or your hosting provider’s tools.
Next, check your site’s security. Update WordPress, plugins, and themes to the latest versions. Use strong passwords and limit login attempts. Consider a security plugin for extra protection.
Plugin And Theme Compatibility
Check if your plugins and themes work well with the new API. Some plugins may conflict and cause errors. Update all plugins and themes before adding the API.
Test your site in a staging environment. This lets you see if anything breaks. Fix conflicts before applying changes on your live site.
Methods To Add Api
Adding an API to your WordPress website can improve its features and functionality. There are two main ways to do this. Each method suits different skill levels and needs.
Using plugins is the easiest way. It requires little technical knowledge. Manual code integration gives more control but needs coding skills.
Using Plugins
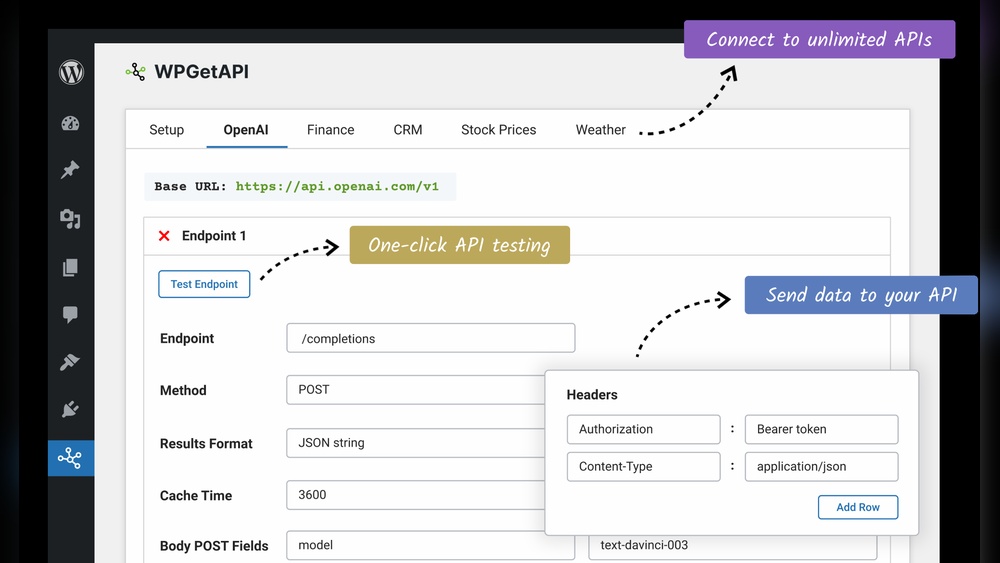
Plugins let you connect APIs without writing code. Many plugins support popular APIs. You just install and activate the plugin.
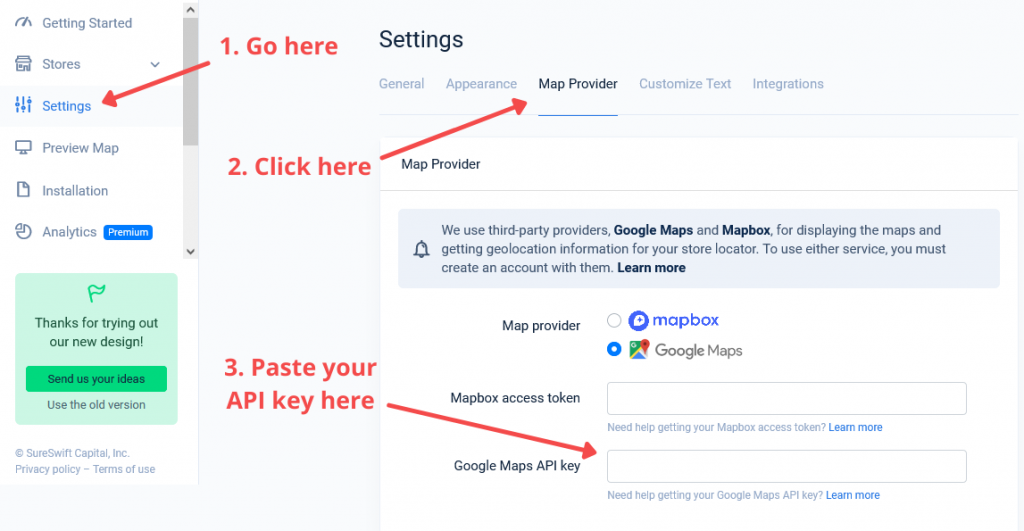
After activation, enter the API key or credentials in the plugin settings. The plugin handles the communication with the API. This method saves time and reduces errors.
Choose plugins with good reviews and regular updates. This ensures security and compatibility with WordPress.
Manual Code Integration
Manual code integration means adding API calls directly into your theme or plugin files. This method needs basic knowledge of PHP and APIs.
You write code to send requests and receive data from the API. Then, display the data on your site as needed.
This method offers full customization and flexibility. You control how the data appears and works.
Always test your code in a staging environment before applying it live. This prevents breaking your site.
Step-by-step Api Integration
Integrating an API into your WordPress website can enhance its functionality. It allows your site to communicate with other services. Follow these simple steps to connect an API smoothly and securely.
Getting Api Credentials
First, you need API credentials. These usually include a key and a secret. Visit the API provider’s website to register your application. Once registered, you will receive your unique credentials. Keep them safe and do not share publicly.
Configuring Api Settings
Next, log in to your WordPress dashboard. Locate the plugin or theme that supports API integration. Enter your API key and secret into the provided fields. Adjust any additional settings like endpoints or request types. Save your changes to apply the configuration.
Testing Api Connection
Finally, test the API connection to ensure it works. Use built-in tools or plugins to verify the link. Check for successful responses from the API server. Fix any errors or issues before going live. This step ensures your site communicates correctly with the API.
Troubleshooting Common Issues
Troubleshooting common issues is an important step when adding an API to your WordPress website. Errors can stop your API from working properly. Fixing these problems quickly keeps your site running smoothly. This section covers typical problems and simple solutions. Follow these tips to handle errors easily and improve your API connection.
Authentication Errors
Authentication errors happen when the API cannot verify your credentials. Check your API key or token carefully. Make sure you enter the correct details without extra spaces. Some APIs require OAuth or other methods; follow their instructions exactly. Also, check if your API key has expired or if you need new permissions. Keep your keys safe and do not share them publicly.
Data Retrieval Problems
Data retrieval problems occur when the API returns no data or wrong data. Verify the API endpoint URL is correct. Confirm your request format matches the API documentation. Sometimes, filters or parameters cause issues; try simpler requests first. Check if the API server is down by testing with tools like Postman. Look at the response codes; they tell you if the request failed or succeeded.
Performance Optimization
Slow API responses can hurt user experience. Use caching to store API data temporarily. This reduces the number of requests to the server. Limit the amount of data you request by using filters or pagination. Avoid calling the API on every page load. Set up background jobs to update data less often. Monitor your API usage to stay within limits and avoid throttling.
Enhancing Api Functionality
Enhancing API functionality on your WordPress site helps improve user experience and site performance. It allows your website to communicate better with other apps and services. This section explains how to extend your API capabilities for more dynamic and automated interactions.
Custom Endpoints
Custom endpoints let you create new API paths tailored to your needs. These endpoints handle specific requests beyond the default WordPress API. By adding custom endpoints, you control the data sent and received.
To create a custom endpoint, use WordPress hooks like rest_api_init. Register your endpoint with the correct URL and permissions. This way, you ensure security and proper access control.
Custom endpoints help deliver unique content or functions to your users. For example, you can build a special API route for user profiles or product details.
Automating Api Requests
Automation saves time by running API tasks without manual work. You can schedule regular data fetching or updates using WordPress cron jobs. This keeps your site data fresh and accurate.
Use PHP functions like wp_remote_get and wp_remote_post to make API calls automatically. Combine these with hooks such as wp_schedule_event for timed execution.
Automating requests ensures your website stays synced with external services. It reduces errors and improves reliability, offering a smoother experience for visitors.
Credit: www.storemapper.com
Maintaining Api Integration
Maintaining API integration is important to keep your WordPress site running smoothly. APIs change over time. Your site must adapt to these changes to avoid errors. Regular care ensures your features stay functional and secure.
Good maintenance helps you catch problems early. It also improves user experience and site reliability. A few simple steps can keep your API integration healthy.
Regular Updates
Check for API changes from the provider often. API versions can update or get deprecated. Update your API keys and tokens when required. Keep your WordPress plugins and themes up to date. New versions may fix bugs or improve API handling.
Test your API calls after updates. This confirms everything works as expected. Avoid using outdated API endpoints to prevent failures.
Monitoring And Analytics
Set up monitoring to track API performance and errors. Watch for slow responses or failed requests. Use tools to log API activity. These logs help identify issues quickly.
Analyze the data to understand usage patterns. Spot unusual activity or spikes in errors. Monitoring helps you fix problems before users notice them.
Frequently Asked Questions
What Is An Api And Why Add It To WordPress?
An API allows your WordPress site to connect with other services. It enhances functionality by integrating external data or features seamlessly.
How Do I Add An Api To WordPress Website?
You add an API by using plugins or custom code. First, get the API key, then configure it in your WordPress settings or theme files.
Which Plugins Help Integrate Apis In WordPress?
Popular plugins include WPForms, REST API Client, and Custom API plugins. They simplify API integration without deep coding knowledge.
Can I Add Rest Api To WordPress Without Coding?
Yes, several plugins offer no-code REST API integration. They let you connect APIs through simple user interfaces.
Conclusion
Adding an API to your WordPress site is simpler than it seems. Follow the steps carefully to avoid errors. Test your API connection before going live. This helps keep your website running smoothly. APIs add useful features and improve user experience.
Keep your API keys safe and update plugins regularly. This keeps your site secure and fast. Practice makes perfect. Try different APIs to find what works best. Your website can grow with the right tools and care.


