
Are you looking to boost your WordPress site’s functionality by adding an API but don’t know where to start? You’re in the right place.
Adding an API can open up new possibilities, like connecting your site to external services, automating tasks, or enhancing user experience. But the process might seem confusing if you’re not a developer. Don’t worry—this guide will break it down into simple, clear steps you can follow right now.
By the end, you’ll know exactly how to integrate an API with your WordPress site and unlock its full potential. Ready to transform your website? Let’s dive in.
What Is An Api
An API, or Application Programming Interface, is a tool that lets different software programs talk to each other. It acts like a bridge, helping two apps share data and commands.
APIs make it easy to connect features from one app to another. For example, showing weather info on your website or accepting payments online.
How Does An Api Work?
An API sends requests and receives responses between apps. One app asks for data or action. The other app sends the needed info back.
This exchange happens fast and follows strict rules. These rules keep data safe and organized.
Why Use An Api With WordPress?
APIs let you add new features to your WordPress site. You can show external content or connect with other services.
Using APIs saves time. You don’t need to build everything from scratch.
Common Types Of Apis
There are many APIs, like REST and SOAP. REST is popular for web apps. It uses simple commands and formats.
APIs can provide data, allow actions, or connect tools.
Benefits Of Using Apis In WordPress
Using APIs in WordPress brings many benefits. APIs help connect your site with other services. This connection can make your website more powerful and flexible.
APIs allow you to add new features without heavy coding. They save time and reduce errors by automating tasks. APIs also help your site stay up-to-date with the latest tools and data.
Improved Website Functionality
APIs let you add new tools and services easily. You can integrate payment gateways, social media, and more. This improves user experience and keeps visitors engaged.
Faster Development Process
APIs reduce the need to build features from scratch. You can use existing services to save time. This helps launch your site or new features quickly.
Better Data Management
APIs allow smooth data exchange between your site and other platforms. This keeps your data accurate and updated automatically. It avoids manual errors and saves time.
Enhanced Customization
APIs provide options to tailor your website to your needs. You can choose which services to connect and how they work. This makes your site unique and user-friendly.
Choosing The Right Api For Your Site
Choosing the right API for your WordPress site is important. The API must fit your site’s needs and goals. The right API can improve your site’s features and user experience. It can also save time and effort in development.
Think about what you want the API to do. Different APIs offer different functions. Some help with social media, others with payments or data management. Pick one that matches your site’s purpose.
Understand Your Site’s Requirements
Know your site’s main function clearly. What features do you want to add? What data should the API handle? This helps narrow down your options. Avoid APIs that have too many or too few features.
Check Api Compatibility
Make sure the API works well with WordPress. Some APIs need special plugins or code. Look for APIs that are easy to integrate. Compatibility saves you from technical problems.
Consider Api Reliability And Support
Choose APIs that are reliable and stable. Check if the API provider offers good support. Look for documentation, community forums, and updates. Reliable APIs reduce site downtime and errors.
Review Api Costs And Limits
Some APIs are free, others charge fees. Understand the pricing and usage limits. Pick an API that fits your budget. Avoid unexpected costs by reading terms carefully.
Evaluate Security Features
Security is critical for your site and users. Choose APIs with strong security measures. Look for data encryption and secure authentication methods. Protect your site from hacks and data leaks.

Credit: www.youtube.com
Preparing Your WordPress Site
Preparing your WordPress site is an important step before adding an API. It helps keep your site safe and ready for new features. Taking a few simple actions can prevent problems later. Follow these steps carefully.
Backup Your Site
Always create a full backup of your WordPress site first. This saves your files and database. Backups protect your site if something goes wrong during the API setup. Use a plugin or your hosting service to make a backup. Store the backup file in a safe place.
Install Required Plugins
Some APIs need specific plugins to work. Check the API documentation to see what plugins you need. Install and activate these plugins on your site. Plugins help connect the API and your WordPress smoothly. Keep plugins updated for better security and performance.
Generating Api Keys
Generating API keys is a key step in connecting your WordPress site to external services. These keys act like passwords that allow your site to communicate safely with other platforms. Without them, your WordPress site cannot access the data or features of the API.
API keys must be created carefully to ensure security. The process involves accessing the provider’s dashboard and setting up keys with the right permissions. The goal is to give your site access while protecting your data.
Accessing Api Provider Dashboard
Start by logging into the API provider’s website. Look for a section called “API” or “Developer” dashboard. This area lets you manage your API keys and settings.
Each provider may have a different layout, but the process is similar. Find the option to create a new API key. You might need to provide some information about your WordPress site.
Once you enter the details, the dashboard generates a unique key. Copy this key and keep it safe. It will be needed later in your WordPress settings.
Creating And Securing Keys
Create keys with only the permissions your site needs. Avoid giving full access if not required. This limits potential damage if the key is exposed.
Use strong names or labels for your keys. This helps identify them later. Set expiration dates if the provider allows it. This adds extra security by limiting key lifetime.
Never share your API keys publicly. Keep them private and store them securely. Use WordPress plugins or environment files to protect these keys from exposure.
Credit: realtyna.com
Adding The Api Using Plugins
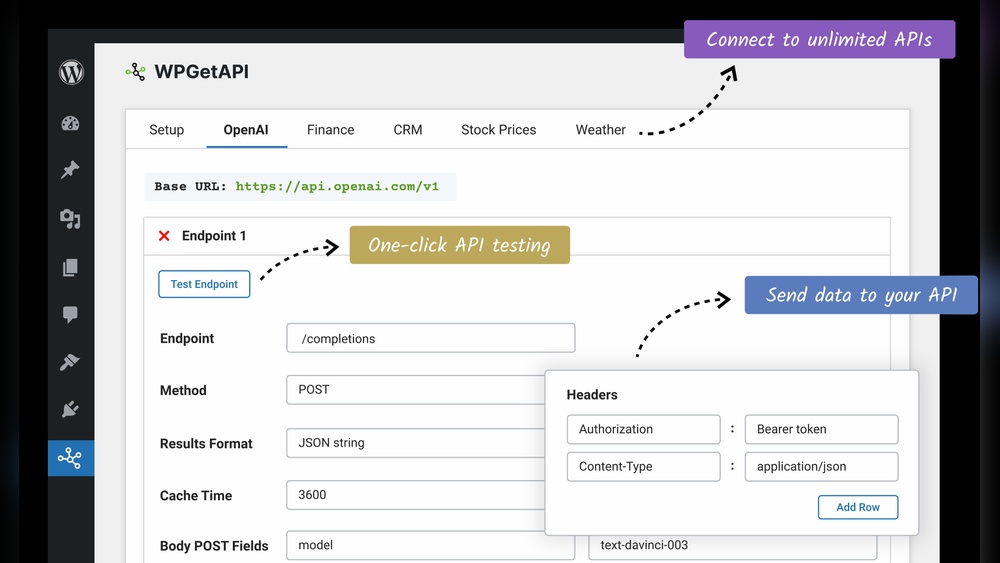
Adding an API to WordPress can be simple with the right plugin. Plugins help connect your site to external services quickly. They handle most of the technical work for you. This section shows how to add an API using plugins in WordPress.
Selecting A Suitable Plugin
Choose a plugin that fits your API needs. Check the plugin’s reviews and ratings before installing. Look for plugins updated recently to ensure compatibility. Read the plugin description to see if it supports your API type. Pick one with clear instructions and good support. Avoid plugins with few downloads or poor feedback.
Configuring Plugin Settings
After installing, open the plugin settings page in WordPress. Enter the API key or token provided by the service. Set the API endpoint URL if required by the plugin. Adjust any additional options, like request limits or data format. Save your settings and test the connection. Fix errors by double-checking keys and URLs. Proper setup ensures the API works smoothly on your site.
Manual Api Integration
Manual API integration in WordPress allows direct control over how the API works with your site. It involves adding custom code to connect and interact with the API. This process is ideal for developers and site owners who want specific functionality without relying on plugins.
Manual integration requires basic knowledge of PHP and WordPress theme structure. The following steps explain how to safely add API calls to your WordPress site.
Editing Theme Files
Start by locating your active theme folder. This is found in the wp-content/themes directory.
Choose the file where you want the API data to appear. Common files include header.php, footer.php, or a custom template.
Open the file in a code editor and insert your API request code using PHP. Be careful to keep the syntax correct to avoid errors.
Save the changes and upload the file back to the server if you use FTP.
Using Functions.php
The functions.php file is a safer place for API integration code. It keeps your theme files cleaner.
Open the functions.php file of your active theme. Add a function to handle API requests.
Use WordPress hooks to run your API function at the right time. For example, use init or wp_enqueue_scripts hooks.
This method keeps your code organized and easier to maintain during theme updates.
Testing The Integration
Clear your browser cache after uploading your changes. This ensures you see the latest version of your site.
Visit the page where you added the API code. Check if the data from the API appears correctly.
Use browser developer tools to inspect errors or debug issues. Look for PHP errors or failed API calls.
Test the API with different inputs if possible. Confirm it works smoothly under various conditions.
Handling Api Responses
Handling API responses is a key step after connecting your WordPress site to an API. The response contains the data you need to show on your site. This data often comes in formats like JSON or XML. Properly reading and using this data ensures your site displays fresh and accurate information.
Understanding how to process API responses helps you build better features. It keeps your site dynamic and engaging. Below, learn how to parse common data formats and display the information clearly.
Parsing Json Or Xml Data
APIs usually return data in JSON or XML formats. JSON is a popular choice because it is easy to read and work with. To parse JSON data in WordPress, use the built-in json_decode() function. It converts the JSON string into a PHP object or array.
XML data needs a different approach. Use PHP’s simplexml_load_string() function to turn the XML string into an object. This makes it easier to access the data elements.
Always check if the data is valid before using it. This avoids errors on your site. Handling errors properly also improves user experience.
Displaying Data On Your Site
After parsing, the next step is to show the data to your visitors. Use WordPress functions like echo or template tags inside your theme files. Format the data in a way that matches your site’s style.
Create lists, tables, or simple text blocks to make the data clear. Use HTML tags such as , or to structure the content. Keep the design clean and easy to read.
Refreshing the data regularly keeps your site up to date. You can set up cron jobs or use plugins to automate this process.
Troubleshooting Common Issues
Adding an API to WordPress can sometimes bring up problems. Knowing how to fix these common issues saves time and stress. This section helps you solve typical troubles fast. Clear steps guide you through each problem, making your API work smoothly.
Authentication Errors
Authentication errors happen when WordPress cannot verify your API credentials. Check if your API key or token is correct. Ensure you use the right authentication method, like OAuth or Basic Auth. Sometimes, expired tokens cause errors. Refresh or generate new tokens to fix this. Also, check if your user has permission to access the API. Without proper roles, access will be denied.
Timeouts And Rate Limits
Timeouts occur when the API takes too long to respond. Slow servers or heavy traffic often cause this. Try increasing the timeout setting in WordPress. Rate limits stop your site from sending too many requests quickly. Most APIs limit requests per minute or hour. If you hit these limits, wait before sending more requests. Use caching to reduce repeated calls and avoid limits.

Credit: rudrastyh.com
Optimizing Api Performance
Optimizing API performance is key to a smooth WordPress site. Slow APIs can cause delays and poor user experience. Efficient API use saves server resources and reduces loading time. This section covers simple ways to boost API speed and reliability.
Caching Api Data
Caching stores API responses temporarily. It cuts down the need to call the API repeatedly. Use WordPress transients or plugins for caching. Cached data loads faster than live API calls. Set cache duration based on how often data changes.
Limiting Api Requests
Too many API calls slow your site and risk hitting limits. Limit requests by fetching data only when needed. Use conditional logic to avoid unnecessary calls. Combine multiple API calls into one if possible. This keeps your site fast and stable.
Frequently Asked Questions
What Is The Easiest Way To Add An Api To WordPress?
The easiest way to add an API to WordPress is by using plugins like WP REST API or custom code. Plugins simplify integration without coding. Custom code allows flexibility but requires programming knowledge. Choose based on your skill and project needs.
How Do I Authenticate Api Requests In WordPress?
You can authenticate API requests in WordPress using methods like OAuth, API keys, or JWT tokens. Authentication ensures secure data exchange. Most plugins support these methods, or you can implement custom authentication in your code for enhanced security.
Can I Use Third-party Apis With WordPress?
Yes, WordPress supports third-party API integration. Use plugins or custom code to connect external services like payment gateways, social media, or analytics. This expands your site’s functionality and enhances user experience effectively.
How To Handle Api Errors In WordPress?
Handle API errors by checking response codes and messages. Implement error logging and user-friendly notifications. Use try-catch blocks in custom code or rely on plugin error handling features for smoother API interactions.
Conclusion
Adding an API to WordPress can boost your site’s features. It allows your site to share and receive data easily. Follow simple steps to connect the API properly. Test your setup to ensure everything works well. This process helps your website stay modern and useful.
Keep your API keys safe and update them regularly. Practice makes perfect, so try it on a test site first. With patience, you can enhance your WordPress site efficiently. Keep learning, and your skills will grow over time.


