

Are you ready to turn your WordPress blog into a money-making machine? Adding ads to your blog can be one of the smartest moves you make to start earning passive income.
But how do you do it without overwhelming your readers or messing up your site’s design? This guide will walk you through simple, clear steps to add ads that fit your style and keep your visitors engaged. By the end, you’ll have the tools to boost your blog’s earning potential while keeping your audience happy.
Let’s dive in and make your blog work for you!
Choosing The Right Ad Network
Choosing the right ad network for your WordPress blog is a key step. The ad network controls the types of ads you display. It also affects your earnings and user experience. Picking the right network helps you make money without annoying your visitors. This guide will explain popular options, important factors, and revenue potential.
Popular Ad Networks For WordPress
Google AdSense is the most popular choice. It offers many ad types and good payouts. Media.net is another option, focusing on contextual ads. Amazon Native Shopping Ads show products related to your content. AdThrive suits blogs with high traffic and offers premium ads. Ezoic uses AI to optimize ad placement and revenue.
Factors To Consider When Selecting
Check the ad network’s compatibility with WordPress. Consider how easy it is to set up. Look at the ad formats available. Think about the impact on your site speed and design. Review the minimum traffic requirements. Also, read reviews about their customer support. Make sure the network follows privacy laws like GDPR.
Comparing Revenue Potential
Google AdSense usually pays well for most niches. Media.net works best for content with strong keywords. Amazon Native Shopping Ads earn through product sales. AdThrive offers higher revenue but needs more traffic. Ezoic can increase earnings by testing ad placements. Your niche and audience affect which network earns more.
Credit: themegrill.com
Preparing Your WordPress Blog
Preparing your WordPress blog before adding ads is important. A well-prepared blog improves user experience and increases ad revenue. Focus on three key areas: site speed, mobile compatibility, and ad-friendly layouts.
Optimizing Site Speed
Fast loading pages keep visitors on your site longer. Use a reliable hosting service to boost speed. Compress images to reduce file size without losing quality. Install caching plugins to serve pages faster. Minimize the use of heavy scripts and plugins. Test your site speed regularly using tools like Google PageSpeed Insights.
Ensuring Mobile Compatibility
Most visitors browse on mobile devices. Your blog must look good and work well on phones and tablets. Choose a responsive WordPress theme that adjusts to screen sizes. Check that fonts and buttons are easy to see and tap. Avoid pop-ups that cover content on small screens. Test your blog on different devices to ensure smooth navigation.
Setting Up Ad-friendly Layouts
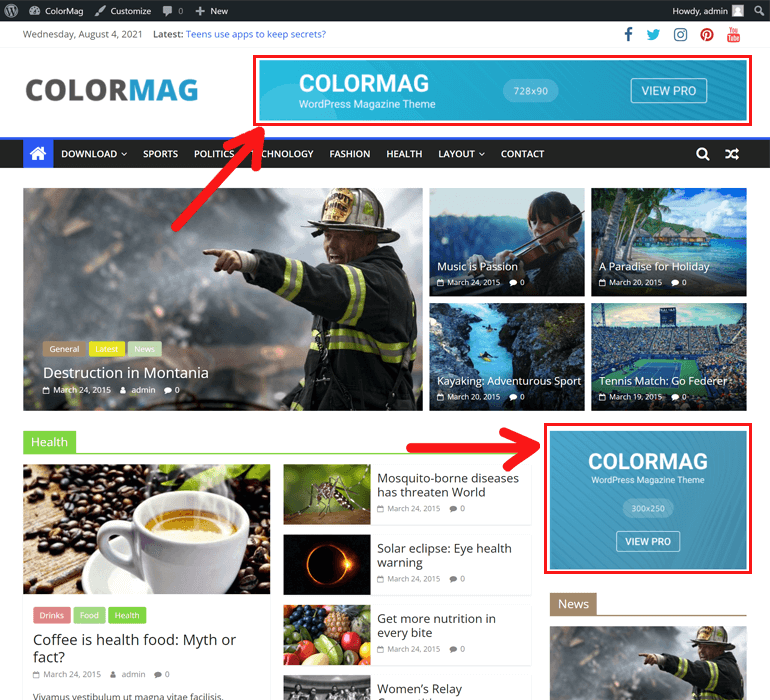
Place ads where they attract attention but don’t annoy readers. Use clean, simple layouts with clear spaces for ads. Common spots include the header, sidebar, and within content. Avoid cluttering pages with too many ads. Use WordPress widgets or ad management plugins for easy placement. Make sure ads do not slow down your blog or interfere with content.
Installing Ad Plugins
Installing ad plugins on your WordPress blog makes managing ads simple. These plugins help place ads in the best spots without coding. They let you control how and where ads appear. This improves your chances to earn money from your blog.
Top Ad Management Plugins
Several ad plugins work well with WordPress. Ad Inserter is popular for its ease and features. Advanced Ads offers many options for ad placement. WP Quads is lightweight and good for beginners. These plugins support different ad types, including Google AdSense.
Step-by-step Plugin Installation
Start by logging into your WordPress dashboard. Go to the “Plugins” section and click “Add New.” Search for your chosen ad plugin by name. Click “Install Now” and wait for the process to finish. After installation, click “Activate” to enable the plugin.
Configuring Plugin Settings
Open the plugin’s settings page in the dashboard. Choose where to place your ads, such as before posts or in sidebars. Set how often ads should appear on your blog pages. Enter your ad codes or connect your ad network account. Save changes to apply your settings immediately.
Credit: www.wpbeginner.com
Adding Ads Manually
Adding ads manually to your WordPress blog gives you full control over where and how ads appear. You can place ads in sidebars, within posts, or even in your website’s code. This method requires some basic knowledge of HTML and WordPress tools but offers great flexibility.
Manual ad placement helps you customize your blog’s look. You decide the size, position, and style of each ad. This approach often leads to better user experience and higher ad revenue.
Inserting Code In Widgets
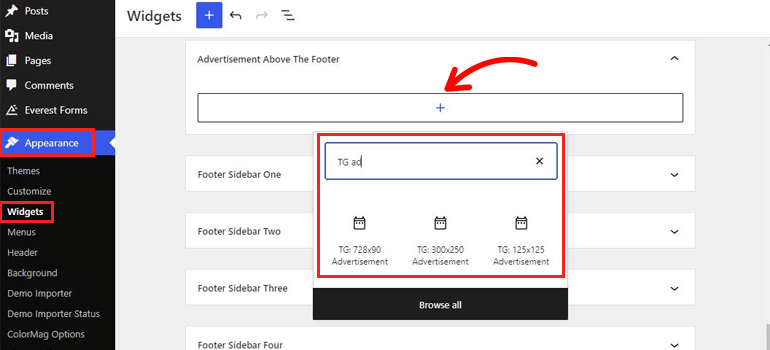
Widgets are small blocks that add content to sidebars or footers. WordPress lets you insert HTML code directly into these widgets. Go to Appearance > Widgets, then drag a Custom HTML widget to the sidebar area.
Paste your ad code into the widget’s content box. Save the widget, and the ad will show up in your sidebar or footer. This method works well for banner ads or small display ads.
Embedding Ads In Posts And Pages
You can place ads inside blog posts or pages for better visibility. Open the post editor and switch to the HTML or Code view. Paste the ad code where you want the ad to appear.
This method lets you add ads between paragraphs or after specific content. It can boost ad clicks by placing ads close to your main content. Remember to check how the ad looks on mobile devices.
Using Theme Files For Ads
For advanced users, editing theme files allows ads to appear site-wide. Access your theme’s files via Appearance > Theme Editor or using FTP. Locate files like header.php, footer.php, or single.php.
Insert your ad code in the desired location within these files. For example, placing code in header.php shows ads at the top of every page. Be cautious and back up files before making changes.
Placing Ads For Maximum Impact
Placing ads for maximum impact helps increase clicks and revenue. Strategic ad placement draws attention without annoying visitors. It improves both user experience and ad performance. Careful planning and testing ensure ads fit well with your content.
Best Ad Positions On Blog
Top positions include above the header and within the content. Ads near the beginning of an article catch readers early. Sidebar ads stay visible while users scroll. Footer ads work well for less intrusive messages. Use a mix to reach visitors at different moments.
Balancing User Experience And Ads
Too many ads can frustrate readers. Keep ads clear but not overwhelming. Space ads evenly to avoid clutter. Match ad style with your blog’s look. Respect visitors by not forcing ads on every page.
Testing And Adjusting Ad Placement
Regularly check which ads get the most clicks. Use tools like Google Analytics to track performance. Try different spots and sizes to find what works best. Adjust based on visitor behavior and feedback. Continuous testing leads to better results over time.
Credit: themegrill.com
Tracking Ad Performance
Tracking ad performance is important for every WordPress blog owner. It helps you see how well your ads are doing. You can find out which ads bring more visitors and which ads do not. This information helps you make better decisions. You can improve your blog’s earnings by tracking ads.
Using Analytics Tools
Analytics tools show you detailed data about your ads. Google Analytics is one popular tool. It tracks visitors and their actions on your blog. You can see which ads get the most views and clicks. Other tools like AdSense provide reports on ad earnings. These tools give clear numbers to understand ad success.
Monitoring Click-through Rates
Click-through rate (CTR) measures how many people click your ads. It is a key metric to check ad performance. A high CTR means your ads attract visitors well. Low CTR means you may need to change ad placement or design. Track CTR regularly to see if your ads improve or decline.
Optimizing For Higher Revenue
Use data from tracking to make changes that increase revenue. Test different ad sizes and positions on your blog. Try using more relevant ads for your audience. Remove ads that have low CTR or earnings. Keep testing and adjusting to find the best setup for your blog.
Avoiding Common Mistakes
Adding ads to your WordPress blog can bring income. Avoid common mistakes to keep your site safe and user-friendly. Simple steps help protect your blog and increase earnings. Focus on smart ad placement and following rules.
Overloading With Ads
Too many ads make your blog look messy. Visitors may leave quickly. Limit ads to a few spots on each page. Balance ads with your content. Keep readers interested in your posts, not just the ads.
Ignoring Site Speed
Ads can slow down your website. Slow sites frustrate visitors and lower your ranking on Google. Choose lightweight ad plugins and tools. Test your site speed often. Fast loading pages keep readers happy and improve SEO.
Violating Ad Network Policies
Each ad network has strict rules. Breaking these can get your account banned. Read policies carefully before placing ads. Avoid prohibited content and bad placements. Follow guidelines to keep your ads running smoothly.
Frequently Asked Questions
How Do I Insert Ads In WordPress Blog Posts?
To insert ads, use WordPress plugins like Ad Inserter or manually add ad code in the post editor. Place ads strategically to avoid disrupting user experience and boost earnings.
What Are The Best Ad Types For WordPress Blogs?
Popular ad types include display banners, native ads, and affiliate links. Choose based on your blog’s niche and audience preferences for higher engagement.
Can I Use Google Adsense On WordPress?
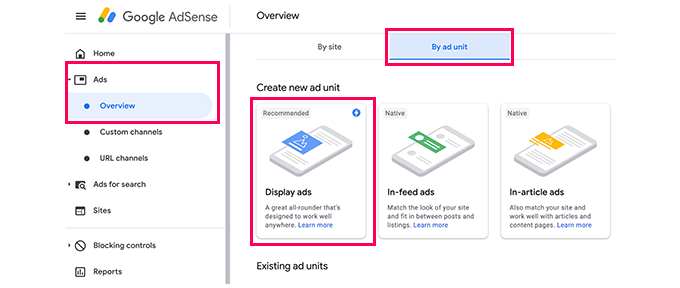
Yes, Google AdSense easily integrates with WordPress. Create an account, generate ad code, and insert it using widgets or plugins for automatic ad placement.
How Do I Optimize Ad Placement For Better Revenue?
Place ads above the fold, within content, and near navigation menus. Test different positions to find spots that improve visibility and click-through rates.
Conclusion
Adding ads to your WordPress blog can bring steady income. Choose the right ad type for your content and audience. Place ads where visitors can see them without feeling annoyed. Keep your site clean and easy to navigate. Test different ad spots to find what works best.
Remember to follow ad network rules to avoid issues. Stay patient; earnings grow over time with effort. Keep improving your blog and ads for better results. Simple steps lead to steady progress. Keep your focus on quality content and user experience.


